Configuring the Internet Explorer Interface
|
|
The Internet Explorer interface gives you several configuration options that can make IE easier to use, or at least customize IE to suit the user’s needs. As an A+ technician, why do you need to know about IE’s interface? The answer is simple: Because you are a part of support in your organization and are often the organization’s problem solver, users may frequently ask for help with IE’s interface. You may also need to configure some options within IE to meet the needs of certain users. In any case, it’s a good idea to spend a few minutes working with IE’s interface options to make sure your skills are adequate.
Customizing the Internet Explorer Toolbar
The Internet Explorer toolbar provides users with easy usability features and access to related programs and functions, such as e-mail and searching capabilities. The toolbars are easily customizable, and you can easily choose what toolbars you want to display by clicking the View menu and choosing the desired options on the Toolbars and Explorer Bar submenus. You can even move the toolbars around so they are placed in different locations within the Internet Explorer interface. In addition, you can separate toolbars on the top and bottom of the screen, or you can even combine them into one long toolbar in order to save more screen space. By selecting the button items that appear, you can also customize the Internet Explorer toolbar. To customize the toolbar, just click View | Toolbars | Customize. On the Customize Toolbar dialog box, shown in Figure 14-15, you can see the toolbar buttons that are available to you as well as the current toolbar buttons. Simply move the items you want displayed to the current toolbar area, and remove items that you do not want displayed.
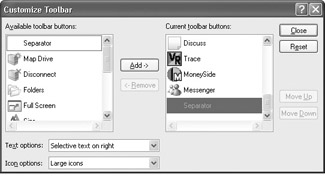
Figure 14-15: Toolbar options
| Secret | If you cannot move your toolbars, click View | Toolbars and clear the check next to Lock the Toolbars. The toolbar handles now appear on the left side of the toolbars and you can drag and drop them. |
History Options
Internet Explorer keeps track of the web sites that you or anyone using your computer accesses. The sites are listed by URL in the History folder and are kept for 20 days by default (you can change the default setting on the General tab of Internet Options). The idea behind the History feature is to enable you to find web sites you have accessed, but cannot seem to find a second time. You can view the history by clicking the History button on the toolbar. By expanding the day and week categories, you can see the sites that have been accessed on those days. Overall, the History feature is simple to use, but there are few important usage points you should keep in mind:
-
Use the View drop-down menu on the History bar to view the history listing in several different organizational formats.
-
You can delete history items individually by right-clicking them and clicking Delete. You can remove the history from an entire day or week by right-clicking the category and clicking Delete. You also delete all history items by clicking the Clear History button on the General tab of Internet Options.
-
Even though you can delete the Today category, it will pop back into place when you use the Internet or access the History folder. In other words, you cannot permanently delete the Today category or the items that it holds. You can, however, delete items individually from the Today list.
-
If you change the Days to Keep History Value setting to 0 on the General tab of Internet Options, the current day’s history is still recorded anyway.
Working with Favorites
The Favorites feature in Internet Explorer provides you with a quick and easy way to keep track of your favorite web sites. Rather than remember individual URLs, you can simply add sites to your Favorites list, give them a user-friendly name, and click the option in Favorites to go to the site.
To add a site to your Favorites list, just click Favorites | Add to Favorites. A small dialog box appears. You can change the name to whatever you want and click OK. To store the favorite in a particular folder available under the Favorites menu, click the Details button and select the folder.
When you choose a favorite, you can also make the favorite available offline. This feature is helpful if you want to read information on a web site without being connected to the Internet. If you want to make the favorite available offline, click the check box option on the Add Favorite window, and if you want to customize the offline feature, click the Customize button. A wizard appears that enables you to customize how the offline web site is handled.
Importing and Exporting
Internet Explorer enables you to import and export certain data. For example, you could export your Favorites list so that your favorites can be used on another computer, or you can even import and export cookies. The good thing about importing and exporting is that you can import and export to a file so that you can share information with Netscape or even print Favorites lists easily. The following steps walk you through the import and export feature.
Importing and Exporting Items
-
To import or export an item, click File | Import and Export.
-
Click Next on the Import/Export Wizard Welcome screen.
-
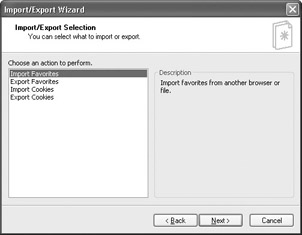
In the Import/Export Selection window, shown here, choose what you want to do. For this example, you will export your Favorites list. Make a selection and click Next.
-
In the source folder, you can choose to export everything or a subfolder. Make a selection and click Next.
-
You can choose to export to another browser on your computer or to a file. For this example, you will export the Favorites list to a file. Make a selection and click Next.
-
Click Finish.
Using Encoding Features
Internet Explorer supports a number of different languages that allow you to view web sites in languages other than English. This process, called encoding, uses HTML information from the web page to determine the language in which the web page is written. This tells Internet Explorer what character set to use to display the web page correctly. If the web page does not tell Internet Explorer the language, Internet Explorer can usually figure the language out anyway, if you have the Auto-Select feature turned on. To make sure Auto-Select is turned on, click View | Encoding | Auto-Select.
If Auto-Select still does not display the language correctly, you can specify the language that is in use. Click View | Encoding | More, and then select the language that you want to use with the web site. In some cases, you may be prompted to download a language pack so that the web site can be displayed correctly.
|
|
EAN: N/A
Pages: 164