Configuring Internet Explorer Settings
|
|
Several important Internet Explorer settings determine the way that IE responds and behaves when it is used. For the most part, these settings are easy and straightforward, but you should be familiar with them since users may complain of different issues related to these settings. The following section explores these settings.
Configuring General Settings
If you access Internet Options, you’ll see a General tab where you can configure several standard IE settings. The General tab, shown in Figure 14-4, contains settings for the home page, temporary Internet files, and history, as well as some other basic settings.
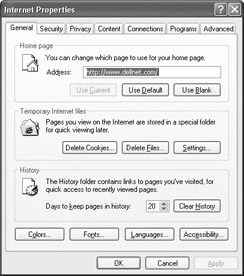
Figure 14-4: General tab
The home page starts Internet Explorer with the URL that is entered in the Address text box. In other words, each time the user opens IE, the browser connects to the specified page. You can put any valid URL in the Address text box. You can also just leave the text box blank if you do not want to use a home page, in which case IE doesn’t open anything until you enter a URL in the Address text box.
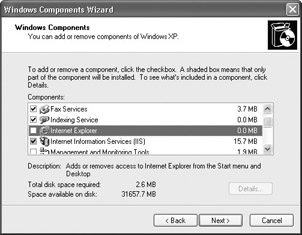
Of course, browsers other than Internet Explorer are available, and you may prefer to use alternatives such as Netscape and Opera with Windows XP. That's fine—you and the users you support are not locked into using IE on Windows XP. You can simply install and use another browser if you like. If you want to remove Internet Explorer icons and shortcuts from the Windows XP taskbar and Start Menu, open Add/Remove Programs in Control Panel, then click the Add/Remove Windows Components button. This opens the Windows Components Wizard. Simply clear the check box next to Internet Explorer to remove the icons and shortcuts, as shown here.
The Temporary Internet Files panel lists web page files and graphics that Internet Explorer caches in an attempt to make web surfing faster. If IE caches files and objects, there is less information to download each time the user connects to that particular page, fostering the illusion that the Internet is working faster than it actually is. You can choose to delete all temporary files and cookies from this location by simply using the Delete buttons. You normally do not have to do this since IE does a good job of managing its own cached content. However, if IE seems to be performing slowly, consider using the Delete option so that IE can rebuild the cache. If you click the Settings button, a Settings dialog box, shown in Figure 14-5, appears that allows you to configure how the cache is managed.
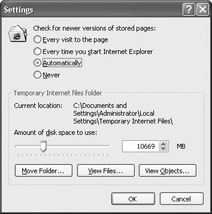
Figure 14-5: Caching Settings dialog box
By default, IE checks for new pages automatically, but you can change this behavior by choosing a different radio button so that IE checks for pages more often, or even never. The Settings dialog box also displays the amount of disk space that is used for temporary Internet files, and provides buttons that enable you to view the files and to move the temporary Internet files folder to a different location.
On the General tab, you can also manage the history. Internet Explorer keeps track of all web pages that the user visits, and this history makes it easy for the user to return quickly to previously viewed pages, which are simply stored as links. By default, the history is maintained for 14 days, but you can adjust this setting on the General tab, and you can manually delete the history as well.
Finally, the General tab gives you several easy-to-use buttons that adjust how web pages are displayed. The Colors, Fonts, Languages, and Accessibility buttons all open simple dialog boxes that allow you to adjust these features on web pages.
Managing Content
The Content tab of Internet Options, shown in Figure 14-6, contains three panels—Content Advisor, Certificates, and Personal Information—that can help you manage content. The following sections explore these features.
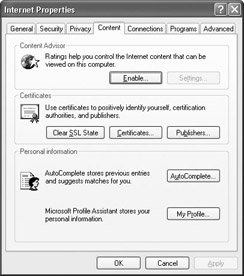
Figure 14-6: Content tab
Using Content Advisor
Content Advisor is used to control different kinds of questionable or objectionable content in Internet Explorer. Typically, the Content Advisor is thought of as a “home” feature that is used to protect children, but in fact, many professional environments use this feature to help block inappropriate content in the workplace.
Content Advisor works through voluntary site ratings. Web site administrators complete a form provided by the Internet Content Rating Association (ICRA). This association evaluates the web site administrator’s responses to the questionnaire, then determines a content rating for the site. IE then examines the content rating of the site, which is found in the site’s HTTP header information, then determines whether or not to block the site. ICRA is not a censor, but simply provides a method for rating web sites based on the site’s feedback about itself. In other words, the effectiveness of the Content Advisor feature depends on the truthful data given by the web site. So, while Content Advisor can help control objectionable material, it is not foolproof. If you are working with children, you may consider using additional third-party products to help control content. Examples of such products are Net Nanny, found at www.netnanny.com, or CyberSitter, found at www.cybersitter.com.
ICRA ratings are based on language, nudity, sexual content, and violence. Using IE, you simply enable Content Advisor to adjust the level of content you want to make available (or unavailable). The following steps show you how to configure the feature.
Configuring Content Settings
-
Choose Tools | Internet Options, then select the Content tab. Click the Enable button.
-
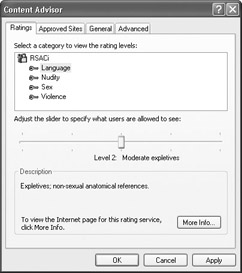
The Content Advisor dialog box appears with four configuration tabs. On the Ratings tab, shown here, you see a listing of rating categories. Select a desired category, and then move the slider bar to the desired level of content you want users to be able to see. Note that each category defaults at Level 0, which is the least offensive setting. Adjust the categories as desired, then click the Approved Sites tab.
-
On the Approved Sites tab, you can override the settings that you configured on the Ratings tab by entering a desired web site address and clicking the Always or Never button. The Never setting will always prompt the user for an administrator password in order to see the site, and the Always setting will allow anyone to see the site without an administrator password.
-
Click the General tab. This tab presents a few different configuration options, as shown here.
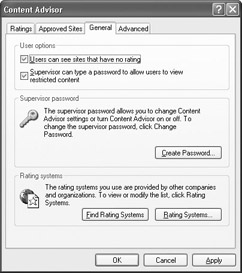
First, you see two important check boxes that allow users to see unrated sites and to override a supervisor’s settings. You should not use the Users Can See Sites That Have No Rating option if you are trying to secure the computer from harmful content. Some sites with inappropriate content do not have a rating, so to secure computers from unrated sites, Content Advisor will display a prompt. The administrator must override this prompt. This may cause some surfing difficulty, but it is the safest setting. You should always keep the supervisor setting selected so that you can override any Content Advisor prompts. If you need to change your supervisor password or find rating systems used by other companies, you can use the additional options found on the General tab. Keep in mind that the administrator password that you assign is used to control and even turn off Content Advisor, so make sure that you remember the password.
Secret If you should forget your password, you can override it with a Registry edit. Navigate to KHLM\Software\Microsoft\
Windows\CurrentVersion\Policies\Ratings and delete the key value that you see. If you are worried about other people deleting the key value to gain access to content management settings, you can use Group Policy to prohibit access to the Registry or you can even use Registry permissions (available from the Edit menu) to control access to the key value. -
Click the Advanced tab. This tab includes the option to locate and use a ratings bureau and use PICSRules. A ratings bureau is an Internet site that can check a rating of a site if the site is not rated by ICRA. This option, however, can seriously slow down browsing time. You can also import PICSRules, which are labels that can also help you determine whether sites can be viewed or not. No default rules are configured, but you can import them.
| Note | If you decide that you no longer want to use Content Advisor after you have configured it, you can always return to the Content tab and click the Disable button. You’ll need to provide your administrator password to turn off the feature. |
Using Certificates
Internet Explorer allows the use of digital certificates for identification purposes. For example, suppose that your network contains a secure Internet site. Users on the network must be able to access the secure site, which requires a digital certificate. The certificate is an authentication tool that allows the user to prove his or her identity before granting access to the site. In cases where certificates are used, a user can obtain a digital certificate from a certificate authority, such as VeriSign. The certificate then can be imported into Internet Explorer using the Certificates option on this tab. Then, when the user attempts to access the secure site, Internet Explorer can provide the user’s certificate to the web site.
Using AutoComplete
AutoComplete is a simple feature that allows Internet Explorer to remember information that you have entered when using the Internet, such as URLs, names, passwords, e-mail addresses, and other information that you might have typed into web forms. IE remembers this information, then tries to identify and complete it automatically for you when you are entering the same information later. The idea is to reduce the amount of time required to type URLs and data on web forms.
On the Content tab, you can click the AutoComplete button. The AutoComplete Settings dialog box, shown in Figure 14-7, then appears. In this dialog box, enable or clear the check boxes to determine the kinds of information that you want Internet Explorer to remember and to adjust how AutoComplete works.
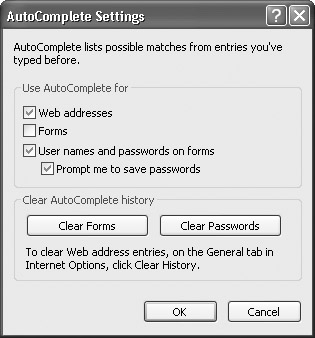
Figure 14-7: AutoComplete Settings dialog box
| Note | Although AutoComplete can remember passwords that you enter on web sites, the passwords will also be available to anyone else who uses the computer. If this is a possible security issue for you, just click the User Names and Passwords on Forms check box. |
Setting Default Programs
Internet Explorer’s Internet Options gives you the Programs tab, shown in Figure 14-8, so that you can set default programs that Internet Explorer should use. For example, although Outlook Express is Internet Explorer’s default e-mail program and newsgroup reader, you may be using Eudora or some other e-mail program. In this case, you can use the Programs tab to select the alternative program that you want to use. Just use the drop-down menus to change the default programs to the programs that you want.
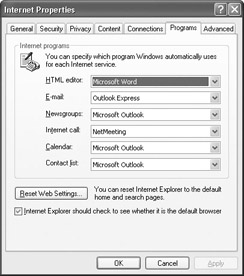
Figure 14-8: Programs tab
Two other important settings here are the Reset Web Settings option and the Internet Explorer Should Check to See Whether It Is the Default Browser check box. Neither of these settings has anything to do with programs per se. The Reset Web Settings button simply resets the default home page and search pages. If users have changed these settings, use this button to restore the defaults easily. Also, if other browsers are in use, you can stop IE from giving you that aggravating “Is IE the default browser?” message that will appear each time you open Internet Explorer. Just clear the Internet Explorer Should Check to See Whether It Is The Default Browser check box to stop this action.
Working with Advanced Settings
Internet Explorer gives you a number of different advanced settings, organized by category, which you can access on the Advanced tab of Internet Options, shown in Figure 14-9.
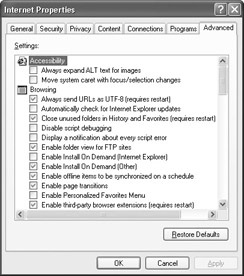
Figure 14-9: Advanced tab
The default settings here are typically all you need, but the options can solve particular problems or give IE some additional functionality if needed. You can browse these to get familiar with them. The following bullet list points out a few of the interesting ones that you might consider taking a look at.
-
Under Browsing, the Automatically Check for Internet Explorer Updates check box is not selected by default. If you have a broadband or network connection to the Internet, consider enabling this setting so that Internet Explorer can periodically check Microsoft.com for updates.
-
Under Browsing, consider disabling the Enable Page Transitions check box if you are using a slow Internet connection. Some web sites have page transitions configured so that one page fades into another. While visually attractive, these transitions waste your bandwidth and time, so disable this feature if your connection is slow.
-
Under Browsing, consider enabling the Enable Personalized Favorites Menu check box. If you use Favorites a lot, the list can become long and cluttered. The Personalized Favorites menu hides the favorites you haven’t used in a while so that the list is easier to see and use.
-
Under Browsing, if you want Internet Explorer to help you automatically complete web addresses that you have used before, click the AutoComplete check box option.
-
Under Multimedia, consider clearing the Play Animations in Web Pages, Play Sounds in Web Pages, and Play Videos in Web Pages check boxes if you have a slow Internet connection. This will help speed up your browsing experience so you will not have to wait so long when downloading multimedia content.
-
Under Security, consider using the Empty Temporary Internet Files Folder When Browser Is Closed check box option if you want to keep Internet Explorer clean and cookies deleted.
|
|
EAN: N/A
Pages: 164