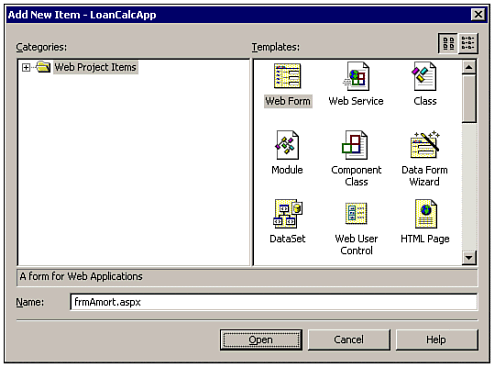
| The sample loan payment calculator application displays the monthly payment in a text box control. However, it would be even more useful if it displayed the portion of interest and principal that make up each month's payment. This type of loan analysis is known as an amortization schedule. In this section, we will add an amortization schedule to the Loan Calculator program. By doing so, you will learn how to add Web forms to a project as well as display information in a tabular format. Adding a Second Web Form As you may recall from Chapter 2, a new Windows Application project includes a single windows form, called Form1.vb. Similarly, a new Web Application includes a single Web form named WebForm1.aspx. To add a new Web form, right-click on the project name (LoanCalcApp) in the Solution Explorer. Choose Add WebForm from the pop-up menu and you will see the dialog box shown in Figure 3.9. Figure 3.9. You can add new forms to a project from the Project menu, the Solution Explorer, or by pressing Ctrl+Shift+A for the New Project Item dialog box.  Change the name of the new Web form item in the Name box to frmAmort.aspx and press OK. The new Web form will be added to the Solution Explorer window. Note Attentive readers may be wondering why we left the name of the original as the default, WebForm1.aspx. You cannot change the name of a form when it is open, and Visual Studio .NET starts new projects with the form designer already open. The authors felt opening and closing forms would confuse beginners and detract from the more important concepts. However, when you have mastered the basics of working with forms, you should definitely start using descriptive form names for all your forms.
Navigating to a New Web Form Now our sample Web application contains two forms. We need to provide a way for the user to switch from the first form to the second. To accomplish this, we will modify the original form we created in the last section (WebForm1.aspx). We will add a button to this form that causes the browser to display the new Web form (frmAmort.aspx). However, we do not want this button to be available until after the user has already determined the monthly payment, because the amounts from the first form are necessary for the amortization calculations. To add the button, follow these steps: -
Right-click WebForm1.aspx and choose View Designer. -
Display the Toolbox. Single-click the Button control. -
Draw a Button control on the Web form and place it below the Calculate Payment link. -
Press the F4 key to display the properties of the Button control. -
Change the ID property of the button to cmdShowDetail. -
Set the Visible property to False. -
Change the Text property to Amortization Schedule.
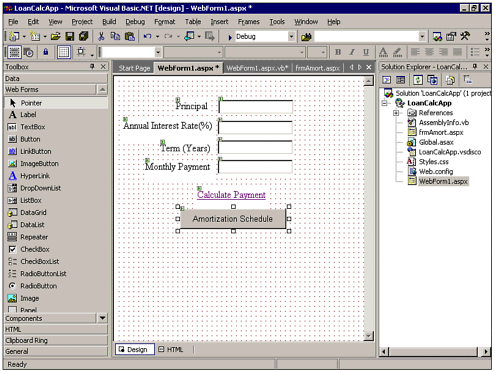
When you have finished drawing the button, your Web form should look similar to Figure 3.10. Figure 3.10. The Button and LinkButton controls appear differently but serve essentially the same purpose.  Now let's add some code. Right-click WebForm1.aspx and choose View Code. Find the code for the cmdCalculate_Click procedure you entered earlier. Add the following additional line of code just before the End Sub statement: cmdShowDetail.Visible = True The previous line of code simply makes the button visible to the user. The reason we added it to the end of the cmdCalculate_Click procedure is to make sure the user does not click the Button control until he has already clicked the LinkButton control to populate the data in the Payment text box. Now, using the class and method drop-down boxes in the code editor, find the Click procedure for the cmdShowDetail button. Add the code in Listing 3.2. Listing 3.2 cmdShowDetail.zip Displaying the Detail Form Public Sub cmdShowDetail_Click(ByVal sender As Object,_ ByVal e As System.EventArgs) Handles cmdShowDetail.Click 'Store text box values in session variables Session.Add("Principal", txtPrincipal.Text) Session.Add("IntRate", txtIntRate.Text) Session.Add("Term", txtTerm.Text) Session.Add("Payment", txtPayment.Text) 'Display the amortization form Response.Redirect("frmAmort.aspx") End Sub The code in Listing 3.2 stores the values of the text boxes as session variables. (Session variables are a way to store information on the server that needs to be shared between Web pages.) The final line of code uses the Response.Redirect method to display frmAmort.aspx.  For more information on session variables, p.443 For more information on session variables, p.443
Designing the Amortization Form The amortization Web form contains a lot more data than the loan payment form. To display this data in a neatly organized manner, we will use the Table control. The Table control appears in the browser as a familiar HTML table. To add a Table control to the amortization form, do the following: -
Right-click frmAmort.aspx in the Solution Explorer and choose View Designer. -
Display the Toolbox and single-click the Table control. -
Drag the Table control from the Toolbox window to the Web form. -
Press F4 to display the Properties window. -
Change the ID property of the table to tblAmortize. -
Change the GridLines property of the table to Both.
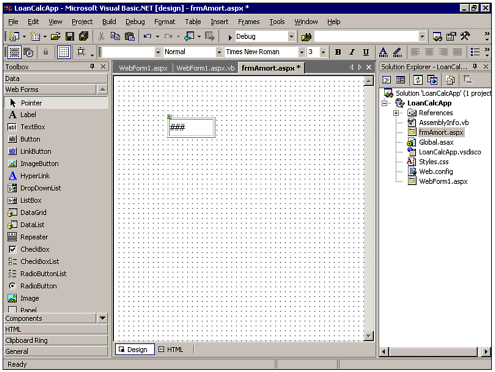
After adding a Table control, your screen should look similar to Figure 3.11. Figure 3.11. An empty Table control appears as a placeholder in design mode.  Like the other controls on a form, the table is an object with properties and methods. The table has a collection of row objects, and each row object contains a collection of cell objects. The cells in a table can contain text or even other controls. Although you can set up rows and cells at design time, in the sample application we will do everything dynamically using Visual Basic code.  For more information on the Table control, p.501 For more information on the Table control, p.501
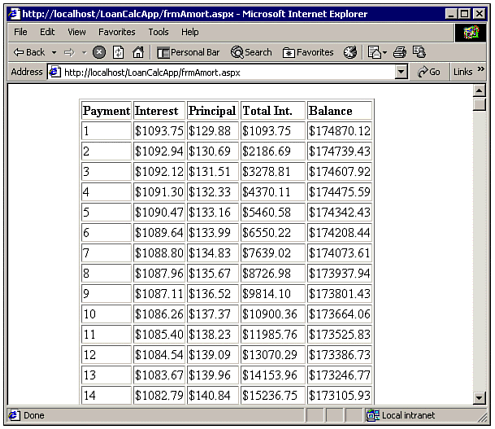
Right-click frmAmort.aspx in the Solution Explorer and choose View Code. Find the Page_Load method of the frmAmort object in the code editor and enter the code from Listing 3.3. Listing 3.3 frmDetailLoad.zip Private Sub Page_Load(ByVal sender As System.Object,_ ByVal e As System.EventArgs) Handles MyBase.Load Dim intTerm As Integer 'Term, in years Dim decPrincipal As Decimal 'Principal amount $ Dim decIntRate As Decimal 'Interest rate % Dim dblPaymnent As Double 'Monthly payment $ Dim decMonthInterest As Decimal 'Interest part of monthly payment Dim decTotalInterest As Decimal = 0 'Total interest paid Dim decMonthPrincipal As Decimal 'Principal part of monthly payment Dim decTotalPrincipal As Decimal = 0 'Remaining principal Dim intMonth As Integer 'Current month Dim intNumPayments As Integer 'Number of monthly payments Dim i As Integer 'Temporary loop counter Dim rowTemp As TableRow 'Temporary row object Dim celTemp As TableCell 'Temporary cell object If Not IsPostBack Then ' Evals true first time browser hits the page 'SET UP THE TABLE HEADER ROW rowTemp = New TableRow() For i = 0 To 4 celTemp = New TableCell() rowTemp.Cells.Add(celTemp) celTemp = Nothing Next rowTemp.Cells(0).Text = "Payment" rowTemp.Cells(1).Text = "Interest" rowTemp.Cells(2).Text = "Principal" rowTemp.Cells(3).Text = "Total Int." rowTemp.Cells(4).Text = "Balance" rowTemp.Font.Bold = True tblAmortize.Rows.Add(rowTemp) 'PULL VALUES FROM SESSION VARIABLES intTerm = Convert.ToInt32(Session("Term")) decPrincipal = Convert.ToDecimal(Session("Principal")) decIntRate = Convert.ToDecimal(Session("IntRate")) dblPaymnent = Convert.ToDouble(Session("Payment")) 'CALCULATE AMORTIZATION SCHEDULE intNumPayments = intTerm * 12 decTotalPrincipal = decPrincipal For intMonth = 1 To intNumPayments 'Determine Values for the Current Row decMonthInterest = (decIntRate / 100) / 12 * decTotalPrincipal decTotalInterest = decTotalInterest + decMonthInterest decMonthPrincipal = Convert.ToDecimal(dblPaymnent)_ - decMonthInterest If decMonthPrincipal > decPrincipal Then decMonthPrincipal = decPrincipal End If decTotalPrincipal = decTotalPrincipal - decMonthPrincipal 'Add the values to the table rowTemp = New TableRow() For i = 0 To 4 celTemp = New TableCell() rowTemp.Cells.Add(celTemp) celTemp = Nothing Next i rowTemp.Cells(0).Text = intMonth.ToString rowTemp.Cells(1).Text = Format(decMonthInterest, "$###0.00") rowTemp.Cells(2).Text = Format(decMonthPrincipal, "$###0.00") rowTemp.Cells(3).Text = Format(decTotalInterest, "$###0.00") rowTemp.Cells(4).Text = Format(decTotalPrincipal, "$###0.00") tblAmortize.Rows.Add(rowTemp) rowTemp = Nothing Next intMonth End If End Sub The code in Listing 3.3 may seem like a lot to take in at first, but it is actually very simple. First, we create the header row of the table by creating individual TableCell objects and appending them to a TableRow object. The temporary variables rowTemp and celTemp are used to set up the table. Next, several variables are assigned values from session variables, which were provided by the previous Web form. Finally, we enter a loop that uses variable values and mathematics to calculate each month's payments. After determining the values, a new row is added to the table. One interesting thing to note about this code is that it all takes place in the frmDetail_Load procedure, which is executed when the Web page is loaded. The If statement checks the NotPostBack property so that the code is only executed the first time this page is requested. Testing the Program To test your program, click the Start button on the toolbar or press the F5 key. Internet Explorer will start and you will see the loan payment form, as shown in Figure 3.10. Enter the following values: Principal: 175000 Term: 30 Interest Rate: 7.5 Click the Calculate Payment link. The Payment text box should be populated with the value 1223.63 and the Amortization Schedule button should appear. Click the button and you should see the Amortization schedule pictured in Figure 3.12. Figure 3.12. A Table control provides an easy way to format data in a grid-like fashion.  If you understand how the Loan Calculator application works, then you have learned some important fundamental concepts of Web applications. However, in these few pages we have only scratched the surface of a vast new area in Visual Basic .NET. Check out the topics of interest in this area: Working with styles, client-side script, and HTML is covered in Chapter 18, "Web Applications and Services." More in-depth coverage of the controls you use with Web forms is discussed in Chapter 19, "Web Controls." Debugging your Visual Basic code is discussed in Chapter 26, "Debugging and Performance Tuning." More on Active Server Pages can be found in Chapter 17, "Using Active Server Pages.NET."
|