| Now that you have learned the basics of ASP.NET, it is time to test your knowledge by building a sample ASP.NET application. In this section, we'll create an ASP.NET application that allows users to upload and view pictures. One use of this type of application would be to collect and share digital camera photos. For this sample application, we will create four .aspx files: category.aspx Allows users to pick a category of pictures to view, or create a new category. pictures.aspx Displays all the pictures in a given category. thumbnail.aspx Creates a smaller version of an image for faster downloading. upload.aspx Allows users to upload a new picture.
In creating this application, we will use many of the ASP.NET concepts discussed earlier in the chapter, as well as some graphics and file manipulation techniques discussed in other chapters. Creating the Application Folder Our sample Web site will be located in its own virtual directory, Photos. To set up the application, do the following: -
Create the directory C:\inetpub\wwwroot\Photos using Windows Explorer. -
Open the IIS management console and find the Default Web site. Although we have not yet created the virtual directory, you will see the Photos folder located under the Default Web site. -
Right-click the Photos folder and choose Properties. -
Click the Create button to create a new application. -
Make sure Write permission is selected, because users will need write access to upload photos. The properties window for the Photos directory should look similar to Figure 17.6. Figure 17.6. The Properties window allows you to control security and other configuration details for an ASP.NET application. 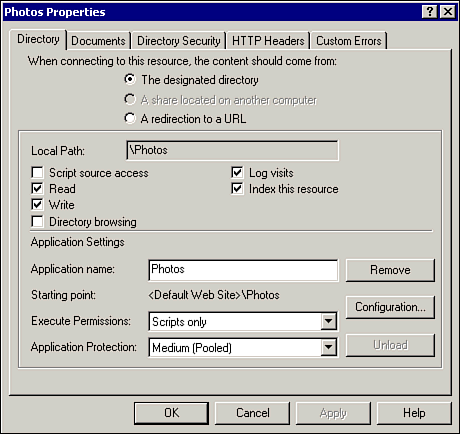
After you have completed making the appropriate settings, click OK to close the Properties window. Managing Photo Categories To allow for better organization of image files, we will allow the user to specify a category for each picture. The categories will be implemented as a separate subdirectory beneath the Photos application directory. We'll allow the user to name the categories and use VB code to create a subdirectory with the same name. Because these new subdirectories will be located beneath the Photos folder, IIS will consider them part of the same application. The code for the category.aspx page is shown in Listing 17.4. Listing 17.4 PHOTOS.ZIP Creating Subdirectories with ASP.NET <% @Import Namespace = "System.IO" %> <SCRIPT LANGUAGE="VB" RUNAT="Server"> Private Sub DisplayCategorylist() Dim strAppRoot As String Dim strCatList() As String Dim strCatLink AS String Dim strShortName AS String Dim intPos AS Integer Dim i As Integer 'Get an array of subdirectory names strAppRoot = Server.MapPath("/Photos") strCatList = Directory.GetDirectories(strAppRoot) For i = LBound(strCatList) to UBound(strCatList) 'Extract the directory name from the full path intPos = strCatList(i).toUpper.IndexOf("PHOTOS") + 7 strShortName = strCatList(i).SubString(intPos) 'Build a hyperlink and send it to the browser strCatLink = "<A HREF=""pictures.aspx?category=" strCatLink &= strShortName & """>" & strShortName strCatLink &= "</A><BR>" Response.Write(strCatLink) Next End Sub Private Sub CreateNewCategory(strName As String) Dim strAppRoot As String Dim strNewFolder As String strAppRoot = Server.MapPath("/Photos") strNewFolder = strAppRoot & "\" & strName Call Directory.CreateDirectory(strNewFolder) End Sub Private Sub Page_Load(ByVal sender As System.Object, _ ByVal e As System.EventArgs) Handles MyBase.Load If Not (Request.Form("txtNewCatName") Is Nothing) Then Call CreateNewCategory(Request.Form("txtNewCatName").ToString) End If End Sub </SCRIPT> <HTML> <BODY> <H1>Web Photo Archive</H1> <HR> Click a category name below to view photos:<BR> <% Call DisplayCategoryList %> <HR> <BR> Enter a new category name to create: <FORM ACTION="category.aspx" METHOD="POST" NAME="frmTest"> <INPUT TYPE="TEXT" NAME="txtNewCatName"> <INPUT TYPE="SUBMIT" VALUE="Create"> </FORM> </BODY> </HTML> Listing 17.4 contains two custom functions: DisplayCategoryList and CreateNewCategory. DisplayCategoryList outputs a HTML hyperlink for each photo category. For example, if there were a category called Vacation, the For loop in Listing 17.4 would generate the following line of HTML for this category: <A HREF="pictures.aspx?category=Vacation">Vacation</A> The CreateNewCategory subroutine creates a new folder on the hard drive. It is called from the Page_Load event only if the user has passed a category name from the HTML input form. Because our code involves creating and listing directories on the file system, we make use of the Directory class, discussed in Chapter 22, "Using ADO.NET (ADO)."  For more details on the Directory class, p.681 For more details on the Directory class, p.681
To create the category page for the sample application, copy the code from Listing 17.4 into the category.aspx page on your own server, in the C:\Inetpub\wwwroot\Photos directory. Creating the Picture Viewer Page Now that we have given users a means to create and select photo categories, we need a Web page that lets them browse the pictures in a given category. To allow for viewing of multiple pictures at once, we will present a page of small uniform preview images, also known as thumbnails. Each thumbnail will also be a link to the underlying full-size picture. In the world of HTML, the <IMG> tag is used to display an image in an HTML page, as in the following example: <IMG src="/books/3/115/1/html/2//stuff/picture2.gif"> When the preceding HTML is delivered to the client browser, the browser asks the Web server to send it the picture file specified in the SRC attribute. Although there are HEIGHT and WIDTH attributes to control display size, the browser will still download the whole image. As you may be aware, photos from a digital camera can vary widely in dimension and size. If you try to put several megabytes of images on a single Web page, it will load very slowly! Fortunately, the .NET framework provides a built-in thumbnail generator in the Image class. As you may recall from Chapter 14, "Designing an Effective User Interface," the Image class can be used for a variety of graphics-related tasks. For more details on the Image class, p.357 To create our page of thumbnail images, we will use ASP.NET to scan a folder of images and dynamically generate an <IMG> tag for each image. Listing 17.5 shows the page that generates the table of images. Listing 17.6 shows thumbnail.aspx, a page that accepts a filename and returns a 100 x 100 thumbnail. Listing 17.5 PHOTOS.ZIP The Picture Preview Page <% @Import Namespace = "System.IO" %> <HTML> <BODY> <% Dim strAppRoot As String Dim strFileList() As String Dim strCategory AS String Dim strPhotoPath As String Dim strShortName As String Dim strCurrentPic As String Dim intPos AS Integer Dim i As Integer 'Get path to physical directory strCategory = "/Photos/" & Request.Params("Category") strPhotoPath = Server.MapPath(strCategory) 'Get List of files strFileList = Directory.GetFiles(strPhotoPath) 'Create photo thumbnail page, 5 pictures per table row Response.Write("<H1>" & Request.Params("Category") & "</H1>") Response.Write("<HR><TABLE>") Response.Write("<TR>") intPos = strPhotoPath.Length + 1 For i = LBound(strFileList) to UBound(strFileList) strShortName = strFileList(i).SubString(intPos) strCurrentPic = strCategory & "/" & strShortName Response.Write("<TD><A HREF=""" & strCurrentPic & """>") Response.Write("<IMG src="/books/3/115/1/html/2/"thumbnail.aspx?FileName=" & _ strCurrentPic & """") Response.Write("</A><TD>") If (i+1) mod 5 = 0 Then Response.Write("</TR><TR>") End If Next %> </TR> </TABLE> <BR> <A HREF="category.aspx">Back to category list</A><BR> <% Response.Write("<A HREF=""upload.aspx?category=") Response.Write(Request.Params("Category") & """>Upload new image</A>") %> </BODY> </HTML> As the table is generated, the browser is told to retrieve each image from thumbnail.aspx, shown in Listing 17.6. Note that Listing 17.6 does not actually generate a thumbnail file on the disk. Instead, it saves the thumbnail to a MemoryStream object and then delivers the bytes in the stream to the client using the Response.BinaryWrite method. Listing 17.6 PHOTOS.ZIP The Thumbnail Generator <% @Import Namespace = "System.IO" %> <% @Import Namespace = "System.Drawing" %> <% 'This ASPX page generates a thumbnail of an image 'It can be used in an <IMG> tag Dim strWebPath As string Dim strFileName As String Dim intLastSlash As string Dim BytesRead As Integer Dim ByteValues() As Byte Dim intFileLength As Integer Dim imgFullSize As System.Drawing.Image Dim imgThumbnail As System.Drawing.Image Dim stmThumbnail As MemoryStream 'Figure out the physical file name strWebPath = Request.Params("FileName") intLastSlash = strWebPath.LastIndexof("/") strFileName = Server.MapPath(strWebPath.SubString(0,intLastSlash)) strFileName &= "\" & strWebPath.SubString(intLastSlash + 1) 'Load the image into memory imgFullSize = System.Drawing.Image.FromFile(strFileName) 'Get a Thumbnail image imgThumbnail = imgFullSize.GetThumbnailImage(100, 100, Nothing, Nothing) 'Save the image as a Memory Stream stmThumbnail = New MemoryStream() imgThumbnail.Save(stmThumbnail, Imaging.ImageFormat.Jpeg) 'Send the image back to the client browser intFileLength = stmThumbnail.Length ReDim ByteValues(intFileLength) stmThumbnail.position=0 BytesRead = stmThumbnail.Read(ByteValues, 0, intFileLength) If BytesRead > 0 Then Response.BinaryWrite(ByteValues) End If stmThumbnail.Close() %> To continue with the sample exercise, copy the code from the previous listings into the pictures.aspx and thumbnail.aspx files in your C:\Inetpub\wwwroot\Photos directory. Creating the Upload Page As a final step in our sample application, we will create the ASP.NET page necessary for the user to upload new photographs. To upload files from a Web browser, you have to add a special type of form field to your HTML file, and then write some VB code to save the submitted file to disk. ASP.NET's new programming model makes this easier by providing the HTMLInputFile control, an abstraction of the HTML upload process. When a file is posted to an ASP.NET page, you simply use the SaveAs method of this control to write it to disk, as shown in Listing 17.7. Listing 17.7 PHOTOS.ZIP Uploading a File with ASP.NET <HTML> <SCRIPT LANGUAGE="VB" RUNAT="SERVER"> Sub btnUpload_Click(sender As Object, e As EventArgs) Dim strCatFolder As String Dim strUserFileName As String Dim strFileName As String Dim intLastBackslash As Integer 'Get the file name without the user's local path strUserFileName = filePicture.PostedFile.FileName intLastBackslash = strUserFileName.LastIndexOf("\") strFileName = strUserFileName.SubString(intLastBackslash + 1) 'Get the physical path to the category folder strCatFolder = Server.MapPath("/Photos") & "\" & txtCategory.Value 'Save the file filePicture.PostedFile.SaveAs(strCatFolder & "\" & strFileName) 'Display the pictures page again Server.Transfer("pictures.aspx?category=" & txtCategory.Value) End Sub Private Sub Page_Load(ByVal sender As System.Object, _ ByVal e As System.EventArgs) Handles MyBase.Load 'Loads the category name into the hidden text field txtCategory.Value=Request.Params("Category") End Sub </SCRIPT> <BODY> <H1>Upload a new Image</H1> <HR> <FORM ENCTYPE="multipart/form-data" RUNAT="SERVER" ACTION="UPLOAD.ASPX"> Select image File: <INPUT TYPE="FILE" RUNAT="SERVER"> <INPUT TYPE="HIDDEN" RUNAT="SERVER"> <INPUT TYPE="BUTTON" RUNAT="SERVER" VALUE="Upload" OnServerClick="btnUpload_Click"> </FORM> </BODY> </HTML> The code inListing 17.7 uses server-side Web controls, which will be discussed in more detail in subsequent chapters. When the user uploads a picture, it is written to the disk in the appropriate category folder. Testing the Sample Application After you have created all the files for the sample application, test it by performing the following steps: -
Open Internet Explorer and display the category page, http://servername/photos/ category.aspx, where servername is the name of your Web server. -
Enter a category name in the box and click the Create button. The page will then show your new category, as shown in Figure 17.7. Figure 17.7. You can verify the correct function of the category.aspx page by checking to see whether a corresponding directory is created on your hard drive. 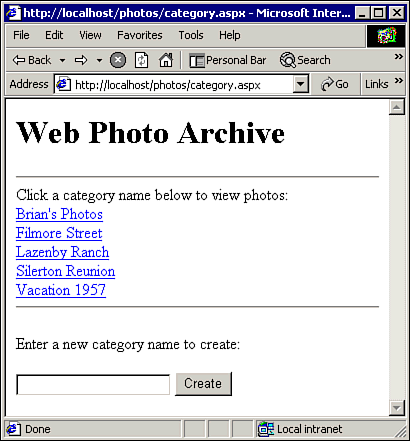 -
Click the category name to display the pictures in that category. The thumbnails of the pictures in that folder will be displayed, as pictured in Figure 17.8. Figure 17.8. To test the thumbnail page, copy or upload some image files into the category folder. The VB should automatically generate a thumbnail for each image. 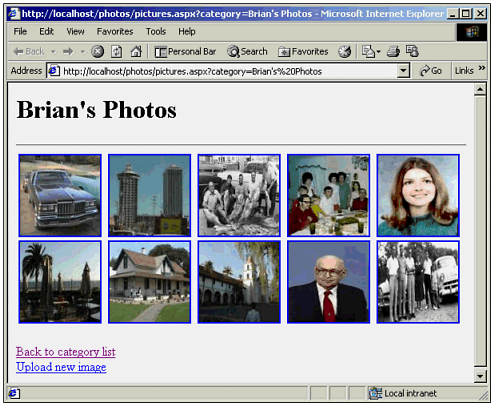 -
At the bottom of the picture page, click the link to upload a new picture. -
Click the Browse button and select an image file on your hard drive. -
Click theUpload button. The picture page should be displayed and contain the new thumbnail image.
| 