Addressing Dial-In Access Design Considerations
|
EXAM 70-293 OBJECTIVE 3
When you plan a system for dial-in access, you need to consider a number of factors. These include the following:
-
How IP addresses will be assigned to clients
-
The number and type of incoming ports to configure
-
The security or administration model you will follow
Allocating IP Addresses
When clients connect to RRAS, whether through a dial-in or VPN connection, the RRAS server assigns each client an IP address. You can configure the RRAS server to allocate IP addresses from a static address pool, or by using DHCP or Automatic Private IP Addressing (APIPA).
Static Address Pools
You can configure the RRAS server to assign IP addresses from a static pool of addresses specified in the RRAS server’s configuration. This requires a range of addresses that are dedicated for this purpose. Although this is often the simplest approach, keep these considerations in mind:
-
Make sure the static address pool does not overlap the range of addresses assigned by a DHCP server. Two machines with the same address will cause a conflict and a loss of connection for both.
-
If you are using multiple RRAS servers with separate modem pools, you will need to define a static address pool for each one and make sure there are no conflicts between the ranges you assign.
-
Be sure the address pool includes at least as many addresses as there are modems for incoming connections.
You can also assign a static address for a single user, group, or a particular type of connection using a remote access policy. This process is described later in this chapter.
Using DHCP for Addressing
Rather than using a static address pool, you can configure the RRAS server to request IP addresses from a DHCP (Dynamic Host Configuration Protocol) server. If you are using DHCP to assign addresses in the network already, this technique allows you to assign remote client addresses from the same address pool and eliminate the possibility of address conflicts. It also makes it easy to manage addressing with multiple RRAS servers, because you can configure them to use the same DHCP server.
| Note | When a remote client is configured to obtain an IP address automatically, it does not act as a DHCP client. Instead, the remote access server is responsible for assigning an address to each client during the PPP connection process. The server can request these addresses from a DHCP server or use its own pool of addresses. |
Using APIPA
Finally, you can configure the RRAS server to assign addresses using Automatic Private IP Addressing (APIPA). This system uses private addresses in the range of 169.254.0.1 through 169.254.255.254, a range reserved for use by Windows networks, and is usually used when a DHCP server is unavailable. APIPA provides some of the advantages of DHCP without a dedicated server, but is usually only suitable for small networks.
If you enable the DHCP option on the RRAS server but a DHCP server is unavailable on the network, it will automatically use APIPA to issue addresses to remote clients. Clients must be configured to obtain an IP address when they connect, rather than with a specific IP address, to use this feature.
Determining Incoming Port Needs
When you are designing a dial-in remote access solution, one of the most important considerations is the number of incoming ports (modems) you will need. The following are some of the factors you should take into account:
-
An estimate of the number of users who will need to concurrently access the network remotely. Keep in mind that a single user who requires access for several hours a day will require an additional modem for reliable access, but several users who use the network for only a few minutes at a time could be easily served by a single modem.
-
The bandwidth available on the RAS server’s connection to the LAN. If the bandwidth of all the modems combined approaches this limit, dial-in users will experience slow connections.
-
The number of IP addresses available. If an address pool or DHCP server is out of addresses, additional modems will not allow additional users.
Multilink and BAP
Another factor that can affect the number of incoming ports you will need is whether you will be supporting multilink connections. This is a Windows Server 2003 feature that enables two or more ports on the RRAS server to be connected to a single client and combined into a higher-bandwidth connection.
For example, if a client connects with two 56K modems and multilink enabled, their bandwidth with a perfect connection would be 112K. In practice, if you’ve spent time trying to get a single modem to work at 56K, you can imagine how unlikely this best-case scenario is, and few client computers have two modems installed. Nonetheless, multilink is sometimes the cheapest way to get a high-bandwidth connection. Multilink is also often used to combine two 64K ISDN channels into a single 128K connection.
| Test Day Tip | A basic rate ISDN connection consists of two 64 Kbps data (B) channels and a single 16 Kbps control (D) channel. The two B channels can be combined using hardware bonding, but this requires that all hardware support this feature. Multilink is a reliable and consistent way to aggregate the channels regardless of the equipment. |
Windows Server 2003 also supports BAP (bandwidth Allocation protocol). This is a system that automatically disconnects one or more ports from a multilink connection if it is using only a small percentage of its capacity. This enables you to make the best use of multiple ports without relying on users to reconfigure their connections.
You can configure multilink and BAP settings as part of a dial-in profile. Remote Access Policies and profiles are described in detail later in this chapter. The Multilink settings tab for a dial-in profile enables you to enable or disable multilink and BAP and change their settings, as shown in Figure 7.1.
Selecting an Administrative Model
There are two basic ways for you to control remote access to your network. You can configure individual user accounts to allow or disallow remote access, or configure one or more remote access Policies to control access based on users, groups, times of day, and many other criteria.
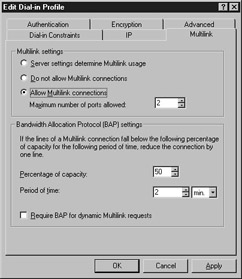
Figure 7.1: Multilink Options
Access by User
You can allow or disallow remote access from the Dial-in tab of a user’s Properties dialog box in the Active Directory Users and Computers console. Exercise 7.01 demonstrates how to enable remote access for a user account.
Exercise 7.01: Enabling Remote Access by User
Follow these steps to enable remote access for a user account:
-
From the Start menu, select Programs | Administrative Tools | Active Directory Users and Computers.
-
Click the + symbol next to the domain name node in the left column to display its contents.
-
Click Users in the left-hand column. A list of the domain’s users and groups is displayed in the right-hand column, as shown in Figure 7.2.
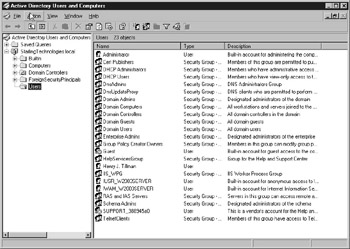
Figure 7.2: Listing the Domain’s Users and Groups -
Click a user name to highlight it; then select Action | Properties from the menu or right click the user name and select Properties from the context menu.
-
The user’s Properties dialog box is displayed. Click the Dial-in tab.
-
The Dial-in properties are displayed. Select the Allow Access option in the Remote Access Permission section at the top of the dialog box.
-
Click OK to exit the Properties dialog box and save your changes.
Access by Policy
You can also configure one or more Remote Access Policies for precise control of which users can reach the network through remote access. Whether a user is affected by policies depends on the setting you choose in the Dial-in tab of the user’s Properties dialog box:
-
Allow access: The user is allowed remote access regardless of policy settings.
-
Deny access: The user is denied remote access regardless of policy settings.
-
Control access through Remote Access Policy: Allows a Remote Access Policy to control whether the user has access.
Exercise 7.02 demonstrates how to enable remote access by policy for a user. You will learn how to create policies later in this chapter.
Exercise 7.02: Enabling Remote Access by Policy
Follow these steps to enable a Remote Access Policy for a user:
-
From the Start menu, select Programs | Administrative Tools | Active Directory Users and Computers.
-
Click the + symbol next to the domain name in the left column to display its contents.
-
Click Users in the left-hand column. A list of the domain’s users and groups is displayed in the right-hand column, as shown in Figure 7.2.
-
Click a user name to highlight it, and then select Action | Properties from the menu or right-click the user name and select Properties from the context menu.
-
The user’s Properties dialog box is displayed. Click the Dial-in tab.
-
The Dial-in properties are displayed, as shown in Figure 7.3. Select the Control access through Remote Access Policy option.

Figure 7.3: Dial-in Properties -
Click OK to exit the Properties dialog box and save your changes.
After you have enabled remote access by policy for the user, you need to create one or more Remote Access Policies to control access. This procedure is described later in this chapter.
|
EAN: 2147483647
Pages: 173