Routing IP Version 6
|
Beginning with versions distributed from February 2000 and later, Solaris 8 is IP version 6 capable. It is not possible to configure Solaris 8 as a solely IPv6 system from the installation menu. It is possible, however, to configure an interface to communicate with any IPv6 host on the network and still retain IPv4 communications. This process is known as running a dual stack. A Solaris system can be configured to run strictly IPv6 by removing the hostname.interface file, although this configuration could cause problems when communicating with IPv4 hosts that do not currently support IPv6. This makes it possible for Solaris to function in any IPv6 environment as a host, gateway, or router.
In this section, we discuss setting up a Solaris IPv6 router. We talk about the file configurations necessary to make IPv6 functional. We also discuss the programs necessary to IPv6. However, we do not discuss the protocol, since there are better documents that do so. It is recommended that a user interested in setting up IPv6 for the first time reference the appropriate RFCs.
Configuration Files
Putting everything in place to make IPv6 functional on a Solaris 8 system is relatively easy. One prerequisite is having the system to route traffic configured for regular IPv4 traffic. Once we have completed the steps for configuring an IPv4 router, we can proceed with the setup of an IPv6. In this section, we talk about the files necessary to get an IPv6 router working. These files include the hostname6.interface file, the ndpd.conf file, and the ipnodes file.
The hostname6.interface File
This file is similar to the previously discussed hostname.interface for IPv4. The syntax of items contained in the hostname6.interface file is different from that of the IPv4 version, however.
Previously, the only thing needed in this file was either an IP address or a host name with an entry in the /etc/hosts directory. Now additional parameters must be entered in the hostname6.interface file. These parameters are parsed by the S30network.sh script in /etc/rcS.d when the system boots and are then passed to ifconfig. In the following example, we see a hostname6.interface entry for our IPv6 router:
addif sturgeon.mydomain.com/64 up
The first parameter we see is addif. The addif parameter is an extension of the Solaris ifconfig command, which tells ifconfig to add the address to the next available interface. Since we are seeing this file in the /etc/hostname6.hme0 file, ifconfig searches the interface table for the next available virtual interface on the hme0 device. The address resolving to sturgeon.mydomain.com will be configured to this interface. At the end of the line, we see the up command, which makes the interface network accessible. As we can see in Figure 7.3, this address was configured to the hme0:1 device.
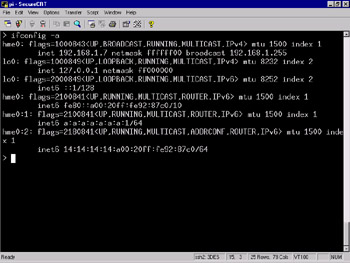
Figure 7.3: A Configured IPv6 Address Attached to the hme0: 1 Interface after a Reboot
As we can see, the address is now configured with the ROUTER flag and is ready to handle traffic from other hosts. However, additional configuration steps have been taken prior the interface being brought up. We'll talk about these steps shortly, in addition to the configuration steps necessary for ifconfig to resolve the address for sturgeon.
One subtle point we have not mentioned is that we're configuring this interface with a static address. There is a good reason to do so. With IPv6, it's possible to autoconfigure hosts when they boot. These systems poll the network during bootstrap to get information necessary to communicate with the rest of the network. If we do this with a router, we're forced to remember that the link-local address in.ndpd assigns to the interface at bootstrap. This address is usually easily remembered because it's typically composed of our network information and the Media Access Control (MAC) address of the interface. Whether or not we configure Solaris 8 with a static IPv6 address, the link-local address is configured by design.
In most cases, it is much easier to remember an address we've specifically assigned to the system. If there is ever a problem on the network, we'll know the address we have given to the router. This knowledge makes the router a little more accessible, a little easier to remember, and a little easier to name with a host name. This process does not take into account DNS, which will be mentioned later.
The ndpd.conf File
The ndpd.conf file is the configuration file for the in.ndpd program, or the Internet Network Discovery Protocol Daemon. This configuration file is supposed to reside in the /etc/inet directory and is read by the daemon when it is launched by the S69inet script when the system enters run-level 2, typically during the bootstrap process. It is worth mentioning that the ndpd.conf file does not exist by default. To understand why this configuration file is significant, we should talk about the in.ndpd program and the purpose it serves.
The in.ndpd program, when implemented on a router, must be configured to act as a router for the IPv6 network. This configuration involves making some entries in ndpd.conf to make the daemon the known router for the network. When other systems bootstrap and send a request for routing information via Neighbor Discovery Protocol, in.ndpd responds as the router for the network.
Minimal configuration of ndpd.conf that provides IPv6 functionality on a Solaris system consists of the following two entries:
ifdefault AdvSendAdvertisements true prefix 0A:0A:0A:0A:0A:0A:0A:0/64 hme0
To understand these entries, let's examine them in a little more detail. On the first line, we see the ifdefault command. The ifdefault and if commands are used to set interface configuration parameters. The ifdefault command must precede any if commands, because ifdefault is used to specify any default operations of the interface.
The next variable we see is the AdvSendAdvertisements parameter. This parameter designates whether or not the system will function as an IPv6 router. By default, this option is set to false on systems, which causes in.ndpd to run in host mode. When AdvSendAdvertisements is set to true, in.ndpd initiates itself as a router on the interface on which it is being configured to operate, sending periodic router advertisements via multicast and responding to router solicitations.
On the next line, we see the prefix entry. The prefix command controls the configuration variables for each prefix, or network. There is also a prefixdefault variable, which is similar to the prefix variable, except that the prefixdefault variable specifies configuration parameters for all prefixes. The prefixdefault variables must precede any prefix variables in ndpd.conf.
Next on the prefix line we see the network address. This is the 128-bit address, divided into eight blocks of 16 bits. At the end of the address we have the netmask. It is worth mentioning that this is a classless interdomain routing address block, also known as CIDR. We should also mention that this address is strictly for educational purposes and should not be used. At the end of the string, we have the name of the physical network interface.
Additional configuration options are supported in this ndpd.conf file. The preceding configurations will get the daemon functioning as the IPv6 router for the 0A:0A:0A:0A:0A:0A:0A:0 network. For more information on other supported options, see the ndpd.conf(4) man page.
The ipnodes File
With IPv4, Solaris uses the /etc/inet/hosts file to resolve known hosts. This process is controlled by the nsswitch.conf file in the /etc directory. When a process from the local system attempts to connect by host name to another system via IPv4, the nsswitch.conf forces the process to check the /etc/inet/hosts for name resolution. With IPv6, Solaris now uses the /etc/inet/ipnodes file to resolve known hosts. This is controlled by the ipnodes entry in nsswitch.conf. The ipnodes configuration file structure is similar to that of the hosts file. In Figure 7.4, we see two entries in the ipnodes file of sturgeon.
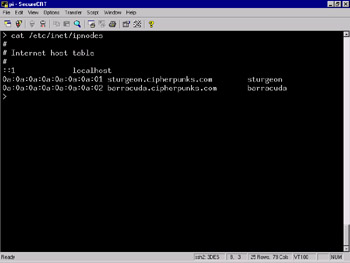
Figure 7.4: IPv6 Addresses Specified via the ipnodes File
On the first line, we see the entry for our router, sturgeon.mydomain.com. Much like the hosts file, this entry assigns the pictured address to the host name and gives it a canonical name of sturgeon. Following this entry, we see an entry for one of the nodes on the network, barracuda.mydomain.com. This address allows us to reach the system barracuda without the necessity for DNS.
The nsswitch.conf File
As we mentioned previously, the nsswitch.conf files in /etc references local files by default. These files are /etc/inet/hosts for IPv4 and /etc/inet/ipnodes for IPv6. If our systems are on a network with a name server that supports IPv6, we might want to change the entries in nsswitch.conf to use DNS.
Enabling DNS can do one of two things on our network. If it is properly configured, it can make our network easier to maintain and smoother running. If configured incorrectly, it can create all kinds of headaches, mysterious problems, and, perhaps, security issues.
In order for DNS to work with an IPv6 network, we need a DNS server that is IPv6 compatible. Currently, the only name service daemon available with IPv6 support is the Berkley Internet Name Daemon (BIND). The series 9 BIND is currently the only version with IPv6 support. If we are going to use DNS with the IPv6 network, we should migrate to BIND9. The current implementation included with Solaris 8 is version 8.1.2.
IPv6 Programs
In this section, we talk about the programs necessary for IPv6 to function. We look at programs that have been designed specifically for IPv6 and their role in ensuring that the network operates smoothly. We also look at programs that have been adapted for the coming of IPv6 in the Solaris operating system and speak briefly about their new features.
The in.ndpd Program
The in.ndpd program is the Neighbor Discovery Protocol Daemon. This program is responsible for the majority of the operations on an IPv6 network in terms of configuration, routing information, and IP addressing. We mentioned the configuration file previously; now we talk specifically about the daemon.
The in.ndpd program is started in the S69inet file when the system enters run-level 2. The script executes a test to determine whether or not the /etc/inet/ndpd.conf script exists. Figure 7.5 contains the code from the S69inet script that determines the system is a router if the ndpd.conf file is found.
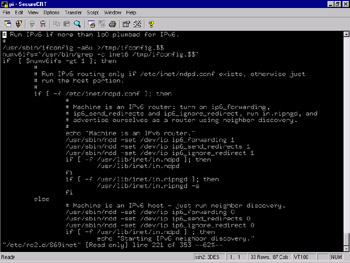
Figure 7.5: Code from the S69inet Script That Determines the System Is a Router if the ndpd.conf File Is Found
If this test returns true, the variables ip6_forwarding, ip6_send_redirects, and ip6_ignore_redirect are set to 1. The daemon is launched in router mode, and the in.ripngd program is started. If the test for the configuration file fails, the previously mentioned variables are set to 0, and the in.ndpd program is launched in host mode.
By examining the code, we can see that we can easily determine whether the system is running as an IPv6 router or an IPv6 host. If the system is running as an IPv6 router, the message "Machine is an IPv6 router" is printed to standard output (stdout) when the system bootstraps. If the system is functioning as an IPv6 host, the message "Starting IPv6 neighbor discovery" is printed to stdout. We can therefore determine whether the system thinks it is an IPv6 router by watching the system bootstrap or reviewing the contents of dmesg.
After the in.ndpd program has been configured to act as an IPv6 router, when a system is set up to autoconfigure via IPv6 bootstraps and polls the network, in.ndpd on the router will respond. The host sends a router solicitation via ICMPv6, the ICMP implementation in IPv6, to the network via the multicast address space. The router then responds with an ICMPv6 packet to the multicast address space, advertising itself as a router. The host receives this packet and configures itself to interact with the advertised router.
The in.ripngd Program
The in.ripngd program is the Routing Information Protocol, New Generation Daemon. This is the Routing Information Protocol (RIP) implementation for IPv6. When the system is bootstrapped and configured as a router, this daemon is launched to manage network routing information.
This daemon is to IPv6 what in.routed is to IPv4. The in.routed program listens on port 520 via UDP, and the in.ripngd program communicates via UDP on port 521. On a router, this daemon multicasts request packets on all functioning IPv6 interfaces and waits for replies from IPv6 hosts. When the daemon receives response packets, it places information about the responding host into RIP tables. This information is later used to update system routing tables.
We will not delve into deep discussion about this program, since it is simply a means to get the job done. It is not essential to our mission, although it can be helpful. More information about this program is available via the in.ripngd(1M) man page.
The ifconfig Command
At one point or another, you will need to manually configure an interface. This is life as a systems administrator or in any other position responsible for the operation, maintenance, and availability of systems. The standard UNIX ifconfig command has been adapted to function with IPv6, providing expanded functionality at the expense of learning the new features.
The differences in syntax for the IPv6 functions of Solaris are relatively minute. It is possible to add addresses to a single interface without worrying which virtual interface will host the address. This is done simply by using the addif flag, as demonstrated here:
ifconfig hme0 inet6 addif 0A:0A:0A:0A:0A:0A:0A:05/64
This code allows us to add the :05 address to the hme0 interface and let the system decide which virtual interface the address will reside on. Executing the ifconfig –a command, we see that the address now resides on the hme0:3 virtual interface.
Accordingly, we can also remove the address, letting the system find and remove it for us. This can be done with the removeif flag. Observe the following example:
ifconfig hme0 inet6 removeif 0A:0A:0A:0A:0A:0A:0A:05
This code allows the system to do our dirty work, removing the :05 address. After executing the command, we can see that the address and virtual interface have been removed.
IPv6 Router Procedure
Let's now take a look at setting up an IPv6 router. As we have previously, we will do this step by step, to ensure that we observe attention to detail. This section can also be made into a checklist for the implementation of any IPv6 routers that you deploy:
-
Gather all necessary documentation. This information includes RFCs, checklists, and technical documents. We might include RFCs detailing things such as the IPv6 Specification RFC (RFC2460) and the autoconfiguration of hosts on IPv6 networks RFC (RFC2462).
-
Decide on a design for our network. The design includes addressing, services that will be offered to the IPv6 network such as DNS, names of systems, whether the systems will also support IPv4, and how the systems will be configured for IPv6.
-
Deploy services we will need for the IPv6 Network. If we are planning to use DNS or anything else that needs to be configured especially for IPv6, we should do this ahead of the transition to assure a smooth change of protocol.
-
Design the IPv6 router. The router's design should conform to the specifications we decided on in Step 2. This includes security concerns, any host-based intrusion detection systems we will use, and necessary software. It also includes deciding whether the router will be created from an initial install of Solaris 8 or whether an existing Solaris 8 system will be used.
-
Implement the router. Build the router according to the specifications previously established.
-
Configure the necessary files for IPv6. These files include the /etc/inet/ipnodes file, the /etc/inet/ndpd.conf file, the /etc/hostname6.interface file(s), and the /etc/nsswitch.conf file.
-
Reboot and test. Reboot the router after the configuration changes have been made. After the router reboots, we need an IPv6 host to test the router functionality. This test can be performed a number of ways. One way is to take down the IPv4 interface and attempt to reach the hosts outside the IPv6 network solely over IPv6. Another is to perform a traceroute outside the IPv6 network, specifying that the IPv6 router as a gateway with the –g flag.
Stopping IPv6 Routing
The process of stopping IPv6 routing is simple. To stop an IPv6 system from routing traffic, there are two methods we can use.
Method 1: Rebooting the System
This method requires a reboot of the system:
-
Remove or move the /etc/inet/ndpd.conf file. If we want to save the ndpd.conf file, we must move it to a different location, or change the name to something like NOndpd.conf. When the system boots and does not find this file, in.ndpd will start in host mode.
-
Reboot and test. After the system has been rebooted, check the bootstrap output for the string "Starting IPv6 neighbor discovery." Additionally, check the ip6_forwarding, ip6_send_redirects, and ip6_ignore_redirect variables via ndd to ensure they are set to 0.
Method 2: Not Rebooting the System
This method does not require reboot of the system. It requires no downtime on the part of the interfaces, and the system will continue to be reachable while these actions are performed:
-
Remove or move the /etc/inet/ndpd.conf file. If we want to save the ndpd.conf file, we must move it to a different location or change the name to something like NOndpd.conf. When the system boots and does not find this file, in.ndpd will start in host mode.
-
Send the HUP signal to in.ndpd. This can be done via the command pkill -1 in.ndpd. Performing this action will restart in.ndpd, and it will attempt to reload the /etc/inet/ndpd.conf file. When it does not find the file, it will enter host mode.
-
Check local interfaces to ensure that the ROUTER flag is no longer present. In Figure 7.6, we see that the interfaces are designated as routing interfaces. Note the differences between Figures 7.6 and 7.3. Notice the change in the Router flag in the output of an ifconfig –a. The system in Figure 7.6 is in a multihomed state.
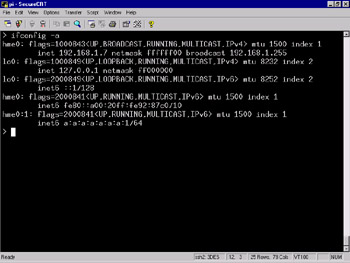
Figure 7.6: System in a Multihomed State -
Disable the IPv6 kernel module routing parameters. This can be done via ndd. We need to set the parameters ip6_forwarding, ip6_forwarding, ip6_send_redirects, and ip6_ignore_redirect to 0. Refer to the ndd (1M) man page for more information on the use of ndd.
-
Test the configuration. As always, test the configuration to assure that the system is no longer routing traffic.
|
EAN: 2147483647
Pages: 240