Managing IPSO Images
|
You may manage Nokia's IPSO images similarly to the way you manage packages. An IPSO image is the base operating system of your Nokia Security Platform. These images are located in the /image directory on your hard drive, and they contain a system kernel and system binaries. You should have at least one image on the system when you receive it, and you can add new images at any time.
| Warning | Please read all IPSO release notes before upgrading your system. You must take into account special considerations, depending on your Nokia model, and sometimes you cannot apply the latest image without first applying an older image. For example, IPSO 3.6 can be installed on the following model numbers:
Do not attempt to install 3.6 on any other models or you might leave the system in an unusable state, and the only way to make it usable again is to RMA the unit for Nokia to reimage the box. IPSO 3.6 can be upgraded on these models only if you are running one of the following previous versions of IPSO. Note that IPSO 3.5.1 is not supported:
If you are running IPSO 3.2.1 or earlier and you want to upgrade to IPSO 3.4.x or later, you must do a manual boot manager upgrade. For that reason, we recommend that if you are on IPSO 3.2.1 or earlier, you first upgrade to IPSO 3.3 and then to 3.4.x or later. Nokia incorporated the boot manager update automatically into IPSO 3.4.x and later. Therefore, if you are on IPSO 3.3 or later and the boot manager needs to be updated during a new image install, it will happen automatically, or you can force a boot manager upgrade using the newimage –b option. |
Upgrading to a New IPSO
If you want to use the Voyager interface to upgrade the IPSO image, you need to have the image file ipso.tgz available on an FTP or HTTP server that is accessible from your NSP. Upgrade IPSO image through Voyager:
-
Log in to Voyager and click Config.
-
Scroll down to the System Configuration heading and select Install New IPSO Image (Upgrade).
-
Fill in the URL to the image and select Test Boot New Image. Fill in any of the other relevant information as shown in Figure 20.8:
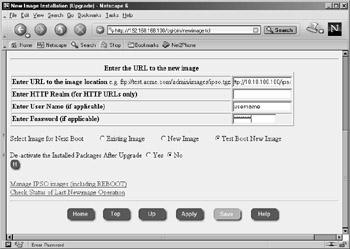
Figure 20.8: Updating Images through Voyager-
Enter HTTP Realm (for HTTP URLs only). This is the name of the realm that you are authenticating to in a Web browser.
-
Enter User Name (if applicable). If you are using HTTP or FTP, you might need to enter a username.
-
Enter Password (if applicable). If you enter a username, enter the password here.
-
-
Click Apply. You will receive the following message:
"File download and image installation could take long time (depending upon the network speed). Click Apply if you want to continue".
This message is accurate; when writing this section, it took approximately 30 minutes for the installation to complete through Voyager.
-
Click Apply to begin the download and upgrade process.
Note If you do not have a name server configured on your Nokia appliance, you need to enter the server's IP address instead of DNS resolvable name in step 3. You will know this is the case if you receive the following error messages: "Error: Invalid URL or server error" and "fetch: 'www.nokia.com': cannot resolve: Resolver Error."
-
Next you will see a screen that says, "New image installation has started…" and then you will be brought back to the New Image Installation (Upgrade) Status page, which displays the status of the download and installation. This page will continue to refresh. Be patient. If the download is not progressing for some reason, you will be notified. If you want to check the progress of the download, just log in to the NSP and run the ls -al command on /var/tmp. The ipso.tgz file will be there and the file size should continue to grow.
-
When the update is complete, you will see the message "Please reboot immediately," as shown in Figure 20.9. Reboot the system cleanly. Refer to the section "Rebooting the System" earlier in this chapter if you need help with rebooting.
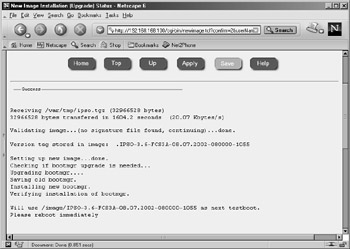
Figure 20.9: Voyager IPSO Upgrade Complete -
When the system comes back up, log in and verify that the new image is running. If you did a test boot, you will want to set the new image as the active image through the Manage IPSO Images screen.
Installing with newimage
If you would prefer to update IPSO versions from the command line, you can use the newimage tool. Table 20.2 lists the various command-line options you can specify in running the command. If you have the ipso.tgz file loaded on the local system in /var/admin, use newimage –k –R –l /var/admin to update the operating system image. After the image is updated, you must reboot to load the new image. You will see the following output:
gatekeeper[admin]# newimage -k -R -l /var/admin Enter ipso image file name [ipso.tgz]: Validating image...(no signature file found, continuing)...done. Version tag stored in image: .IPSO-3.6-FCS3-08.01.2002-181200-1051 Setting up new image...done. Checking if bootmgr upgrade is needed... Will use /image/IPSO-3.6-FCS3-08.01.2002-181200-1051 as root for next boot. To install/upgrade your packages run /etc/newpkg after REBOOT Please reboot immediately gatekeeper[admin]# sync; sync; reboot
| Switch for newimage | Description |
|---|---|
| -k | Upgrades the IPSO image and keeps all currently active packages so they will be started upon reboot. |
| -r <image> | Specifies the image to use on the next boot. |
| -R | Sets the new image to be used on the next reboot. |
| -l <path to image> | Tells the newimage command where to find the ipso.tgz file,which contains the new image. |
| -t <image> | Specifies the image to use for a test boot. |
| -T | Enables you to perform a test boot with the new image. |
| -i | Sets the newimage command in interactive mode. Use this option if you need to FTP the file or use the CD-ROM drive (IP440 only) to upgrade the IPSO image. |
| -b | Forces upgrade of bootmgr. |
| -v | Verbose mode for FTP. |
Deleting Images
If you don't have enough disk space in /image to load new images, you need to remove old images to make space. The process for deleting images is simply done through the Voyager Web interface. To delete old IPSO images:
-
Log in to Voyager.
-
Click Config to bring up the main Configuration window.
-
Click Manage IPSO Images under the System Configuration heading.
-
Click the link labeled Delete IPSO images.
-
Select the option button to Delete the old images. You may select one or more images to delete as shown in Figure 20.10.
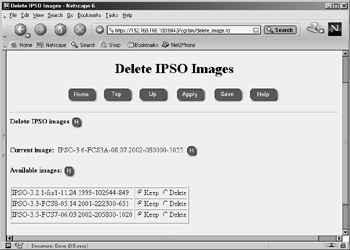
Figure 20.10: Deleting IPSO Images -
Click Apply and then click Save.
|
EAN: 2147483647
Pages: 240