| In this part, you will learn to set up these three connectivity scenarios: From DB2 for iSeries client to DB2 for Linux, UNIX, and Windows server From DB2 for iSeries client to DB2 for z/OS server From DB2 for iSeries client to DB2 for iSeries server
The DB2 Connect software is not required in these scenarios. Scenario 1: DB2 for iSeries Client to DB2 for Linux, UNIX, and Windows Server Figure E.5 shows the overview for the scenario described in this section. Figure E.5. DB2 for iSeries client to DB2 for Linux, UNIX, and Windows servers 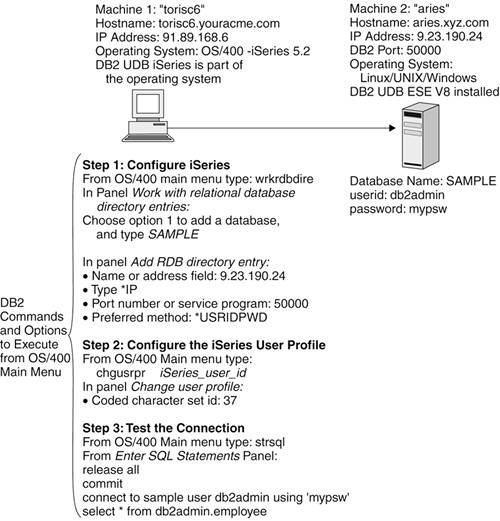
Table E.7 presents the list of commands required to set up this connection. Table E.7. DB2 for iSeries Client to DB2 for Linux, UNIX, and Windows ServerCommands to Run on Machine 1 (torisc6) DB2 for iSeries | Information You Need to Obtain from Machine 2 (aries) DB2 for Linux, UNIX, and Windows to Perform the Commands on Machine 1 |
|---|
Step 1: Configure iSeries | From the OS/400 Main menu, type: wrkrdbdire
After you press Enter, this command will bring up the Work with Relational Database Directory Entries panel. | No corresponding information required on this machine. | From the Work with Relational Database Directory Entries panel: | SAMPLE is the database in this machine 2 that you want to connect from the iSeries machine. If you don't remember the database name, you can issue from the CLP the following command: list db directory
and look for any entries with a directory entry type of indirect. These entries would correspond to local databases in your machine. | In the Add RDB Directory Entry panel, specify: Note: The hostname could have been used instead of the IP address. After you specify *IP for the TCP/IP protocol and press Enter, other choices will appear: Note: The default port number is *DRDA, which means port 446. The service name as defined on this machine 1 (client) could have been used instead of the port number. The default authentication method is *ENCRYPTED, which only works between iSeries machines, thus *USRIDPWD is used. | For this example: 9.23.190.24 = the IP address of machine 2 50000 = the port used for DB2. To find out the port used, issue this command from the CLP: get dbm cfg
Then, look for the parameter SVCENAME. If the value of SVCENAME is not the port number but a string, then look in your system for the file services and grep for this string, which is normally based on your DB2 instance name. For example, if your instance name is db2inst1, you will normally find a corresponding entry like this: db2cdb2inst1 50000/tcp
You can locate the services file at /etc/services in UNIX and X:\WINNT\System32\drivers\etc\services in Windows. | Step 2: Configure the iSeries User Profile | For this example we logged on to the iSeries machine with a user ID of jmascare. We need to change the profile for this user so that the CCSID value is not the default of 65335 but something else, like 37 (US English). There is no codepage conversion supported for CCSID 65335. From the OS/400 Main menu, type: chgusrprf jmascare
This command will invoke the Change User Profile panel. Then, specify the coded character set ID as 37. | No corresponding information required on this machine. | Step 3: Test the Connection | Start the Interactive SQL tool from the OS/400 Main menu by typing: strsql
From the Enter SQL Statements panel, type: release all (Press Enter) COMMIT (Press Enter) CONNECT TO sample USER db2admin USING 'mypsw' (Press Enter) SELECT * FROM db2admin.employee (Press Enter)
Note: The password needs to be passed in single quotes in order to maintain its case. Using double quotes for the user ID as shown below also works: CONNECT TO sample USER "db2admin" USING 'mypsw' (Press Enter)
| For this example: db2admin = the user ID as defined on machine 2 mypsw = the password as defined on machine 2 |
Table E.8 provides troubleshooting hints for connectivity problems. Table E.8. What to Check If You Cannot ConnectClient Machine torisc6 | Database Server aries |
|---|
ping aries.xyz.com
This command can be performed from the OS/400 Main menu (assuming the hostname was used instead of the IP address itself in the Add RDB Directory Entry panel). | aries.xyz.com = the host name of the database server If you cannot ping, there may be problems with the DNS. Try pinging the IP address. | ping 9.23.190.24
This command can be performed from the OS/400 Main menu. | 9.23.190.24 = the IP address of the database server This will confirm whether or not there are problems with the network. | No corresponding information required on this machine. | Is DB2 started? If not, run db2start. Is DB2COMM set to TCPIP? Check by executing the following command: db2set -all
If this registry variable is not set, you should execute: db2set db2comm=tcpip
and then issue a db2stop/db2start command to make sure the change takes effect. Is SVCENAME set to the port number or service name specified in the services file of this server machine? Check this parameter from the CLP by issuing: get dbm cfg
| If you used a service name instead of the port number in your Add RDB Directory Entry panel, make sure the entry is correct in the services file at the client machine. | No corresponding information required on this machine. | netstat
This command shows all connections and port numbers and their statuses. It can be performed from the OS/400 Main menu, options 6 -> 5 -> 10 -> 7 -> 3. | netstat -a -n
This command shows all connections and port numbers and their statuses. Issue it from your command prompt. |
Scenario 2: DB2 for iSeries Client to DB2 for z/OS Server Figure E.6 shows the overview for the scenario described in this section. Figure E.6. DB2 for iSeries client to DB2 for z/OS Server 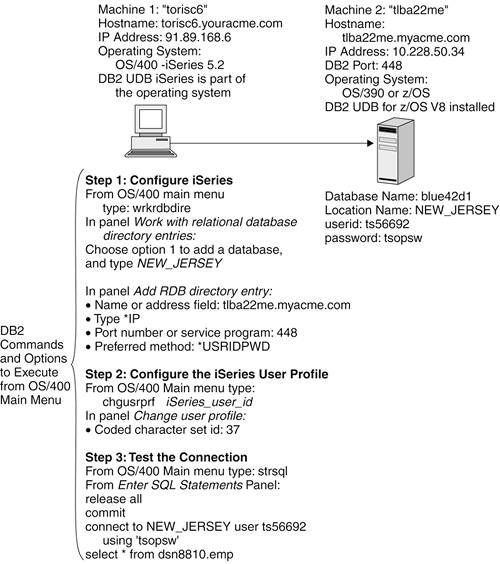
Table E.9 presents the list of commands required to set up this connection. Table E.9. DB2 for iSeries Client to DB2 z/OS ServerCommands to Run on Machine 1 (torisc6) DB2 for iSeries | Information You Need to Obtain from Machine 2 (tlba22me) DB2 for z/OS to Perform the Commands on Machine 1 |
|---|
Step 1: Configure iSeries | From the OS/400 Main menu, type: wrkrdbdire
After you press Enter, this will bring up the Work with Relational Database Directory Entries panel | No corresponding information required on this machine. | From the Work with Relational Database Directory Entries panel: | NEW_JERSEY is the location name of the DB2 for z/OS subsystem you want to access on machine 2. To find out the location name, contact your DB2 for z/OS administrator, who can check the MVS syslog for message DSNL004I. "LOCATION" in that message contains the location name to use. Also, the -DISPLAY DDF command provides this information. | In the Add RDB Directory Entry panel, specify: Name or address field: tlba22me.myacme.com
Type: *IP
Note: The IP address could have been used instead of the hostname. After you specify *IP for the TCP/IP protocol and press Enter, other choices will appear: Note: The service name as defined on this machine 1 (client) could have been used instead of the port number. Versions other than DB2 for iSeries 5.2 may not have some of these choices. | For this example: tlba22me.myacme.com = the host name of machine 2 448 = the port used for DB2 Though the example shows port 448, port 446 is normally the default value. To find out the port used, contact your DB2 for OS/390 and z/OS administrator, who can check the MVS syslog for message DSNL004I. "TCPPORT" in that message contains the port to use. Also, the -DISPLAY DDF command provides this information. | Step 2: Configure the iSeries User Profile | For this example we logged on to the iSeries machine with a user ID of jmascare. We need to change the profile for this user so that the CCSID value is not the default of 65335 but something else, like 37 (US English). There is no codepage conversion supported for CCSID 65335. From the OS/400 Main menu, type: chgusrprf jmascare
This command will invoke the Change User Profile panel. Then specify the coded character set ID as 37. | No corresponding information required on this machine. | Step 3: Test the Connection | Start the Interactive SQL tool from the OS/400 Main menu: strsql
From the Enter SQL Statements panel, type: release all (Press Enter) COMMIT (Press Enter) CONNECT TO NEW_JERSEY USER ts56692 USING 'tsopsw' (Press Enter) SELECT * FROM dsn8810.emp (Press Enter)
Note: The password needs to be passed in single quotes in order to maintain its case. Using double quotes for the user ID as shown below also works: CONNECT TO NEW_JERSEY USER "ts56692" USING 'tsopsw' (Press enter)
The SELECT query is using the sample table dsn8810.emp for Version 8. If connecting to a DB2 for OS/390 and z/OS Version 7 subsystem, use table dsn8710.emp. | For this example: ts56692 = the user ID as defined on machine 2 tsopsw = the password as defined on machine 2 |
Table E.10 provides troubleshooting hints for connectivity problems. Table E.10. What to Check If You Cannot ConnectClient Machine torisc6 | Database Server tlba22me |
|---|
ping tlba22me.myacme.com
This command can be performed from the OS/400 Main menu (assuming the hostname was used instead of the IP address itself in the Add RDB Directory Entry panel). | tlba22me.myacme.com = the host name of the database server If you cannot ping, there may be problems with the DNS. Try pinging the IP address. | ping 10.228.50.34
This command can be performed from the OS/400 Main menu. | 10.228.50.34 = the IP address of the database server This will confirm whether or not there are problems with the network. | No corresponding information required on this machine. | Since the Database server is DB2 UDB for OS/390 and z/OS, check: Is DB2 started? If not, execute -start db2. Is DDF started? If not, execute -start ddf.
| If you used a service name instead of the port number in your Add RDB Directory Entry panel, make sure the entry is correct in the services file at the client machine. | No corresponding information required on this machine. | netstat
This command shows all connections and port numbers and their statuses. It can be performed from the OS/400 Main menu, options 6 -> 5 -> 10 -> 7 -> 3. | netstat
This command shows all connections and port numbers and their statuses. Issue this command from option 6 Command in the main ISPF menu. |
Scenario 3: DB2 for iSeries Client to DB2 for iSeries Server Figure E.7 shows the overview for the scenario described in this section. Figure E.7. DB2 for iSeries client to DB2 for iSeries server 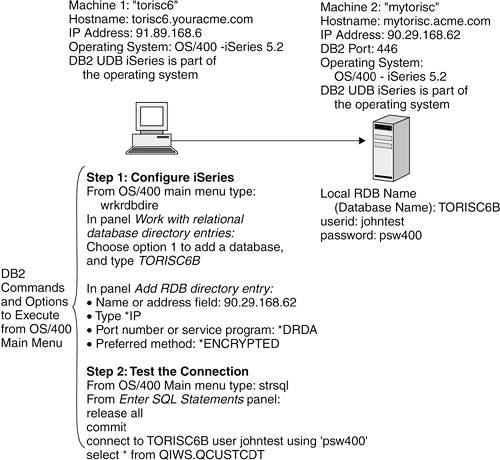
Table E.11 presents the list of commands required to set up this connection. Table E.11. DB2 for iSeries Client to DB2 iSeries ServerCommands to Run on Machine 1 (torisc6) DB2 for iSeries | Information You Need to Obtain from Machine 2 (mytorisc) DB2 for iSeries to Perform the Commands on Machine 1 |
|---|
Step 1: Configure iSeries | From the OS/400 Main menu, type: wrkrdbdire
After you press Enter, this will bring up the Work with Relational Database Directory Entries panel. | No corresponding information required on this machine. | From the Work with Relational Database Directory Entries panel: | TORISC6B is the local RDB name you want to access on machine 2. In order to determine the local RDB name, contact your iSeries administrator, who can issue the command WRKRDBDIRE. When the Work with Relational Database Directory Entries panel appears, the administrator can find the desired value in column Relational Database that maps to the column Remote Location with a value of *LOCAL. | In the Add RDB Directory Entry panel, specify: Note: The hostname could have been used instead of the IP address. After you specify *IP for the TCP/IP protocol and press Enter, other choices will appear: Note: *DRDA is equivalent to entering port 446. This value is very unlikely to be changed. *ENCRYPTED authentication works between iSeries machines. Versions other than DB2 for iSeries 5.2 may not have some of these choices. | For this example: 90.29.168.62 = the IP address of machine 2 *DRDA = the port used for DB2 *DRDA is equivalent to port 446 and is the default value. | Step 2: Test the Connection | Start the Interactive SQL tool from the OS/400 Main menu: strsql
From the Enter SQL Statements panel, type: CONNECT TO TORISC6B USER johntest USING 'psw400' (Press Enter) SELECT * FROM QIWS.QCUSTCDT (Press Enter)
Note: The password needs to be passed in single quotes in order to maintain its case. Using double quotes for the user ID as shown below also works: CONNECT TO TORISC6B USER "johntest" USING 'psw400' (Press Enter)
| For this example: johntest = the user ID as defined on machine 2 psw400 = the password as defined on machine 2 |
Table E.12 provides troubleshooting hints for connectivity problems. Table E.12. What to Check If You Cannot ConnectClient Machine torisc6 | Database Server mytorisc |
|---|
ping mytorisc.acme.com
This command can be performed from the OS/400 Main menu (assuming the hostname was used instead of the IP address itself in the Add RDB Directory Entry panel). | mytorisc.acme.com = the host name of the database server If you cannot ping, there may be problems with the DNS. Try pinging the IP address. | ping 90.29.168.62
This command can be performed from the OS/400 Main menu. | 90.29.168.62 = the IP address of the database server This will confirm whether or not there are problems with the network. | No corresponding information required on this machine. | Since the Database server is DB2 UDB for iSeries, check: Is DDM started? If not, execute the following command: STRTTCPSVR SERVER(*DDM)
| If you used a service name instead of the port number in your Add RDB Directory Entry panel, make sure the entry is correct in the services file at the client machine. | No corresponding information required on this machine. | netstat
This command shows all connections and port numbers and their statuses. It can be performed from the OS/400 Main menu, options 6 -> 5 -> 10 -> 7 -> 3. | netstat
This command shows all connections and port numbers and their statuses. It can be performed from the OS/400 Main menu, options 6 -> 5 -> 10 -> 7 -> 3. |
|