The Art of Trimming
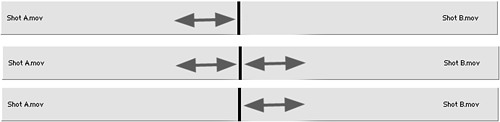
| Trimming is an essential technique used by just about every editor. Normally, most editors overdigitize the amount of source material necessary for the final sequence. That's OK to a certain extent, but try to be efficient about it. The real power of Premiere is that you can go back at any point and readjust any edit point any number of frames, plus or minus, so long as you have digitized the media. When you have made all your in and out marks and your movie is cut together, you can still go back and tweak any edit point as desired. Trimming is the feature that allows you to clean up and fine-tune your edits by adding or removing frames to or from either side of an edit point. The three basic methods of trimming involve adding or removing frames to or from the outgoing clip or the incoming clip or working both sides of the edit point at the same time (see Figure 4.1). Figure 4.1. Three basic methods of trimming an edit point.
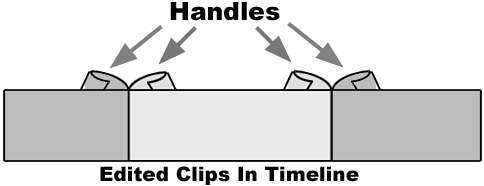
To understand how trimming works, I will use an analogy that I think will help you understand how editing with Premiere works. When you mark in and out points in a source clip and edit that particular segment into your timeline, the remainder of the source footage that you initially digitized for that clip still exists within the project. The additional material does not get deleted automatically (and for a good reason). This remaining footage is called handles. These handles are used when you trim a segment in your timeline without your having to go back and find the source footage yourself. I tell people to imagine that all source clips are made up of two spools, similar to paper-towel rolls or film reels. The portion of the source footage that is unwound is the portion displayed in your timeline. The handles, or unused source footage, are rolled up on each end of the clip and are not displayed in the timeline (see Figure 4.2). Figure 4.2. The portions of your source clips not used in your timeline, known as handles, are available for trimming.
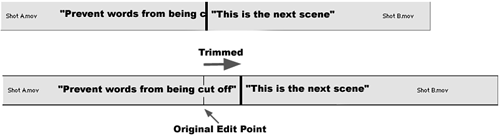
In a sense, the trimming of a clip is this rolling-up or unrolling of the remaining portions of the source footage. Therefore, if the end of Shot A is cut off in your timeline, instead of having to go back to the source footage and make a new edit, you can simply use a Trim function and extend the outgoing portion of Shot A (see Figure 4.3). As with most features in Premiere, there are several different ways you can trim clips. The two most common are by entering trim mode or working directly in the timeline. Figure 4.3. As long as the source material exists, you can use the trim feature to fix bad edit points.
note The only times when no source footage handles exist are if you use the entire length of the footage you digitized or if you select the option to delete unused footage from your project. This option allows you to permanently delete the portions of your digitized footage not used in your timeline. |