Getting Rid of Unwanted Source Footage
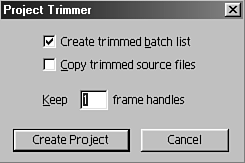
| Many times when you digitize, you wind up with unwanted media before and after the desired portion of the clip. Because video, especially, takes up tremendous amounts of hard drive space, you probably want to delete the unnecessary footage surrounding your clip. Besides running out of hard drive space faster, having a great deal of excess footage also becomes a problem when it's time to back up your project for archiving and storing on the shelf. Keeping that unwanted footage for every clip might cause you to need extra backup storage tapes (usually DAT or DLT tapes), which can get expensive. tip Always leave some room on each side of the portion of the clip you are using. These handles can come in handy if you need to trim the clip or add a transition. Premiere automatically makes a duplicate of your project when you select to trim a project. Each in and out point becomes the starting and ending point for those clips, removing the unwanted portions before the set in point and after the set out point. You can choose to keep handles for each clip. Handles are the extra amount of footage (already digitized) you choose to keep before a given in point and after the out point on each clip used in your project. Any clips that are not used in your project are not copied to the new duplicate version of your project. note Premiere copies only clips used in the project's sequence. It does not bring over any clips not used in the sequence, even if they have in and out marks. To remove unwanted source footage, do the following:
After you have copied and checked your material, you can delete the original project and its related media. The "condensed" files retain the same quality as your originally digitized material. I highly recommend doing this for the first time with a test project, just to make sure you are comfortable with the procedure. |
- ERP Systems Impact on Organizations
- The Second Wave ERP Market: An Australian Viewpoint
- Data Mining for Business Process Reengineering
- Intrinsic and Contextual Data Quality: The Effect of Media and Personal Involvement
- Relevance and Micro-Relevance for the Professional as Determinants of IT-Diffusion and IT-Use in Healthcare

