Prep Your Tape
| Before you output your program to tape, you need to address a few last-minute details. These are the vital portions of your program (especially if you're editing for broadcast). Whether you are outputting your program for air or just making your protection master to store in the archives, it's always a good idea to prepare your tapes with all the proper "tech specs" before outputting your edited program to tape. For one thing, adding the correct amount of black space before the program starts is a must. Nothing is more frustrating to work with than a tape where the program begins as soon as the tape is inserted into the deck (at the very beginning of the tape). Here's one of the standard ways to prepare your tape (but check with each facility to find out its specific requirements):
These tasks are discussed in the following sections. Adding BlackThere are several ways to add black to your timeline (before or after your edited program), including the following:
note If you have device control and a timecode generator, you typically want the first frame of your movie to begin on the one-hour mark of your timecode (01:00:00:00). This means that your prep materials start before the one-hour timecode say, at 00:58:30:00. A black video clip appears in your bin. To change the clip's duration, do the following:
Bars and ToneIt is a good habit to put bars and tone at the beginning of every tape. Standard SMPTE color bars are used as a measurement tool to balance the deck and monitors so that the program is calibrated properly and looks the way it should (see Figure 10.1). This is just like when you digitize footage into the system and you use the color bars to adjust and balance the video signal. If you didn't put bars on your edited master tapes, no one would be able to correctly balance the signal during playback. It would all be guesswork, having to be done by eye. Figure 10.1. SMPTE color bars.
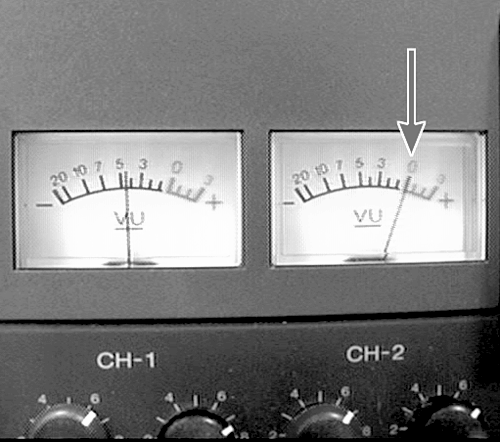
An audio tone generally goes with the SMPTE bars. This is usually a 1 kHz (1,000 hertz) tone set at 0 on your analog VU meters (or approximately 12 on the digital meters). This too is used as a calibration signal to adjust the proper playback levels after your signal has been recorded to tape. What you must do is set the level of the tones to be the same level as the loudest portions of your movie's audio level. If you mixed your audio well throughout your editing, the majority of your movie should remain consistent and ride around the 0 VU meter mark. If your movie contains softer portions, it is perfectly acceptable to let the meter drop below 0 VU, but try to refrain from going too much past +1 or +2 on your VU meter (see Figure 10.2). If your signal goes much past that point, you might begin experiencing audio distortion, clipping, or complete signal dropout (depending on whether you are outputting to analog or digital format). This is generally called "pinning the needles." Figure 10.2. An analog VU meter gauges the level of the audio signal.
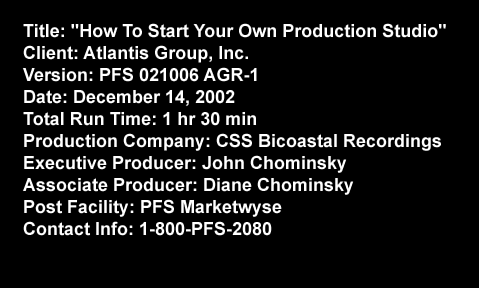
If your audio tracks are very dynamic (there are vast differences between high and low volume levels), you might want to look into using a compressor. A compressor takes any signal that goes over a certain threshold (that you set) and "compresses" it, reducing the dynamic range. This keeps signals more even and balanced, avoiding extremely loud surges. For example, if a scene in your movie contains a person screaming or a bomb exploding, these loud (dynamic) sounds would not send the needles off your meters. Using a compressor helps even out dramatic fluctuations in volume without making it sound overly processed. Premiere also has, as one of its audio filters, a digital compressor that you can apply at any time during the editing process to any of the audio segments in your timeline. This can be useful when you want to control any clips that vary greatly in dynamic range and even out the levels from within Premiere. tip You can use external, outboard audio gear found at most professional music equipment stores or use one of the third-party plug-ins that are becoming available to integrate within your editing software. The Slate: Who, What, When, and WhereYou don't have to get overly fancy with this. Some people include the slate information with their countdown screen. I generally keep it separate, because it makes it easier to make any kind of text changes that always seem to occur (not that my clients ever change their minds). Slate information is especially helpful in many situations. You never know if a label on the outside of a tape will get ripped off or written over. How many times does a tape wind up in the wrong box? How many times are there multiple versions of the same program? By having the slate information right at the beginning of the program, you can quickly cue up the tape to the slate and verify whether it is the version you are looking for. The following is some basic information to include (again, check with each facility to obtain a list of its specifications):
Making a slate is as easy as typing white letters on a black screen (see Figure 10.3). Feel free to get as creative as you want, but keep in mind that the general public almost never sees the slate. It's designed for information only, not artistic expression. Only the guys in the tape room who cue up your program get to view it. My advice is not to spend too much time or money trying to make a fancy slate. Figure 10.3. A sample slate information screen.
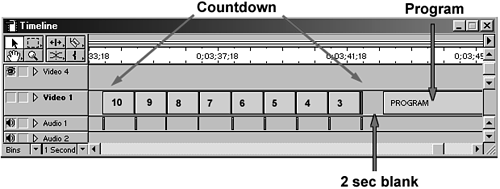
Ten, Nine, Eight, ...Creating a countdown is important if your material is going out for broadcast. The countdown does exactly what you think it does. It signifies how much time is left until your movie starts. Generally you start at 10 seconds and count down to 2 seconds, leaving exactly 2 seconds blank (just black video) before your program starts (see Figure 10.4). Figure 10.4. The timeline indicates 2 seconds of black before the main program begins.
Do you know why you don't count down to 1 second? This goes back to the time of live television (before computers controlled our world). The 2 seconds of black gave the program directors enough time to switch between video sources and fade up audio levels without your seeing or hearing any portion of the countdown. Now, with frame-accurate computer-controlled sources, a countdown is almost not as necessary, but I advise you to keep it in. |


