Changing the Color Balance Over Time
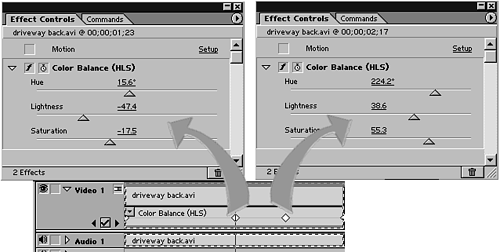
| What happens if the color begins to shift in a shot you need? This can happen due to changes in lighting or circuitry going bad in a camera. Fortunately, Premiere's Color Balance Filter allows you to easily compensate for most shifts in color occurring over time. Or maybe you want the color to gradually change over time for some type of effect. The trick to having an image's color balance change over time is to use keyframes. tip To achieve a warmer feeling when trying to get a black-and-white image, do not drop the saturation level all the way to zero. Leave about 20% of the original color value to give it a nice warm look. Do the following to change the color value scheme over the duration of the clip:
You can add as many keyframes as necessary throughout the clip's duration. Premiere interpolates the changes that need to occur between the keyframes. This functionality is called tweening (short for in-betweening). Tweening is the program's ability to calculate the percentage of change that needs to occur in each frame from the settings of one keyframe to the settings of the next keyframe. The farther apart the keyframes are (depending on the settings' variance), the more gradual the changes will be between keyframes. The closer the keyframes appear (assuming the same setting changes), the more radical each frame's changes will be as Premiere plays back the clip. |