Using the Label Web Control
| The Label Web control differs from the Literal Web control in that it contains a number of formatting properties that, when set, specify how the Text property should be displayed in the user's web browser. For example, we can display the Label text in a bold font by setting the control's Font property's Bold subproperty to true. Let's create a new ASP.NET web page to demonstrate using a Label Web control. Start by creating an ASP.NET page named LabelControl.aspx; then drag and drop a Label Web control onto the page. Select the Label Web control and note its list of properties in the Properties window. There are far more properties listed here than with the Literal Web control. First, let's set the Label Web control's Text property to Hello, World!. After you have done this, your screen should look like Figure 8.6. Figure 8.6. A Label Web control has been added and its Text property has been set.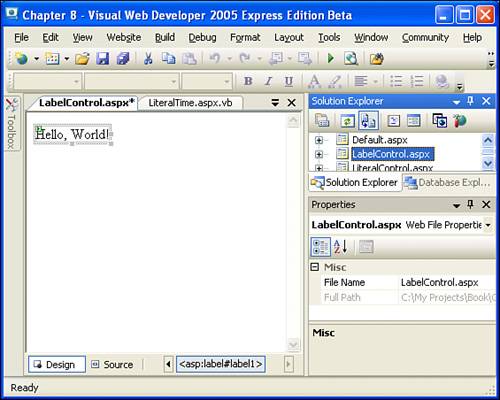 After the Text property has been set, let's make it display its content in a bold font. To accomplish this, click the Label Web control, which will load the control's properties in the Properties window. One of the properties listed is Font. To the left of this property name, you'll find a plus, which indicates that this property has subproperties. Click the plus to expand these subproperties. The subproperties of the Font property are listed in Table 8.1. One of these subproperties is Bold, which defaults to a value of False. Go ahead and select true from the drop-down list. This has the effect of making the Label Web control's text in the designer appear bold, as you can see in Figure 8.7, which shows how the control looks after the Bold subproperty has been set to true. Figure 8.7. The Label Web control's Bold subproperty has been set to true.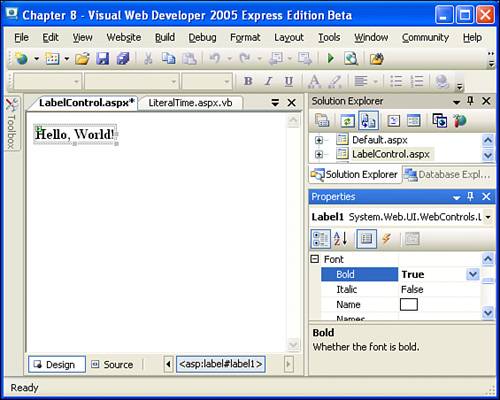
Go ahead and view the ASP.NET page through a web browser. When viewing the LabelControl.aspx page through a browser, you should see the message "Hello, World!" in a bold font, just like we saw in the designer. Examining the HTML Markup Generated by the Label Web ControlWith the Literal Web control, the HTML markup sent to the web browser was the value of the Literal Web control's Text property. With the Label Web control, the Text property is sent in addition to extra HTML markup to provide the associated formatting. But what HTML markup does the Label send to the browser? Interestingly, this depends on what browser visits the ASP.NET web page! Whenever a browser makes a request for a web page, it sends along a piece of information known as the User-Agent header. This bit of information specifies what browser is being used.
Recall from the "Examining the Web Controls Designed for Displaying Text" section that when the ASP.NET web page is being executed by the ASP.NET engine, the various Web controls are rendered and converted into HTML markup. When these controls are rendered, they take into account the User-Agent header and render HTML appropriate for the particular browser. For example, Listing 8.3 contains the HTML markup received when visiting the LabelControl.aspx web page using an uplevel web browser. (ASP.NET classifies uplevel web browsers as those that include support for client-side script, cascading style sheets, and HTML 4.0. Some examples of uplevel browsers include versions of Internet Explorer 4.0 or higher, Mozilla FireFox, and versions of Netscape 6.0 or higher.) Listing 8.3. An Uplevel Browser Receives the Following HTML Markup from LabelControl.aspx
Line 14 contains the HTML markup produced by the Label Web control. Note that it uses a <span> HTML tag whose id attribute is equal to the ID property of the Label Web control. Also note that for uplevel browsers, the text "Hello, World!" is made bold through the <span> tag's style attribute. Listing 8.4 contains the HTML markup produced by LabelControl.aspx when visited by Netscape version 4, an antiquated web browser that does not have support for HTML version 4.0. Such browsers, like Netscape 4, that are not considered uplevel are said to be downlevel. Listing 8.4. Downlevel Browsers Receive the Following HTML Markup from LabelControl.aspx
Line 12 in Listing 8.4 differs from line 14 in Listing 8.3. Instead of specifying that the text "Hello, World!" should be bold using the <span> tag's style attribute, the HTML markup produced for downlevel browsers uses a <b> tag to make the text bold.
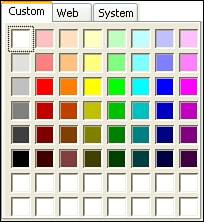
Examining the Formatting Properties of the Label Web ControlThe Label Web control contains a number of formatting properties. We've already seen how to make the text of the Label Web control bold. There is a plethora of other Label Web control formatting properties worth examining. These formatting properties can be divided into the following classes: color properties, border properties, font properties, and miscellaneous properties. We'll examine each of these classes of properties in the next four sections. Looking at the Color PropertiesThe Label Web control contains two properties for specifying the color of the outputted text: ForeColor and BackColor. If you couldn't guess, ForeColor specifies the text's foreground color, whereas BackColor specifies its background color. Let's create a new ASP.NET web page to try out these two color properties. Start by creating an ASP.NET web page named ColorLabel.aspx, and drag and drop a Label Web control onto the page. After adding the Label Web control, change the Text property to This is a test of the color properties. Now, let's set the BackColor to Navy and the ForeColor to White. To accomplish this, make sure that the Label Web control is selected so that its properties are displayed in the Properties window. Then find the BackColor property in the Properties window. Selecting the BackColor property will display a palette with three tabs: Custom, Web, and System. As Figure 8.8 shows, the Custom tab contains 64 colors that you can choose from for setting the BackColor property. Figure 8.8. The Custom tab displays various colors.
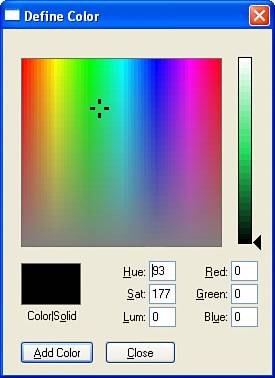
If you see a color that you want to set the BackColor to, simply click the color. If you do not see the color you want, you can right-click one of the blank color boxes in the bottom two rows, which will open the Define Color dialog box (see Figure 8.9). From here, you can choose a particular color from the color palette. After you select a color and click the Add Color button, the color you right-clicked in the Custom tab will be replaced by the new color you defined. Additionally, the BackColor property will be set to this newly created color. Figure 8.9. The Define Color dialog box allows you to create a custom color. You can also choose a color by clicking on the Web tab. The Web tab lists a number of colors that you can select from. Finally, the System tab contains a list of Windows-specific color properties, such as ActiveCaption, Desktop, and WindowText. These names refer to various user-definable color settings in the Windows operating system. For example, the Desktop color is the background color of your Windows Desktop. If you choose to use one of these color names, the color displayed in the user's browser will depend on the color settings she has specified in Windows.
Let's go ahead and set the BackColor to Navy, which is a color listed in the Web tab. The Label Web control's ForeColor property indicates the foreground color of the text displayed. When the ForeColor property is selected, the same three-tabbed palette appears. For this, select the White color from the Web tab. At this point we've set three of the Label Web control's properties. We set the Text property to This is a test of the color properties, the BackColor to Navy, and the ForeColor to White. The designer should show the text "This is a test of the color properties" in a white foreground color with a navy background color, as shown in Figure 8.10. Figure 8.10. A Label with a white foreground and navy background is shown in the designer.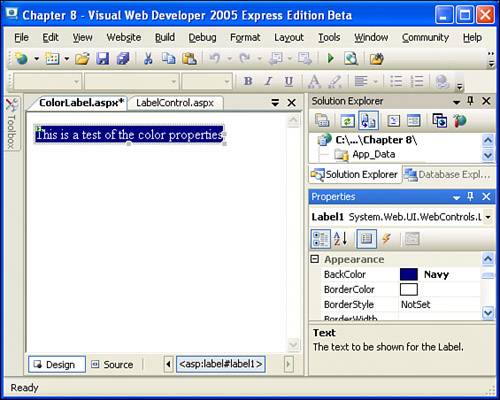 Now, take a moment to save the ASP.NET web page and view it through a browser. If you view the page through an uplevel browser, you will see the same output shown in the designerthe text "This is a test of the color properties" in a white foreground color with a navy background color. However, if you view the web page through a downlevel browser, such as Netscape version 4.0, you will see...nothing! Figure 8.11 shows Netscape 4.0 when visiting ColorLabel.aspx. Figure 8.11. When we view the web page through a downlevel browser, no text appears on the screen.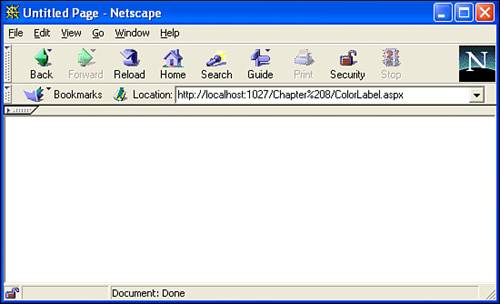 To understand why we don't see anything, let's look at the HTML markup received by Netscape 4.0 (or any downlevel browser). Listing 8.5 contains this HTML. Listing 8.5. The HTML Markup Received by a Downlevel Browser
As line 12 shows, the Label Web control's ForeColor property is rendered as a <font> tag with its color attribute set to White. But how is the BackColor property rendered? As you can see from Listing 8.5, it isn't; at least, it isn't for downlevel browsers. The reason is that without style sheets, the only way to give a background color to text is to place the text within an HTML <table> that has its bgcolor attribute set accordingly.
The short of it is that the BackColor of the Label Web control is not displayed in downlevel browsers. Keep this in mind when setting color properties for a Label Web control. Examining the Border PropertiesIn uplevel browsers, a border can be placed around the text displayed by a Label Web control. (In downlevel browsers, setting the border properties has no effect in the HTML markup rendered by the Label Web control.) Let's create an ASP.NET web page that displays a border around the text displayed by a Label Web control. Start by creating a new ASP.NET page titled BorderLabel.aspx. Drag and drop a Label Web control onto the page and set the Label's Text property to Testing the border properties. Next, click the Label Web control's BorderStyle property. This should open a drop-down list that contains various options for the style of border to be placed around the Label Web control. These options are enumerated in Table 8.2.
Go ahead and select the Solid option for the BorderStyle property. In the designer you will see a solid border appear around the edges of the Label Web control. At this point your screen should look similar to Figure 8.12. Figure 8.12. The Label Web control has a solid border.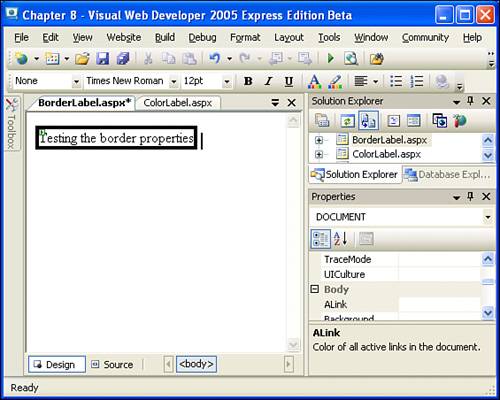 Note that the border displayed in Figure 8.12 is black. We can change the border's color via the BorderColor property. Selecting the color for the BorderColor property is identical to selecting a color for the BackColor or ForeColor properties. Go ahead and opt to have our Label Web control's BorderColor property set to Red, a color from the Web tab. In addition to the BorderStyle and BorderColor properties, there's a BorderWidth property as well. Go ahead and enter a value of 2 as the BorderWidth property, which will create a border 2 pixels wide. Figure 8.13 shows the Design view with these property values set. Your screen should look similar. Figure 8.13. The designer shows a Label Web control with a solid red border 2 pixels thick.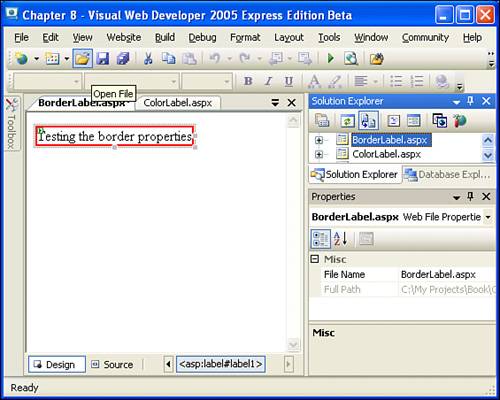 Take a moment now to view this ASP.NET web page through a browser. If you view the page using an uplevel browser, the text "Testing the border properties" will be displayed with a red, solid border 2 pixels thick, just like in the designer. If you are viewing the page with a downlevel browser, just the text "Testing the border properties" will be displayed, without a border around it. Delving into the Font PropertiesAs we saw earlier in this hour, the Label Web control has a Font property that contains a number of subproperties, such as Bold, Italic, Underline, Name, and others. We already examined how setting the Bold subproperty can make the text of a Label Web control appear in a bold font. To further our examination of the other Font property's subproperties, create a new ASP.NET page named LabelFont.aspx, and drag and drop a Label Web control onto the designer. Set this Web control's Text property to Working with the Font properties. Next, expand the Label Web control's Font property by clicking on the plus to the left of the Font property name. This will expand the Font property, listing the subproperties. (You can find a complete list of the Font property's subproperties in Table 8.1.) Let's set some of the Font property's subproperties. Start by setting the Italic subproperty to true, which should make the Label's text appear in an italic font in the designer. Next, under the Name property, choose the font name Arial. When selected, the Label Web control in the designer should be updated to show its text in the Arial font. Finally, set the Size subproperty to 22pt. This will cause the Label Web control's text in the designer to enlarge to a 22-point size. Figure 8.14 shows Visual Web Developer at this point. If you're following along, your screen should look similar. Figure 8.14. A Label Web control with some Font property subproperties set. As with the previous examples, take a moment to view the page through a web browser, examining the HTML markup sent to the browser. If you visit the page with an uplevel browser, the Label Web control's rendered HTML markup will specify its style settings via the style attribute. For example, with the Font property settings we used, the following HTML will be rendered by the Label Web control in an uplevel browser:
However, if you visit the web page in a downlevel browser, the HTML markup rendered by the Label Web control uses HTML tags to specify the style settings, as you can see here:
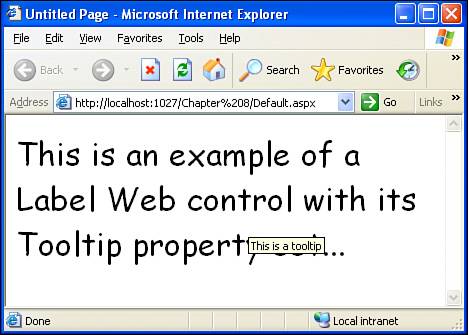
The Miscellaneous PropertiesThe remaining Label Web control properties can be grouped under miscellaneous properties. For example, there is a Tooltip property, which can be set to a string value. If you specify a Tooltip, whenever the user hovers his mouse pointer over the label's text in his browser, a floating light yellow box appears displaying the value of the Tooltip property. Figure 8.15 shows an ASP.NET web page that has its Tooltip property set to This is a tooltip. Figure 8.15. A tooltip is displayed when the mouse pointer hovers over the Label Web control. Two other miscellaneous Label Web control properties are Height and Width. These two properties can be set to specific values through the Properties window. We can also set these values by resizing the Label Web control in the designer. To resize a Web control, simply select the Web control by left-clicking it. This will cause three small, empty squares to appear around the Web controlone along the bottom, one in the bottom-right corner, and one on the far right. Then left-click one of the boxes and, while holding down the mouse button, move the mouse. After you have resized the Web control appropriately, release the mouse button. The Height and Width properties will be updated accordingly. The Visible property, a Boolean property, determines whether the Label Web control appears in the browser. If the Visible property is set to true (the default), the Label Web control's rendered HTML markup is sent to the browser. If, however, the Visible property is set to False, the Label Web control is not rendered, and therefore no HTML is sent to the browser for the Label Web control. You may be wondering why in the world anyone would ever want to use this property. If someone didn't want to display the Label Web control, why create it and set its Visible property to False rather than simply not adding the Label Web control to an ASP.NET web page? In the next few hours, when we examine using Web Forms to collect user input, we'll see scenarios in which we just might want to create a Label Web control and initially set its Visible property to False. For example, imagine that we have an ASP.NET web page that prompts the user for her username and password. If the user provides an incorrect username or password, we want to display an appropriate message. Therefore, we can place a Label Web control on the web page that has such a message and initially set its Visible property to False. Then, if the user enters an incorrect password, we can programmatically set the Label Web control's Visible property to true, thereby displaying the message.
|
EAN: 2147483647
Pages: 233