Completing the Photo Album Administration Pages
| In the preceding hour we completed the category administration page (PhotoAdmin/ManageCategories.aspx), from which users could manage the categories in their album. We still need to implement the PhotoAdmin/Default.aspx page, which enables users to upload new pictures and to manage existing ones. When we added support for managing categories, we first added a SqlDataSource control that returned all of the currently logged-on user's categories. The user's particular categories were selectable through the UserId column in the Categories table. To determine the currently logged-on user's UserId value in the SqlDataSource SELECT statement, we added the UserIdValue Label to the page and, in the Page_Load event handler, assigned its Text property accordingly. Like categories, pictures are also user-specific. Therefore, let's start by adding a SqlDataSource control to the PhotoAdmin/Default.aspx page. This SqlDataSource will retrieve the columns from the Pictures table whose UserId column value matches the UserId of the currently logged-on user. To complete this, perform the following steps:
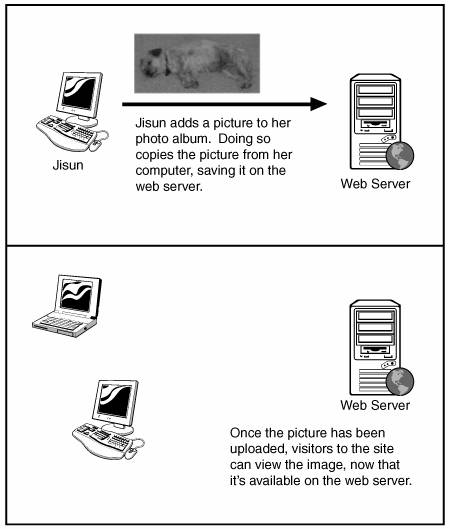
Remember that when we're using uniqueidentifier column types through the SqlDataSource wizard, it's imperative that we manually edit the control's parameters. Specifically, we need to go to the Source view and remove the Type="Object" properties from the parameters for the picturesDataSource SqlDataSource, just like we did in the previous hour for the categoriesDataSource SqlDataSource. With the picturesDataSource SqlDataSource configuration complete, we're ready to implement the functionality for adding new pictures and managing existing ones. Adding New Images to the Photo AlbumFor our application, users can add to their album only photos that exist on their computer. When users go to their photo album administration page and choose to add a new picture, they need to be prompted to select an image from their computer along with the image's title, description, and category. After they have selected an image; provided the title, description, and category; and clicked the Insert button, the image file's contents need to be uploaded to the web server where a copy of the image file will be saved. In addition, a new record will be added to the Pictures table with the title, description, and category values the users entered. With the image file saved on the web server's file system, anyone who can access the web server can view the image. Figure 24.1 illustrates this concept. Keep in mind that the uploaded image file is saved on the web server's file system, in a particular folder in the website's location on disk. Some photo album implementations opt to store the actual binary contents of the uploaded file in the database itself. Our application, however, will use the file system instead. Figure 24.1. When users add an image to a photo album, the image file is uploaded to the web server.
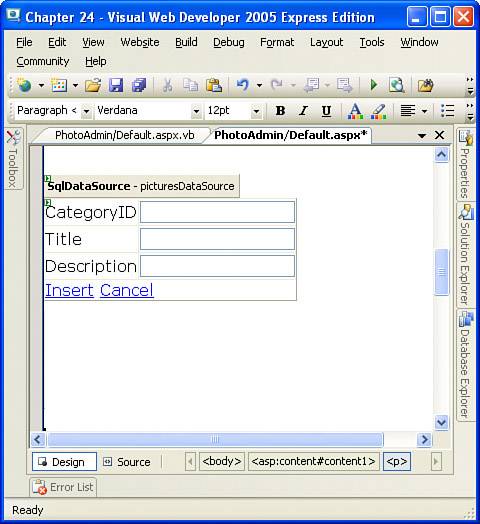
After the user selects a file from his computer; enters the picture's title, description, and category; and clicks the Insert button, the ASP.NET page must perform two distinct steps:
For reasons we'll see shortly, these two steps must be performed in this order. Furthermore, these two steps can be examined and implemented independently. In the next section, we'll create the inserting interface. Later, in the "Uploading and Saving the Image File" section, we'll see how to augment the inserting interface to enable users to pick a file from their computer and how to save the uploaded image to the web server's file system. Inserting the Picture Information in the DatabaseBefore we concern ourselves with the details of uploading and saving an image file from a user's computer, let's first build the interface for adding a new picture without worrying about the uploading requirements. To accomplish this, we'll use a DetailsView whose DefaultMode is set to Insert, just like with the interface for adding new categories explored in the preceding hour. Start by adding a DetailsView control to the page, setting its ID property to dvPictureInsert and selecting the picturesDataSource control from the drop-down list in the DetailsView's smart tag. Next, set the DefaultMode property to Insert so that the DetailsView control is perpetually in insert mode. At this point the DetailsView should show five fields: UserId, CategoryID, Title, Description, and UpdatedOn. Because the purpose of the UpdatedOn column in the Pictures database table is to capture the date and time the picture was uploaded, we don't want to let the user enter this value; rather, we want this value to be set to the current date and time when the user clicks the Insert button. To accomplish this, we'll set the UpdatedOn value programmatically, in the DetailsView's ItemInserting event handler. Therefore, go to the smart tag, click on Edit Fields, and remove the UpdatedOn BoundField. Also remove the UserId BoundField because we don't want to let the user enter a UserId here; rather, we'll programmatically set this value to the currently logged-on user's UserId value, just like we did in the preceding hour when adding a new category. At this point your screen should look similar to Figure 24.2. The categories that GridView added to this page in the preceding hour appear above the DetailsView. Figure 24.2. New pictures can be added through this DetailsView control. When the user visits this page and enters the title, a description, and a category ID and clicks Insert, a postback will ensue and the DetailsView will work with its SqlDataSource control to attempt to insert a new record into the Pictures table. However, we need to programmatically provide two bits of information to have this interaction work successfully: the currently logged-on user's UserId value and the current date and time, for the UpdatedOn value. As we saw in the preceding hour, the DetailsView's ItemInserting event fires before the actual INSERT statement is issued to the database. This event provides an opportunity for programmatically assigning the values to be inserted. Go to the ASP.NET page's source code portion and create an event handler for the dvPictureInsert DetailsView's ItemInserting event. Then add the following two lines of code: e.Values("UserId") = Membership.GetUser().ProviderUserKey e.Values("UploadedOn") = DateTime.Now The first line of code sets the value being inserted into the UserId column to the currently logged-on user's UserId. The second line of code sets the value being inserted into the UploadedOn column to the current date and time. With this code in place, you can visit PhotoAdmin/Default.aspx through a browser and add new records to the Pictures table. This interface, while working, leaves a lot to be desired. For starters, it doesn't allow the user to upload the associated picture. Rather, it just adds a new record to the Pictures database table. Another poor usability point is that if the user wants to associate a picture with a category, she must know the CategoryID value of the category. Finally, because there are no validation controls, if the user forgets or omits the title or description values, an exception will be raised since these columns do not accept Null values. We will address all of these woes over the next few sections. Displaying a Drop-Down List of CategoriesBy default, the CategoryID BoundField, when in insert mode, is displayed as a TextBox. This requires that the user enter the appropriate CategoryID value, which assumes that the user somehow knows the IDs of his categories. Clearly, a better alternative would be to present the user with a drop-down list of his categories. As we've seen in previous hours, customizing the inserting interface of the DetailsView involves turning a BoundField into a TemplateField. Take a moment now to convert the CategoryID BoundField into a TemplateField through the Fields dialog box. Next, from the DetailsView's smart tag, select Edit Templates and then select the CategoryID field's InsertItemTemplate. At this point the CategoryID field's InsertItemTemplate contains a TextBox. Delete this TextBox and, instead, drag in a DropDownList control, settings its ID property to pictureCategory. The pictureCategory DropDownList needs to show those categories particular to the currently logged-on user. In the preceding hour we saw how to accomplish this in creating the categoriesDataSource SqlDataSource control. To replicate this functionality in PhotoAdmin/Default.aspx, add a SqlDataSource to the page, placing it before the dvPictureInsert DetailsView control. Next, configure it to return the CategoryID and Name columns from the Categories table for the currently logged-on user. Recall that this is accomplished by adding a WHERE clause using the UserIdValue Label control value. (For the categoriesDataSource control on this page, you do not need to generate the INSERT, UPDATE, and DELETE statements.) Bind the pictureCategory DropDownList to this SqlDataSource control, having the DropDownList's text display the Name column and the value of the CategoryID column (see Figure 24.3). Figure 24.3. Choose the categoriesDataSource control as the DropDownList's data source.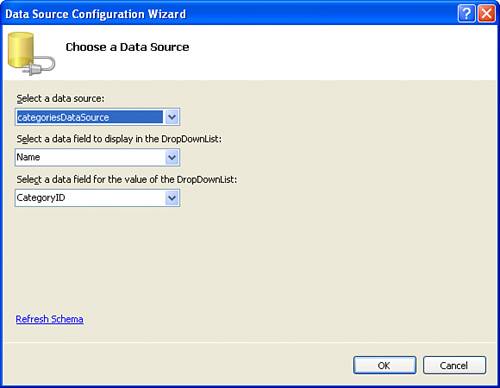 With the pictureCategory DropDownList's data source configured, the user will see all of his categories listed here. To have the user's category selection saved upon clicking the Insert button, we need to configure the data bindings. Specifically, we must instruct the DetailsView to use the DropDownList's SelectedValue property for the CategoryID of the newly inserted record. We accomplish this by selecting the Edit DataBindings link from the DropDownList's smart tag and binding the SelectedValue property to the CategoryID field using two-way data binding, as shown in Figure 24.4. Figure 24.4. The DropDownList's SelectedValue indicates the picture's CategoryID value.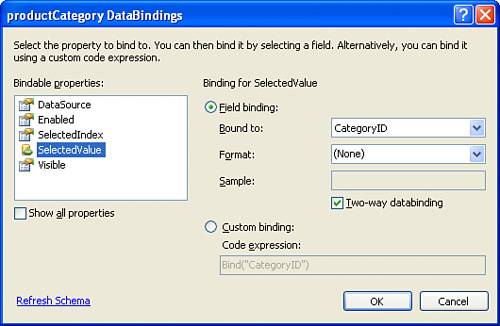
Take a moment to view this page in your browser. When you visit this page, you should see the currently logged-on user's categories in the drop-down list. Adding a -- None -- Item to the Drop-Down ListOne of the design requirements for the photo album application is that a user can optionally select a category for a picture. That is, a user should be able to add a new category that does not belong to any category. (Such pictures will have a Null value in their CategoryID column.) Currently, the pictureCategory DropDownList shows the user's existing categories, requiring that the user select one of them. But what if there are no categories for the user? Even if there are categories, how can a user select that the uploaded picture should not have a category assigned? What we need is an additional item in the drop-down list, one that appears at the top and is labeled -- None --. With this additional drop-down list item, there will always be at least one item in the drop-down list, even if the user hasn't created any categories. Furthermore, the user can select this -- None -- option to indicate that the uploaded picture does not have a category associated with it. As we discussed in Hour 11, "Collecting Input Using Drop-Down Lists, Radio Buttons, and Check Boxes," a DropDownList's items can be specified through the Items property statically or dynamically. Currently, the values are specified dynamically, by associating the DropDownList with a SqlDataSource control. However, we can have the items specified both statically and dynamically. We'll leave the DropDownList associated with a SqlDataSource but add an additional -- None -- option by statically specifying it through the Items property. Go to the pictureCategory DropDownList's Items property and click on the ellipses to bring up the ListItem Collection Editor dialog box. From here, add a new item, setting its Text property to -- None --, and click OK (see Figure 24.5). Figure 24.5. Add a "-- None --" option to the DropDownList's Items collection. Regardless of what we set the Value property to, we need to go to the Source view and locate the ListItem instance just added in the declarative markup, which will look something like this: <asp:DropDownList runat="server" DataSource DataTextField="Name" DataValueField="CategoryID" SelectedValue='<%# Bind("CategoryID") %>'> <asp:ListItem Selected="True" Value="value">-- None --</asp:ListItem> </asp:DropDownList> Here, the value in the <asp:ListItem> tag will depend on what value you entered in the ListItem Collection Editor dialog box; if you cleared out this property, the <asp:ListItem> tag will not have the Value property specified: <asp:ListItem Selected="True">-- None --</asp:ListItem>. Regardless, you need to modify this <asp:ListItem> tag explicitly, setting the Value to the empty string, like so: <asp:ListItem Selected="True" Value="">-- None --</asp:ListItem>
The last step is to set the DropDownList's AppendDataBoundItems property to true. By default, when a DropDownList is bound to a datasource control, the DropDownList's existing items are cleared out and then the data binding takes place. This, however, would clear out the -- None -- option added in Figure 24.5. To keep the -- None -- option (or whatever ListItems have been added prior to data binding), simply set the AppendDataBoundItems property to true. Ensuring That the User Enters a Title and DescriptionBecause the Pictures table does not allow Nulls for the Title or Description columns, if the user fails to provide a value for either of these inputs in the DetailsView, an exception will occur. To overcome this problem, we need to customize the inserting interface for these two fields, adding RequiredFieldValidator controls. We performed this exact same process in the preceding hour to ensure that the user provided a name when adding a new category. As in the preceding hour, to accomplish this, first convert the Title and Description BoundFields into TemplateFields. Then choose Edit Templates from the DetailsView's smart tag and configure the two TemplateFields' InsertItemTemplate sections. Specifically, add a RequiredFieldValidator, setting its ControlToValidate, Display, ErrorMessage, and ValidationGroup properties appropriately. After adding and configuring these RequiredFieldValidators, be sure to set the ValidationGroup property of the DetailsView's New, Insert, Cancel CommandField to the same value as the two RequiredFieldValidators' ValidationGroup values. (I used PictureAdd.)
At this point we have a completely functional interface for adding new records to the Pictures table. Granted, no actual image file is being uploaded to the web server, but entering a title, description, and category and clicking the Insert button would cause a postback and result in a new record being added to the table. Take a moment to try this out. After you add some new pictures, return to Visual Web Developer and view the contents of the Pictures table. You should see a row for each picture added. When we get the uploading feature working, you're encouraged to delete these test records because no uploaded picture is associated with them. For now, though, don't worry about these junk records; just focus on testing and trying out the user interface. Uploading and Saving the Image FileFor adding new pictures, all that remains is providing the ability for the users to select an image from their computer and have it uploaded and saved to the web server's file system. Uploading an image from a user's computer to the web server's file system is relatively easy thanks to the FileUpload ASP.NET Web control. When a user visits a page with a FileUpload control, she sees a text box and a Browse button. Clicking the Browse button opens a dialog box that prompts the user to choose a file on her computer (see Figure 24.6). Figure 24.6. The FileUpload control, when viewed through a browser.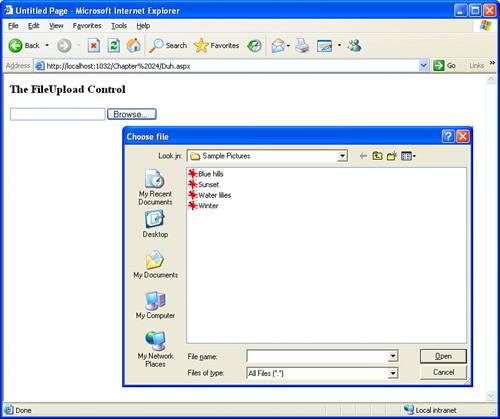 After the user has selected a file and submitted the form, the actual contents of the file are sent to the web server. From the ASP.NET page's code portion, we can save the contents of the uploaded file to a folder on the web server. Let's start by adding a new TemplateField to the DetailsView, one that contains a FileUpload control. To accomplish that, perform the following steps:
With this addition, the DetailsView's inserting interface now includes a new row from which the user can pick the image file from his computer that he wants to add to his album. While the FileUpload control automatically uploads the selected file from the user's computer to the web server, we need to write code to save the uploaded file. When we want to save user-uploaded content on a web server, a common challenge facing developers is how to name the uploaded files. Although the FileUpload control's FileName property indicates the name of the image uploaded by the user, if we use this filename, there is a chance for naming conflicts. For example, if Jisun uploads a picture named MyDog.jpg, and we save it on the web server as MyDog.jpg, what happens if, sometime later, Sam uploads a picture called MyDog.jpg? The solution to this problem is to ensure that each uploaded image has a unique filename. We can guarantee this by saving the uploaded image with the filename PictureID.jpg, where PictureID is the PictureID column value of the corresponding record in the Pictures table. Because the PictureID column is a primary key, it's guaranteed to be unique; therefore, we can be certain that each uploaded image will have a unique filename. This presents a sticky challenge: How do we determine what the PictureID will be for the uploaded image's corresponding record in the Pictures table? We need to wait until after the record has been added to the Pictures table before we save the uploaded image file because we won't know the PictureID value until after the record's been added to the table. The DetailsView's ItemInserted event fires after the record has been added to the database table. In this event handler we can query the database to determine the most recent PictureID value for the currently logged-in user and then save the uploaded file using this filename. Figure 24.7 illustrates this workflow. Figure 24.7. A new record is added to the Pictures table, after which the uploaded image is saved.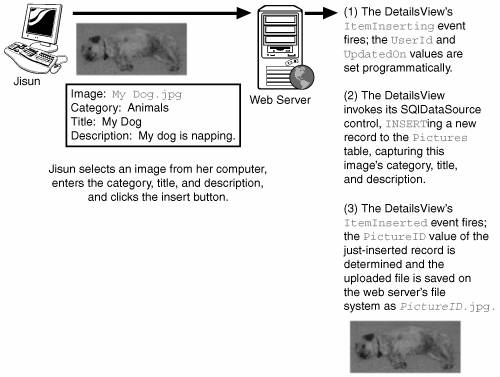 To determine the filename to use to save the uploaded image, we need to determine the PictureID value of the just-inserted record. We can accomplish this by grabbing the maximum PictureID value of the currently logged-in user. This logic works because the PictureID column is an Auto-increment column, meaning that each new record added to this table has a PictureID value greater than the preceding row. Because the currently logged-in user has just added a new row to the Pictures table, we can grab that PictureID value by simply getting the maximum PictureID for that user. To accomplish this, we need to add yet another SqlDataSource control to the page. Set this SqlDataSource control's ID to maxPictureIDDataSource and start the control's Select Data Source Wizard. When you reach the Configure the Select Statement screen, select the Specify a Custom SQL Statement or Stored Procedure radio button and click Next. Then, in the SELECT tab, enter the following query: SELECT MAX(PictureID) FROM Pictures WHERE UserId = @UserId This will return the maximum PictureID value from the Pictures table for the user specified by the @UserId parameter. After you enter this query, click Next. Here, we are asked to provide the value for the @UserId parameter (see Figure 24.8). As we did with the categoriesDataSource and picturesDataSource SqlDataSource controls, select Control as the parameter source and then choose the UserIdValue Label from the ControlID drop-down list. (Recall that the UserIdValue Label's Text property is assigned the currently logged-on user's UserId value.) Figure 24.8. Assign the @UserId parameter's value to the Text property of the UserIdValue Label.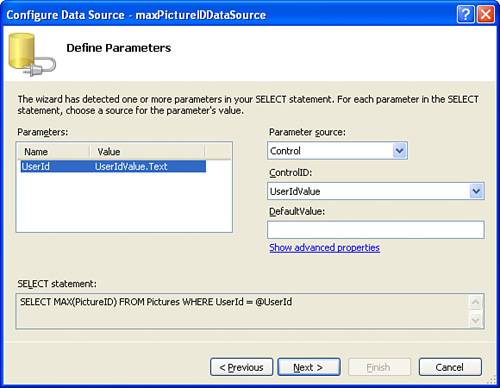 With this SqlDataSource complete, we can query it programmatically from the DetailsView's ItemInserted event handler. When we have the PictureID value, we can save the uploaded image using the FileUpload control's SaveAs(path) method. Listing 24.1 contains the complete code for the ItemInserted event handler.
Listing 24.1. The Uploaded File Is Saved in the ItemInserted Event Handler
The event handler begins on line 3 by checking the AffectedRows property of the DetailsViewInsertedEventArgs object passed into the event handler. This property indicates how many rows were affected by the insert. There may have been some error in inserting, in which case we do not want to save the uploaded file. Assuming there's at least one affected row, the next step is to determine the PictureID value of the just-inserted record. This logic is handled by the maxPictureIDDataSource SqlDataSource; we just need to invoke the SELECT statement and retrieve the value. We accomplish this by calling the SqlDataSource control's Select() method, as shown on line 5. This method returns a DataView, which is an object that contains the data returned by the SELECT query. You can find the value of a particular row and column of the returned data using the syntax DataViewVariable(rowIndex)(columnIndex), where both rowIndex and columnIndex are indexed starting at zero. This returned DataView object is assigned to the results variable. The actual PictureID value resides in the first column returned by the first row. This is accessed on line 7 by retrieving the value of results(0)(0) and casting it to an Integer. After the PictureID value has been determined, we're ready to save the uploaded file. We start by grabbing a programmatic reference to the FileUpload control (line 10). Next, we check to ensure that the user picked a file to upload by checking the FileUpload control's HasFile property. If a file has been uploaded, we need to determine the path where we want to save the file. We first need to determine in which folder to save the file. For our site let's save all user-uploaded picture files to the UploadedImages folder. (Take a moment to add this folder to your project.) To determine the path to a folder on the website, use the Server.MapPath(folderInSite) method, as shown on line 13. This method takes a virtual path, like ~/UploadedImages/, and returns its corresponding physical path, like C:\My Documents\My Websites\PhotoAlbum\UploadedImages\. To save the uploaded image, we need to work in terms of a physical path. We then concatenate the baseDirectory value, the newly inserted PictureID value, and the .jpg extension and save the uploaded file to the resulting, concatenated path using the FileUpload control's SaveAs() method (line 15).
With this code in place, a user can now upload an image from her computer to the web server. Take a moment to test the page through a browser (see Figure 24.9). You should be able to select a file, choose a category, and enter a title and description. Clicking the Insert button causes a postback, during which a new record is added to the Pictures table and the uploaded image is saved to the UploadedImages folder in the website. Note that the filename of the uploaded image is equal to the PictureID value of the image's corresponding Pictures record. For example, the row added to the Pictures table for the image uploaded in Figure 24.9 happened to have a PictureID value of 7. Therefore, the uploaded image was saved in the UploadedImages folder with the filename 7.jpg. Figure 24.9. The user can select a picture from her computer to add to her album.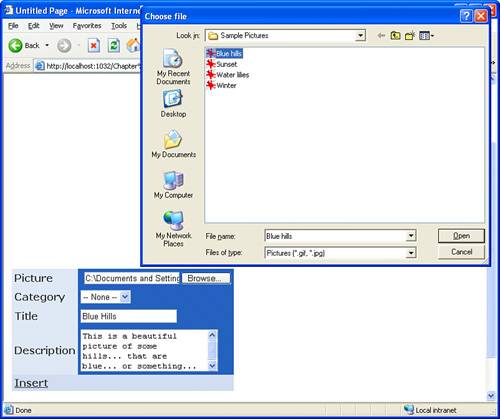 Ensuring That Only Image Files Are UploadedCurrently, the photo album application doesn't ensure that the user has chosen a file to upload, nor does it require that the image uploaded be a JPEG image file. (That is, the user could upload a text file.) Let's examine how to both require that the user select a file to upload and that the file has the .jpg extension. To ensure that the user has selected a file in the FileUpload control, we just need to add a RequiredFieldValidator to the Picture TemplateField, configuring its properties appropriately. As with the other RequiredFieldValidators added to the DetailsView's TemplateFields, be sure to set its ValidationGroup property to the same value as the others. With the RequiredFieldValidator, we can ensure that the user has uploaded some file, but how can we guarantee that he uploads a JPEG image, and not some other type of file? Ideally, when the user clicks the Browse button, the file dialog box will list only files with the .jpg extension; however, the FileUpload control cannot be configured in this manner. Rather, we have to wait until after the image is uploaded to determine its file extension. Our test for determining whether a file is a JPEG image is a simple one: We simply check the file's extension. If the file's extension is .jpg, we assume that it's a valid JPEG image. If it does not have this extension, we assume that it's not a valid JPEG image.
This check should be handled before a new row is added to the Pictures table. If the image uploaded is not an image file, we want to cancel the insert statement. Update the DetailsView's ItemInserting event handler so that it looks like the code in Listing 24.2. Listing 24.2. If an Invalid File Type Is Uploaded, the Insert Is Canceled
The ItemInserting event handler starts on line 4 with the creation of a local variable named cancelInsert. This variable indicates whether the insertion should be canceled. Initially, it is set to False, but checks from lines 917 might cause it to be set to true. On line 7 the FileUpload control is programmatically referenced (just like we did on line 10 in Listing 24.1), and the HasFile property is checked to ensure that a file has been uploaded. If there is no file, the cancelInsert variable is set to true. If, however, a file has been uploaded, we proceed to check its extension (lines 1416). The file extension check is performed with help from the EndsWith() method, which has the following form: someString.EndsWith(substring) EndsWith() returns true if the string someString ends with the passed-in substring, and returns False otherwise. Before calling the EndWith() method, the filename is capitalized by calling the ToUpper() method. This capitalization is performed because string comparisons are case sensitive. To skirt this issue, we simply capitalize the filename and then see whether it ends with the capitalized string ".JPG" (line 14). If the extension of the uploaded file doesn't equal .JPG, cancelInsert is set to true. If cancelInsert is TRue by the time line 19 is reached, the insertion is canceled by setting the Cancel property of the passed-in DetailsViewInsertEventArgs object (e) to true (line 21). If the insert fails, we need to alert the user that his attempted upload failed because the file uploaded was not considered a valid image file. In the HTML portion of the ASP.NET page, I've added a Label control with the ID cannotUploadImageMessage with a Text property value explaining the problem. Therefore, if the insertion fails, the Visible property of this Label control is set to TRue so that the informational message is displayed (line 22). Lines 2630 contain the code that programmatically sets the values of the UserId and UploadedOn values. Recall that we examined these lines of code earlier in this hour. With this new code in place, if the user attempts to upload a file with an invalid file extension, the insert will cancel and he will see a message explaining the problem (see Figure 24.10). Canceling the insert prevents a new row from being added to the Pictures table and prevents the uploaded file from being saved to the web server's file system. Figure 24.10. The user has attempted to upload a text file.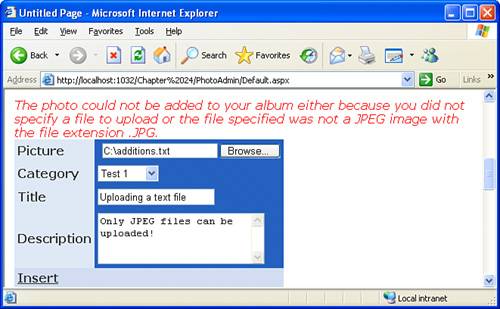 Viewing, Editing, and Deleting Existing PicturesWith the functionality to add new pictures and save the uploaded image complete, the last step for the photo album administration page is adding the GridView that allows the user to view, edit, and delete her existing pictures. To list the pictures, we'll use a GridView, much like we did in the preceding hour in the "Viewing, Editing, and Deleting Categories" section. Start by adding a GridView after the dvPictureInsert DetailsView control. Associate the GridView control with the picturesDataSource SqlDataSource; set its ID property to gvPictures; and check the Enable Paging, Enable Sorting, Enable Editing, and Enable Deleting check boxes. Take a moment to clean up the GridView's fields, removing the superfluous ones and formatting the remaining ones. From the GridView's smart tag, click the Edit Columns link to bring up the Fields dialog box and remove the PictureID and UserId BoundFields. Next, set the CategoryID field's HeaderText property to Category and the UploadedOn BoundField's HeaderText property to Date Added. Take a moment to test the page in a browser and attempt to edit an existing picture. Clicking the Edit link successfully displays the row in edit mode. However, if you try to save the values, the exception "Cannot insert the value NULL into column 'UserId'" is thrown. The reason is that the UPDATE statement issued by the GridView's underlying SqlDataSource control is expecting this value to be provided. This same challenge faced us when working with the categories GridView in the preceding hour. Recall that we fixed this problem by programmatically assigning this value in the GridView's RowUpdating event handler. We can reapply this logic here. Create the RowUpdating event handler for the gvPictures GridView and add the following line of code: e.NewValues("UserId") = Membership.GetUser().ProviderUserKey With this event handler in place, changes to an existing picture can successfully be saved back to the database. As we've done with the previous DetailsViews and GridView controls on this page, the next step is to convert the remaining BoundFields into TemplateFields to customize their editing interface. The Title and Description fields will need to be enhanced to include RequiredFieldValidators, while the CategoryID field should use a DropDownList just like was done in the dvPictureInsert DetailsView control. The UpdatedOn field needs to be made read-only because a user shouldn't be able to change it when she uploads a particular file. In addition to turning the existing BoundFields into customized TemplateFields, we need to add a field that will show the actual picture. The next several sections examine how to accomplish these tasks. Displaying a Drop-Down List of Categories with a -- None -- OptionEarlier in this hour, when implementing the interface for adding a picture, we saw how to display a drop-down list of the user's created categories to aid with choosing the category in which to place the new picture. In the GridView that displays the existing pictures, we want to use the same concept both when viewing the pictures in read-only mode and when editing a particular picture. The only difference between the read-only DropDownList control and the edit mode DropDownList control is that when a record is in read-only mode, the DropDownList's Enabled property will be set to False. To accomplish this, we need to first convert the CategoryID BoundField into a TemplateField. Next, we need to replace the Label and TextBox controls in the ItemTemplate and EditItemTemplates with DropDownLists. In the ItemTemplate, set the DropDownList's ID property to pictureReadOnlyCategories and Enabled to False; in the EditItemTemplate, set the DropDownList's ID value to pictureEditCategories. Both DropDownLists will use the same datasource controlcategoriesDataSource, which returns the currently logged-on user's categoriesdisplaying the Name and CategoryID column values as the DropDownLists' text and value properties. Plus, both need to have their SelectedValue property bound to the CategoryID value using two-way data binding. To add the -- None -- option to the DropDownList controls, set the AppendDataBoundItems properties to TRue and then add a new ListItem through the ListItem Collection Editor dialog box. After adding the new ListItem, don't forget to go to the Source view and explicitly add Value="" to the <asp:ListItem> tags for the two DropDownLists. After you make these changes, take a moment to test the functionality in a browser. As Figure 24.11 shows, the list of pictures for the currently logged-on user is displayed with a disabled DropDownList for the read-only records. For the record being edited, the user can change the picture's category. Saving changes to a picture will work as long as you provide a value for the picture's title and description and use a valid date/time value for the UpdatedOn field. Figure 24.11. Each picture's category is shown as a drop-down list.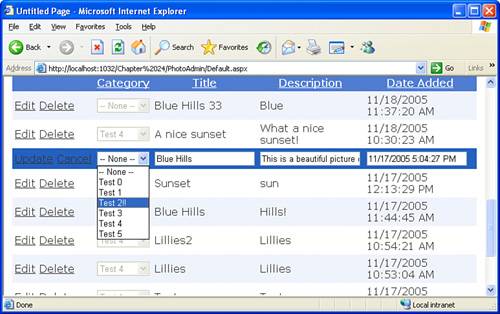 Ensuring that the User Enters the Title and DescriptionBecause the Title and Description columns in the Pictures table do not allow Nulls, the user must provide values when editing a picture. To ensure that the user provides a value, we need to customize the editing interface for these two fields and include a RequiredFieldValidator, just like we did in the dvPictureInsert DetailsView control earlier in this hour. Because we've discussed the process of adding RequiredFieldValidators in both this hour and the preceding one, I don't need to spell out the precise steps for adding the RequiredFieldValidator controls. Just be certain to assign the ValidationGroup properties of both controls to some value (I chose PictureEdit). Whatever ValidationGroup value you choose, be sure to also set the GridView's CommandField's ValidationGroup property to the same value.
Making the UpdatedOn Field Read-OnlyThe GridView's UpdatedOn BoundField displays the date and time the picture was uploaded. Because the UpdatedOn field is a BoundField, when a GridView row is made editable, the UpdatedOn field will display a text box, allowing the user to edit the UpdatedOn value. However, we want to prevent the user from updating this value; after the photo has been uploaded, this value should never be changed. To make this field uneditable, we need to convert the UpdatedOn BoundField into a TemplateField and replace the TextBox control in the EditItemTemplate with a Label control whose Text property is bound to the UpdatedOn column value using two-way data binding. To accomplish this, perform the following steps:
After you complete these steps, test this page in a browser. When you click the Edit button for a row, the editable row's UploadedOn field should display the value as text rather than as a text box. Showing the Associated ImageThe gvPictures GridView lists the contents of the Pictures database table, allowing the user to manage the pictures in his album. While this functionality is sufficient, it would be nice to display a thumbnail image of the actual picture along with each GridView row (see Figure 24.13). This can be accomplished using an ImageField. As we discussed in Hour 18, "Exploring Data Binding and Other Data-Related Topics," the ImageField displays an image whose URL is based, in part or in total, on one of the database columns bound to the GridView or DetailsView. We accomplish this by setting the following two properties:
To see how these two properties work together, add an ImageField to the gvPictures GridView and set the DataImageUrlField property to PictureID and the DataImageUrlFormatString property to ~/UploadedImages/{0}.jpg (see Figure 24.12). Figure 24.12. Add an ImageField to the GridView and set its properties. The ImageField will display an image for each row in the GridView. The image URL for a particular row will be ~/UploadedImages/ PictureID.jpg, which is the location and filename where the uploaded file was saved. For example, in Figure 24.13 the first recordA nice sunsethas a PictureID value of 11; therefore, the ImageField renders the following markup: <img src="/books/2/971/1/html/2/../UploadedImages/11.jpg" /> Figure 24.13. Add an ImageField to the GridView and set its properties.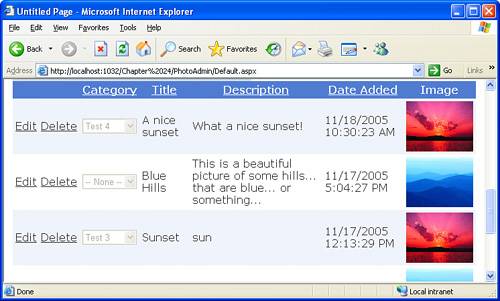 The URL of the image is 11.jpg. When I uploaded this particular picture to the website, it was saved in the UploadedImages directory as 11.jpg. Like the BoundField, by default an editable GridView's ImageField field is rendered as a TextBox for the editable row, displaying the value of the DataImageUrlField in the TextBox control. To prevent this, set the ImageField's ReadOnly property to true.
Deleting PicturesThe GridView contains a Delete button, and clicking it causes the corresponding record in the Pictures table to be deleted. It does not, however, cause the actual image file to be deleted from the web server's file system. When a user clicks the Delete button, a postback ensues, the underlying record is deleted, and the GridView's RowDeleted event fires. To delete the associated image file, we can create an event handler for the GridView's RowDeleted event and add code there that performs the file deletion.
After you add the RowDeleted event handler, add the following three lines of code: Dim baseDirectory As String = Server.MapPath("~/UploadedImages/") Dim fileName As String = baseDirectory & e.Keys("PictureID") & ".jpg" File.Delete(fileName) The first line gets the physical path to the UploadedImages folder and is identical to line 13 in Listing 24.1. The second line creates the full name of the file to be deleted by concatenating baseDirectory together with the PictureID value for the deleted row and the .jpg extension. In the third line, the file is deleted by calling File.Delete(fileName). The Complete Source Code PortionWe've at long last finished the photo album administration piece! Congratulations! Listing 24.3 contains the entire source code portion of the PhotoAdmin/Default.aspx page. Listing 24.3. The Complete Source Code Portion of the PhotoAdmin/Default.aspx Page
|

EAN: 2147483647
Pages: 233