Examining the HTML Markup Portion of an ASP.NET Web Page
| As we discussed in the preceding hour, there are some fundamental differences between static web pages and dynamic web pages, the most profound one being that dynamic web pages contain a mix of HTML markup and server-side source code. Whenever a dynamic web page is requested, its source code is executed, generating HTML. This dynamically generated HTML is then sent back to the requesting client. In this section, we are going to look at the HTML markup portion of a dynamic web page. In the next section, "Examining the Source Code Portion of an ASP.NET Web Page," we'll look at one of the more interesting parts of dynamic web pagesthe source code. Before we begin our examination of the HTML portion of an ASP.NET page, it is important to have an understanding of what HTML is, its syntactical rules, and how it is rendered in a web browser. This topic is tackled in the next section, "A Brief HTML Primer." If you are already well versed in HTML syntax, feel free to skip ahead to the "Creating the HTML Portion of an ASP.NET Web Page Using Visual Web Developer" section. A Brief HTML PrimerHTML, as you may already know, specifies how data should be displayed in a web browser. For example, to have a web browser display a message in bold, you could use the following HTML: <b>This will be in bold.</b> HTML is composed of elements that specify how the data should be rendered in a web browser. An element is composed of a beginning tag and an optional ending tag, like <elementName>... some content ...</elementName> Here, <elementName> is referred to as the start tag and </elementName> is referred to as the end tag. The semantics of an HTML element apply formatting to the content between the start and end tags; the formatting applied depends on the element name. As we saw earlier, text is made bold by placing it between <b> and </b> tags. (The <b> element specifies that the content it contains be made bold.)
Not all HTML elements have a start and closing tag. For example, the <br> element, which specifies a line break, does not have a closing tag. Nor does the <hr> element, which displays a horizontal line. Similarly, you can use the paragraph element (<p>) without a closing tag like so: This is one paragraph. <p> And this is another. <p> And yet another. However, you can use starting and closing paragraph tags like so: <p>This is one paragraph.</p> <p>And this is another.</p> <p>And yet another.</p>
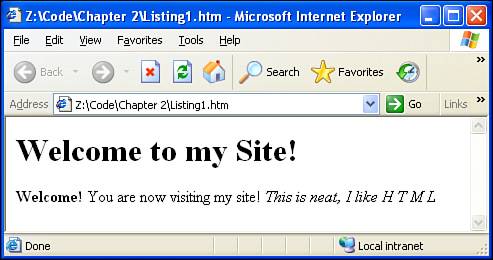
Extraneous WhitespaceWhen a web browser renders HTML from a website, the whitespace in the markupcarriage returns, tabs, spaces, and so forthdo not affect the whitespace displayed in the browser. For example, consider the HTML shown in Listing 2.1, which contains several carriage returns, tabs, and extraneous spaces. Listing 2.1. A Snippet of HTML with Extraneous Whitespace
The HTML markup, when viewed through a browser, will compress the whitespace, as shown in Figure 2.1. Notice that any extra whitespace is reduced down to a single space. For example, each carriage return between the H, T, M, and L letters in the markup is rendered as a single space between each of the letters in the browser. On line 5, the multiple spaces and tabs between "You are" and "now visiting my site!" are compressed down into one space in Figure 2.1. Figure 2.1. Extra whitespace in the HTML is ignored by browsers. Finally, note that some elements are rendered on a new line, whereas others follow after one another. For example, the content of the <h1> element appears on a separate line from the content of the <p> element. The <b> and <i> elements, however, have their content flow together on the same line. HTML elements can be displayed in one of two ways: as inline elements or block elements. Inline elements do not introduce a carriage return after the closing tag, whereas block elements do. As you can probably guess from the rendered output in Figure 2.1, <h1> is a block element, while <b> and <i> are inline elements. (Although it might not be clear from the example, <p> is a block element.)
With extraneous whitespace compressed by the browser, a natural question at this point is, "How do I position HTML elements?" That is, if no number of carriage returns or spaces affects the positioning of an HTML element, how do you create a web page where content appears to the right of other content or is indented? HTML elements contain various style attributes that you can use to specify formatting information, such as padding, margins, positioning, and how the content flows relative to other content in the page. These topics are a bit beyond the scope of this book, but we will examine some techniques to position elements throughout this book. Additionally, Visual Web Developer can help in laying out elements, as we'll see next hour. Nested TagsHTML tags can be nested, meaning that one set of HTML tags can appear within another. For example, if you wanted to have a web page display a message in both italics and bold, you would use both the <i> and <b> tags like so: <i><b>This is both italic and bold</b>, whereas this is just italic</i> In this example, the <b> tag is said to be inside the <i> tag. (Throughout this book I will also refer to nested tags as one tag being contained within the other, or enclosed within.) The semantics of nested tags are fairly straightforward. In our example, the <i> tag indicates that everything within it should be formatted using italics. Next, the <b> tag indicates that everything within it should be bold. Therefore, the text "This is both italic and bold" will be formatted using both bold and italics, while ", whereas this is just italic" will appear in italics. There's no reason why the <b> tag must be inside the <i> tag and not the other way around. That is, you could also do <b><i>This is both italic and bold</i>, whereas this is just bold</b> The preceding two examples show how to use properly nested tags. Note that in our last example, the <i> tag that is contained within the <b> tag has both its starting and closing tag (<i> and </i>) before the closing <b> tag (</b>). An improperly nested tag is one whose start tag is contained within a tag, but its closing tag is not. The following HTML is an example of an improperly nested tag: <i><b>This is both italic and bold</i>, but this is just bold</b> Notice that the <b> tag's starting tag is contained within the <i> tag, but the <b> tag's closing tag is not. Therefore, the <b> tag is improperly nested.
Case SensitivityHTML tag names are not case sensitive; that is, the casing of the tag names is irrelevant. For example, a bold tag can be specified using <b> or <B>. The <table> tag can be specified using <tAbLE> or <TABLE>. Additionally, the case of the start and close tags need not match either. That is, <b>This is bold.</B> will have the same effect as <B>This is bold.</B> or <B>This is bold.</b> A Brief Look at XHTMLXHTML is a variant of HTML that has stricter syntax rules. Specifically, XHTML requires that its tags be properly nested tags and that all tags appear in lowercase. That is, to create an HTML table using the XHTML dialect, you must use <table>, not <TABLE> or any other casing variation. Additionally, XHTML documents require that all tags have a matching close tag. That means to use the paragraph tag, you can't simply use <p>, but instead must use <p>...</p>. For tags that don't have a closing tag, such as <br> and <hr>, XHTML requires that you use the following variation: <br /> and <hr /> The /> is a shorthand notation to specify that there is no content between the starting and closing tags. Using <tagName /> is synonymous to using <tagName></tagName>. Finally, XHTML compliance requires that elements have quoted attributes. An attribute is a name and value pair that can optionally be placed within the opening tag, like so: <p style="color:red;">blah blah blah</p> Here, the <p> tag has two attributes: id, with a value of instructions, and style, with a value of color:red;. Note that the values of these two attributes are delimited by quotation marks ("). All elements with attributes must have quoted values in order for the document to be XHTML compliant.
Having a thorough understanding of XHTML is not vital when creating ASP.NET web pages. However, it is important to be familiar with the concepts for a couple of reasons. First, Visual Web Developer provides an easy way to validate your page's markup against various rules, including XHTML compliance, which we'll examine in the next hour. Second, ASP.NET's Web controls, which we'll be looking at in this hour, are denoted using XHTML in the HTML portion of the ASP.NET page. Additionally, when an ASP.NET page is requested by a browser, these Web controls are converted into XHTML, and it's that markup that's sent to the browser. Creating the HTML Portion of an ASP.NET Web Page Using Visual Web DeveloperThe HTML portion of an ASP.NET web page is composed of both static HTML and Web controls. Web controls are programmatically-accessible chunks of HTML, enabling developers to modify the HTML sent to the browser based on programmatic logic. Web controls also provide a means by which user input can be collected. They serve as the bridge between the HTML and source code portions of an ASP.NET page. We'll examine adding and working with Web controls in more detail later in this hour; starting with Hour 8, "ASP.NET Web Controls for Displaying Text," we'll spend significant time examining the plethora of Web controls available at our disposal. Visual Web Developer provides two means by which HTML content and Web controls can be added to an ASP.NET web page:
In my experience, I've found most developers already familiar with HTML prefer typing in the HTML and Web control syntax by hand, rather than using the WYSIWYG capabilities. Those coming from a background that did not include HTML exposure, however, usually find using the WYSIWYG designer to be a more intuitive and cost-effective approach. Regardless of your past experiences, I encourage you to try both techniques and settle on the one that you are most productive with. To illustrate adding content to the HTML portion of an ASP.NET page, let's create a simple ASP.NET website with a single web page. To follow along, start Visual Web Developer by choosing Start, Programs, Microsoft Visual Web Developer 2005 Express Edition. Create a new website by going to the File menu and choosing New Web Site. This will display the New Web Site dialog box, shown in Figure 2.2. Create a new website by choosing the ASP.NET Web Site template with the Location drop-down list set to File System and the Language drop-down list set to Visual Basic. Finally, specify the folder to place the website files in the text box to the right of the Location drop-down list. (For this example I will be placing the website a folder named Chapter2 on my Desktop.) Figure 2.2. Choose to create a blank ASP.NET website.
After you make the appropriate settings in the New Web Site dialog box and click the OK button, Visual Web Developer will create the following folders and files in the directory you specified:
Figure 2.3 shows Visual Web Developer after creating the new website. The Solution Explorer, shown in the upper-right corner, lists the files in the project. In the main window, Visual Web Developer has opened up the file Default.aspx, showing its HTML markup. Figure 2.3. Congratulations! You have created your first ASP.NET website.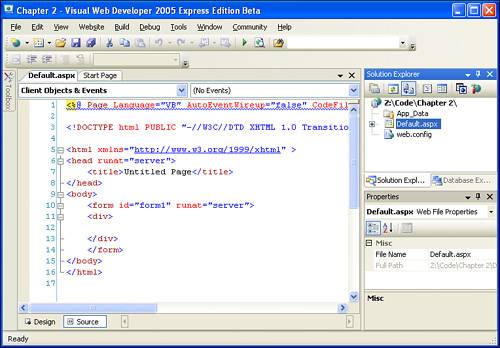 In the bottom-left corner you'll find two tabs: Design and Source. The Design tab displays the designer, which is the WYSIWYG editor. Using the designer, you can simply type in the content you want to appear on your ASP.NET page. If you want to add HTML elements or Web controls to the page, you just select them from the Toolbox on the left and drag them onto the designer. We'll see how to do this shortly. The next tab is the Source tab, which contains the actual HTML of your ASP.NET web page. This tab is selected by default, as you can see the HTML content for Default.aspx on your screen. Notice that even though we have yet to add any HTML content to our ASP.NET web page, some HTML content already exists. At the top of the page is the @Page directive:
This directive provides information about the ASP.NET page. The Language attribute indicates the programming language of the page's source code portion; the CodeFile attribute provides the name of the file that contains the page's source code. When we look at an end-to-end example later in this hour, you'll find that not all content in an ASP.NET page is sent to the requesting browser. The @Page directive is one such fragment; its contents provide information to the ASP.NET engine on the web server, and therefore it is not rendered to the client. After the @Page directive, you'll find the default HTML content Visual Web Developer adds when creating a new ASP.NET page. This includes an <html> element, which has nested within it <head> and <body> elements. Inside the <body> element is a <form> element, and inside the <form> element is a <div> element. You may have noticed that the <form> tag in Figure 2.3 contains a runat="server" attribute. This is not a standard HTML attribute. In fact, the <form> element in Figure 2.3 is not an HTML element at all! In an ASP.NET web page, HTML elements that contain the runat="server" attribute are a special form of Web control. We'll be discussing what, exactly, Web controls are and what is their place in an ASP.NET web page throughout this hour. Hour 9, "Web Form Basics," looks at this special <form> element and its purpose in greater detail. Editing the HTML Content Using the DesignerTo edit the ASP.NET web page's HTML content, you can either use the Design tab, which provides a WYSIWYG experience, or you can add content while viewing the page's HTML using the Source tab. Let's examine how to add content to our page using the designer. Specifically, let's add an HTML <table> that lists some popular Internet websitesYahoo!, Google, MSN, and Lycosalong with their logos.
Start by switching to the Design tab. The first thing to add is an HTML <table>. Go to the Layout menu and select Insert Table. Choosing this option will show the dialog box in Figure 2.4. Here, you can either choose a standard template or create a custom table by entering the number of columns and rows you want to display, as well as the table's overall width and height. Figure 2.4. When inserting an HTML table, you can specify the number of rows and columns as well as the table's width and height. Choose a table with two columns and four rows and an overall width and height of 300 pixels by 500 pixels. In the first column we will display the name of the website, and in the second column we will display the website logo. To add the website names, simply click inside the first column of each row and type in the website's name. Figure 2.5 shows the table after the names have been added. Figure 2.5. The first column contains the names of four websites. Notice that the name of each website is displayed left-justified in a fairly plain-looking font. Let's spruce things up a bit by centering the name of each website and displaying each name in a bold, Arial font. To accomplish this, simply select the text of a particular website. Once it is selected, you can make the text bold by going to the Format menu's Font submenu and selecting Bold. Next, to center the text that is still highlighted, go to the Format menu's Justify submenu and select Center. Finally, to make the font of the still-selected text Arial, simply click on the list of fonts that is positioned beneath the Cut, Copy, and Paste icons near the top-left corner. (The Cut, Copy, and Paste icons are the scissors, paper, and clipboard icons found directly beneath the View, Format, and Layout menu headers.) Figure 2.6 shows Visual Web Developer after this formatting has been applied to all four website names. Figure 2.6. The website names have been centered, bolded, and changed to Arial font.
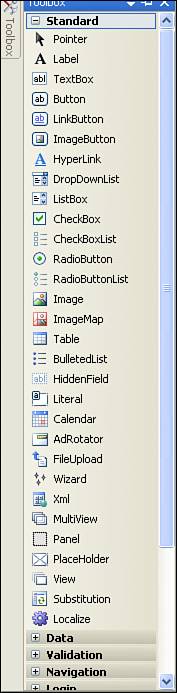
Now, let's add the logos for each of the websites in the second column. The Toolbox contains HTML elements and Web controls that can be dragged onto the WYSIWYG designer. By default, the Toolbox is shown on the left side of Visual Web Developer; if you do not see the Toolbox on your screen, you can display it by going to the View menu and selecting the Toolbox menu item. There are eight tabs in the Toolbox:
Each tab contains a number of elements underneath it. By default, the Standard tab will be expanded, which includes items such as Label, TextBox, Button, LinkButton, and so on. The Toolbox with the Standard tab expanded is shown in Figure 2.7. Figure 2.7. The Toolbox contains elements that can be dragged and dropped into the designer. The Toolbox contains both Web controls and standard, static HTML elements. The HTML elements can be found in the Toolbox's HTML tab; all other tabs contain Web controls. At this point in our discussion, we've yet to explore the differences between Web controls and static HTML elements. When we finish examining the HTML portion and then turn to the source code portion of an ASP.NET page, the differences will become clearer. For now, just understand that unless you are adding items from the HTML tab onto the designer, you are adding Web controls to the page, and not HTML elements. To add one of the items in the Toolbox to your ASP.NET web page, simply click on the item you want to add and, holding down the mouse button, move the mouse pointer over the location you want the item to be placed and then release the mouse button. As you can see from Figure 2.7, one of the items in the Standard tab is an Image Web control. We'll use this Web control to add the website logos in the second column of the <table>. Start by dragging and dropping four Image Web controls into the designer, one in each of the second columns of each of the four rows. Figure 2.8 shows what you should see after the four Image Web controls have been added to the designer. Figure 2.8. An Image Web control has been added to each row in the table. Note that each Image Web control currently is displayed as a red X. The reason is that we have yet to specify the URL of the image. The Image Web control has an ImageUrl property that specifies the URL of the image. Before we can assign the ImageUrl property, though, we first need to have the appropriate image files present for our website. Go to each of the search engine's home pages, locate its logo, and save that logo to the same folder where you created your website. (To save an image in your browser, right-click the image and choose Save As.) Once you have downloaded the four logos to your computer, you can now edit the ImageUrl properties of the Image Web controls. The properties of a Web control can be viewed and altered through the Properties window, which resides, by default, in the lower-right corner. If you do not see the Properties window, go to the View menu and choose Properties Window. To specify an Image Web control's ImageUrl property, click on the Image Web control in the Design view, which will load the control's properties in the Properties window. By default, the ImageUrl property's value is a blank string, meaning that no value for the ImageUrl property has been specified. You can either type in a value or click the ellipses to select a file. Because we already have the image files in our website's root directory, click on the ellipses. This will display the Select Image dialog box, shown in Figure 2.9. From here, you can choose which image to display in the Image Web control. For each of the four Image Web controls on your page, select the appropriate logo. Figure 2.9. Choose the image to display in the Image Web control.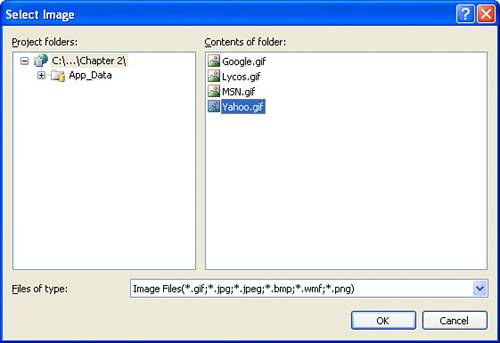
At this point we've created the HTML content, which includes both static HTML, such as <table>, along with Image Web controls. Note that we did not have to write a single line of HTML; rather, we simply chose various menu options, dragged and dropped Web controls from the Toolbox, and set properties via the Properties window. To test your ASP.NET web page, go to the Debug menu and choose Start Without Debugging. Alternatively, you can press Ctrl+F5. This will compile your ASP.NET pages' source code portions and launch a web browser, taking you to the website's startup page. The project's startup page is the page the browser automatically navigates to when you begin debugging. When you create a new website, Default.aspx is made the startup page. You can indicate which ASP.NET page should be the startup page by right-clicking on that page in the Solution Explorer and choosing Set as Startup Page.
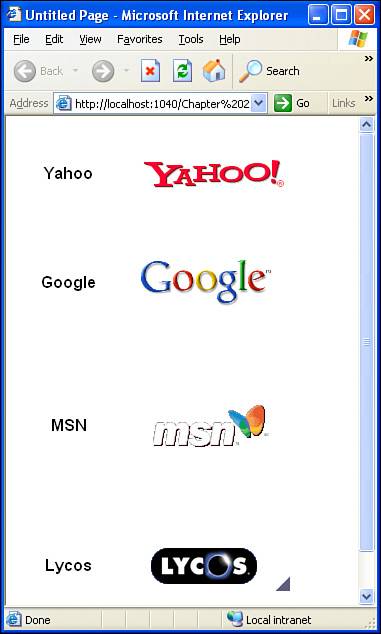
Figure 2.10 shows the ASP.NET web page when viewed through a web browser. Note that what the user visiting the page sees is what we saw in the designer; this is why the designer is referred to as a What You See Is What You Get (WYSIWYG) editor. Figure 2.10. The ASP.NET web page when viewed through a browser. Examining the HTML ContentSome Web designers feel more comfortable creating a web page by being able to view the page's HTML rather than using a WYSIWYG editor. Although entering the HTML through the Source view is usually not as easy or efficient as using the designer, entering the HTML through the Source view allows for finer control over markup, as well as its positioning and indentation. To appreciate the time the designer saves, take a moment to switch from the Design tab to the Source tab. This lengthy markup is shown in Listing 2.2. Listing 2.2. The Markup Generated by the Designer
First, appreciate the bulk of HTML that the designer automatically adds. It added the various <table>-related elements along with the style information (the bold, centered, Arial text). Without doubt, the designer knocked off several minutes of time it would have taken us to type this out by hand.
Next, study the syntax for the four Image Web controls (lines 17, 23, 29, and 35). The Google Image Web control (line 23) has the following markup: <asp:Image runat="server" ImageUrl="~/Google.gif" Width="133px" /> The Web controls have an HTML-like syntax: They are represented by opening and closing tags; the opening tag can optionally contain attributes; and, although not shown in the Image Web control example, Web controls may contain content within their starting and closing tags. While there are a bevy of valid HTML elements, asp:Image is not one of them. In fact, none of the ASP.NET Web controls (all of whose tags have the notation asp:WebControlName) are valid HTML elements. This does not pose a problem, however, because the Web control syntax shown in our ASP.NET page in Visual Web Developer is not the markup that gets sent down to the browser that requested the ASP.NET page. Instead, the Web controls are rendered into valid XHTML-compliant markup. Rather than the browser receiving an <asp:Image> element, the Image Web control is rendered into an <img> element, which is a valid HTML element. To see this in action, return to viewing Default.aspx through a browser. Then, from your browser, view the HTML source received. (For Internet Explorer, go to the View menu and choose Source.) This will open up Notepad with the contents of the HTML sent to your browser. Listing 2.3 shows the rendered HTML that was sent to my browser (Internet Explorer 6.0) when visiting Default.aspx. Listing 2.3. The HTML Received by the Browser When Visiting Default.aspx
While the markup in Listings 2.2 and 2.3 look nearly identical, there are some subtle and important differences. Starting from the top, the @Page directive on line 1 in Listing 2.2 is not in the rendered HTML output shown in Listing 2.3. Next, notice how the <form runat="server"> on line 10 in Listing 2.2 has been transformed into <form name="form1" method="post" action="Default.aspx" > There's also a hidden form field that's been added to Listing 2.3 (on line 10):
We won't be discussing these transformations in this hour; instead, this topic is left for Hour 9, "Web Form Basics." Lastly, note that the Image Web control syntax from Listing 2.2 has been replaced by standard <img> HTML elements in Listing 2.3, with the ImageUrl property transformed into the src attribute. These changes highlight an important concept with ASP.NET pages: The markup present on the web server is not necessarily the markup that is sent to the requesting browser. When an ASP.NET page is requested, the ASP.NET engine handles the request, which involves making these changes as needed. Also, as we'll see shortly, the rendering process involves the execution of any server-side code that we've written for the page. This server-side rendering process, which occurs when any ASP.NET page is requested, is what makes ASP.NET a dynamic web technology. The resulting HTML sent down to the browser can be programmatically altered based on various criteria, such as database data, user input, and other external inputs. |

EAN: 2147483647
Pages: 233