Scripting
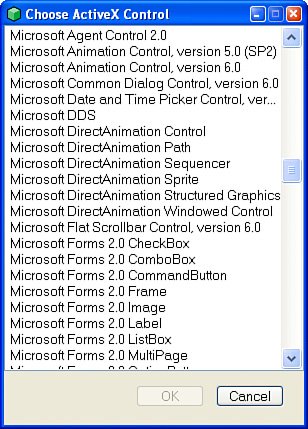
| If you are running your application on a Macintosh, you can use AppleScript to make your application scriptable, but that will work only for when you're running it on a Macintosh. REALbasic provides a cross-platform solution to the problem with the RBScript class. RBScriptRBScript is a subset of the REALbasic programming language. It retains most of the features of the language itself, with a few limitationsthe most notable is that many of the global functions that are available to you when writing REALbasic code in the IDE will not be available to you when writing a script. For instance, MsgBox cannot be called from RBScript. The Language Reference provides a detailed list of available functions, so I will not repeat that information here. RBScript ObjectThe RBScript language is a fairly complete implementation of REALbasic, and you can do quite a lot with it. It supports classes, interfaces, and modules. You can instantiate the RBScript object in code, just like any other class, or you can drag it onto a Window like a Control. Either way, after the object is available, you then need to set it up so that your users can use it to script your application. As I mentioned earlier, one thing that is not available to RBScript is some global functions. This limitation is a good one because the purpose of RBScript is to provide a scripting interface to your application. As a developer, you will want control over which parts of your application are accessible by RBScript, and you do this by assigning an object to the RBScript.Context property: RBScript.Context as Object The object that you assign to the Context should be one that provides the script with the functions you want your users to have control over. For starters, suppose you want the user to access the SystemRBScript.Context property object through RBScript. It's as easy as the following: RBScript1.Context = System Now, if in your code you try to access the System object directly, you'll be in for a surprise, because it won't work. You can access it by working directly with the Context object, but REALbasic provides an easier way because all the members of the System object will be available to your script as global methods and properties. If you want to check the value for an environment variable, you can do the following: Dim s as String s = EnvironmentVariable("PATH"RBScript.Context property)To run a script, you need to assign the source code of the script to the Source property of RBScript: RBScript.Source as String Prior to executing the script, you should check the current state of the RBScript object to see if it is ready to execute a new script, whether it is already running, completed, or if the execution of the script has been aborted in some way: RBScript.State as Integer Legal values for RBScript.State are 0 = Ready 1 = Running 2 = Complete 3 = Aborted There was a time when RBScript was an interpreter, which meant that the scripts themselves were never directly compiled into machine code. That is no longer the case. One consequence of this (besides much better performance) is that the following property doesn't work anymore if you are using a current version of REALbasic: RBScript.CurrentLineNumber as Integer (Deprecated) Because the script is a string, it sometimes needs to use characters from languages, such as Japanese, that require 2 bytes to represent. RBScript.EncodingFont as String Now that scripts are no longer run through the interpreter, they get compiled into native application code. You run a script by calling the Run method: RBScript.Run() At that time, the script will be compiled and executed. You have the option, however, of compiling the script at some arbitrary point prior to running it, and for that you call the following method: RBScript.Precompile() You are also give the option of running the script for only a certain number of seconds, using PartialRun: RBScript.PartialRun(millisec as Integer) You would do this to yield time back to the application. After a script is finished running, the value for RBscript.State is 2, which means the script has completed execution. If you want to run the script again, you must reset it using the Reset method: RBScript.Reset() The interesting part of all this is linking the script to your application. As I already mentioned, you can assign an object to the Content property and your script will be able to access the properties and methods globally. That in itself is enough to get something done that's meaningful, but REALbasic provides another way of interacting with the script through the use of two events in the RBScript class: RBScript.Input(prompt as String) as String Handles Event RBScript.Print(msg as String) Handles Event Most programs accept some kind of input and produce some kind of output. RBScript uses the Input and Print events as a means of getting additional input during the execution of the script and of outputting data during the execution of the script. Input and Print are both events that your script can raise at any time during the running of the script. You use both of them as if they were methods, like this: Dim s as String s = Input("Please give me input.")When this couplet of code gets executed, the Input event is triggered, and if you have implemented that event, the code in that implementation gets passed the "Please give me input." string, does some processing based on that, and then returns a string of some sort back to the script. Here's one possible way to implement the Input event: RBScript1.Input(Prompt as String) as String Dim result as Integer result = MsgBox(Prompt, 3) If result = 6 Then // 6 signifies "Yes" button Return "Yes!" Else Return "No." End If Within the body of your script, you do not have access to MsgBox, so you cannot call it from there. Because the Input event is implemented in REALbasic code, not using RBScript, you have access to everything you normally have access to. In this instance, my script asks for input, triggers the Input event, and the Input event handles getting that input from the user in some way. The Print event works in a similar way, but by sending output. Again, it's an event that gets called in code when and how you want to. You pass a string to the event and you implement the Print event to do something with that String. You may display the output to the user, you may use it to assign a value to a property elsewhere in your application, or you may execute a block of code based on the content of the string. There are also two error-related events, each for a different kind of error. If there is an error in your code that keeps it from being compiled properly, a CompilerError event is triggered: RBScript.CompilerError(line as Integer, errorNumber as Integer, errorMsg as String) Handles Event If any other kind of error occurs, this event is triggered: RBScript.RuntimeError(line as Integer, error as RuntimeException) The Language Reference provides a complete list of compiler errors with their explanations. It also documents which global functions and language elements are available in the scripting environment. Web Server ScriptingSuppose you want to add a scripting capability for your web server so that every file that ends in .rs is executed as a REALbasic script. The process for doing this is simple. The first step is to identify requests for files that end in .rs and then assign them to the Source property of an RBScript object. After that, the script should be executed and the results returned to the user. This is where things get a little tricky. RBScript is executed asynchronously, which can be a problem because the TCPSocket class that the HTTPServer class is built on is asynchronous as well. When the request comes in, you will want to maintain the connection to the client from within the DataAvailable event and then process the script and return the results. In the HTTPServer example, I placed all the Write methods within the DataAvailable event. If I didn't do that, a new request could come through and generate a new DataAvailable event while I was still processing the data from the previous request. I need to be able to call and execute the script and get the results prior to exiting the DataAvailable event, and I can do it this way: While True If RBScript1.Results = "" Then // loop Else Write RBScript1.Results End If Wend I create a class to serve as the Context object for the script, something which could easily be an HTTPRequest object with a Result property, which is where the output of the script will be assigned in the Print event: Print(msg as String) Results = msg The code in the DataAvailable event will loop while it waits for the Results property to be assigned. As soon as it is assigned, it writes the data back to the client. For the script to work properly, all it has to do is generate the HTML it is going to send back to the client, and then pass that String to the Print event. You'll need to add more error checking and things like that for this to work reliably, but at least you are well on your way to having implemented a scriptable web server. Office AutomationREALbasic supports Microsoft Office automation on both the Windows and the Macintosh platforms. The Macintosh implementation is somewhat more limited; the most obvious distinction is that you have to execute your REALbasic application from within the same folder as the Office application you are automating. The examples in this section were developed on Windows because this is the most likely place that you will be using it. The biggest challenge to using these classes is that they are not documented. REALbasic provides some supporting classes, plus some code completion support for Office automation, but don't make the mistake of believing that the absence of code completion indicates a lack of support. Check the documentation available in Word, PowerPoint, or Excel to find out the properties, methods, and events that are applicable to any given object. Controls can be dragged onto a WindowWordApplication, PowerpointApplication, and ExcelApplication, all of which are subclasses of OLEObject. They aren't true controls, because they are not a subclass of RectControl and they can be instantiated in the normal way with the New operator. All these classes are subclasses of OLEObject, which is where I will turn first. OLEObjectIn Windows terminology, OLE stands for object linking and embedding. It was originally designed so that you could embed one application into another. In other words, you could embed an Excel spreadsheet in the middle of a Word document. This basic technology has evolved over the years and it is now part of a broader Component Object Model (called COM). I won't get into too much detail about COM, but there are a few things to be aware of that will help you understand what's going on in the background. Components are distributed. They are pieces of code (much like a shared library) that other applications can execute. Each component has a unique ID that is listed in the Windows Registry. If you want your application to use a particular component, you need to have that unique ID. There is a COM server that will return a reference to the component that your application can use. The most commonly used components are ActiveX components, many of which are controls. In fact, there is an OLEContainer Control in REALbasic that can be used to include ActiveX controls in your application. The COM server does other things, too. For instance, it controls how many instances of the component are in memory. When automating Office applications, you will be using the OLEObject class, or a subclass of OLEObject throughout. An OLEObject is a component, which means it is something managed by a COM server and accessible through the Windows Registry. There are three subclasses of most importance: WordApplication, PowerpointApplication, and ExcelApplication, each of which is a class that represents the respective Office application. These are not the only OLEObjects you will encounter, however, because there are many others, some of which you'll see momentarily. Because OLEObjects are components, all have a globally unique identifier assigned to them, and they are referenced by this number internally. The number needs to be unique because you cannot always predict what other OLEObjects are going to be available on a system, and you want to be able to avoid namespace problems. There are two Constructors, one of which takes the unique identifier as an argument (referred to as ProgramID in the documentation). The second also takes the identifier, but also specifies whether to create a new instance of the object, rather than using an existing instance. Behind the scenes, REALbasic is getting a reference to the component from the COM server, which is why you need to let it know whether to create a new instance or to use an existing instance if one is already available. OLEObject.OLEObject(ProgramID as String) OLEObject.OLEObject(ProgramID as String, NewInstance as Boolean) Like all objects, OLEObjects have properties, methods, and events. Because OLEObject is a generic representation of a particular OLEObject, it also has to provide some generic methods for getting and setting properties, executing methods, and so on. To set a property, you use the following method: OLEObject.Value(PropertyName as String, ByValue as Boolean) as Variant You can find out what type of OLEObject it is, using the following: OLEObject.TypeName as String Functions are accessible by name. The following two methods provide a way to execute functions: OLEObject.Invoke(NameOfFunction as String) as Variant OLEObject.Invoke(NameOfFunction as String, Parameters() as Variant) as Variant The first function requires only the function name, whereas the second one lets you pass along the parameters as well. If you pass parameters, you will need to know which order to place them into the array, because they are determined by position. OLEParameterVisualBasic supports optional parameters, which in practice work like polymorphism. In REALbasic, you can have a single method with multiple signatures utilizing different parameters. To handle optional parameters in REALbasic in a way that's compatible with the VBA implementations, you need to use the OLEParameter class. Later on in the examples, you will see exactly how the OLEParameter class is handled. OLEParameter.PassByRef as Boolean OLEParameter.Position as Integer OLEParameter.Type as Integer OLEParameter.Value as Variant OLEParameter.Value2D OLEParameter.ValueArray as Variant OLEParameter Class Type ConstantsWhen passing a value to an OLEParameter instance, you will need to let it know what type it is. You can use the following constants OLEParameter.ParamTypeBoolean as Boolean OLEParameter.ParamTypeChar OLEParameter.ParamTypeDouble OLEParameter.ParamTypeNull OLEParameter.ParamTypeSigned64bit OLEParameter.ParamTypeSignedChar OLEParameter.ParamTypeSignedLong OLEParameter.ParamTypeSignedShort OLEParameter.ParamTypeSingle OLEParameter.ParamTypeString OLEParameter.ParamTypeUnsigned64bit OLEParameter.ParamTypeUnsignedLong OLEParameter.ParamTypeUnsignedShort OLEContainer ControlOne special kind of OLEObject is an ActiveX control, which is like a REALbasic control, except that it works only on the Windows platform. There happen to be a lot of them, so it can be beneficial to have access to them. The OLEContainer control is a generic ActiveX container that you use just like any other Control on a Window in your application. The container has a reference to the associated OLEObject, which is accessible with the Content property: OLEContainer.Content as OLEObject You can find out the program ID, too: OLEContainer.ProgramID as String You can select the ActiveX control through the IDE. Drag the container onto a Window, and then right-click the Control. A Window pops up with a list of ActiveX controls available on your computer. You can select whichever one you want and the values for the ProgramID will be set for you. ActiveXIn the following examples, I will go through the process of embedding the Windows Media Player into a REALbasic application. Figure 11.1 shows the list of available ActiveX controls I can choose from in my application: Figure 11.1. ActiveX controls. When I select Windows Media Player, the ProgramID is set to the following: {6BF52A52-394A-11d3-B153-00C04F79FAA6}Some ActiveX controls have property pages, which are basically windows that are made available to the user so that the user can set certain properties for the control themselves. The method to use is this: OLEContainer.ShowPropertyPages If I call this method on the Windows Media Player control, the property page shown in Figure 11.2 appears: Figure 11.2. Windows Media Play property page.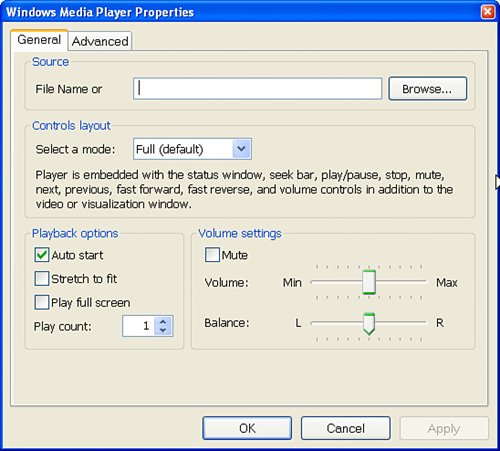 You can use the same OLEContainer to reference different OLEObjects at different times during the execution of your application. The following two methods are used to use a new OLEObject, or to remove it from memory: OLEContainer.Create as Boolean OLEContainer.Destroy Handling EventsEvents are handled uniquely in this situation. First, because the OLEContainer object is a Control, it has a typical collection of REALbasic events available for implementation. However, because you can assign any ActiveX control to the container, there are not specific references to any of the additional events that these controls can implement. For this reason, there is the Eventtriggered event, which is triggered when an event specific to a particular ActiveX control is fired: OLEContainer.EventTriggered(NameOfEvent as String, parameters() as Variant) Handles Event When you drag a mouse over the container that contains the Windows Media Player ActiveX control, the EventTRiggered event is triggered. To see what gets passed to the event, I placed the following code in the handler: Dim x,y as Integer Dim buffer(-1) as String y = Ubound(parameters) For x = 0 To y buffer.append(parameters(x).StringValue) Next MsgBox eventName + EndOfLine + Join(buffer,EndOfLine) The MsgBox that gets displayed as a result of this event firing is shown in the Figure 11.3: Figure 11.3. EventTriggered MouseMove event results. I said earlier that because the OLEContainer is a Control, it also has all the usual events that a typical REALbasic control has. In fact, the OLEContainer control also has a MouseMove event in addition to the Eventtriggered event. This provides us with a unique opportunity to see the event from two different perspectives: the first as handled by the Eventtriggered event and the second as handled by the MouseMove event. I placed the following code in the MouseMove event: MsgBox "Internal MouseMove" + Str(x) + "/" + Str(y) With this code in place, when I drag the mouse across the Control, the following Window pops up (see Figure 11.4): Figure 11.4. OLEContainer Control MouseMove event.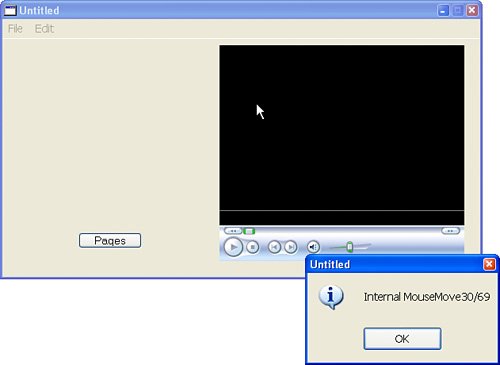 As you can see, there are two values, X and Y, that are passed in the regular MouseDown event, but there are four parameters in the MouseDown event handled by the Eventtriggered event. I can deduce that the last two parameters are values for the mouse position, just like the X and Y values passed to the other event, but what about the first two parameters, each of which happen to be 0 each time it's triggered. One way to find out is to use the VisualBasic documentation provided in Microsoft Word. To get the actual information about the Media Player Control, I had to open a Word document and then insert a Media Player Control onto the page using the Control Toolbox. This works much like the Window does when assigning an ActiveX control to an OLEContainer Control in REALbasic. The Control Toolbox has a group of buttons that you can click to select some of the more commonly used controls, but there is also another button to select a custom control. When that is clicked, a long list of available ActiveX controls appears, and you can select Windows Media Player from that list. With this control embedded in the Word document, I go to the Tools menu and select Macros, followed by the VisualBasic editor, as shown in Figure 11.5. The current document is referenced as ThisDocument. I can select ThisDocument and I'll see that it contains an object called WindowsMediaPlayer1. In the editor, I can select it in the object menu; then in the adjacent menu, a list of available events appears. Figure 11.5. Microsoft Word Visual Basic Editor.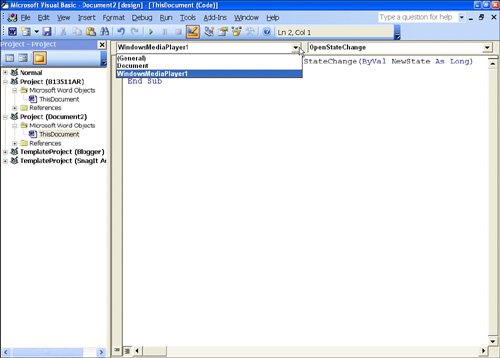 I can select the one called MouseMove and I will be shown the following signature:
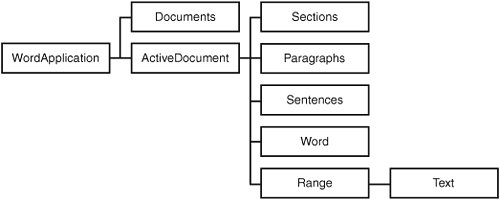
Looking at this signature, we see that there are indeed four parameters for the MouseMove event, and that the first one is called nButton and the second is nShiftState. These refer to which mouse button is being clicked and whether the Shift key is currently down. The reason I was getting a value of 0 for both was that I wasn't clicking any button, nor was I holding down the Shift key. Finally, one more OLEContainer event needs to be mentioned. The following event is triggered prior to the control being shown: OLEContainer.ShowObject Handles Event This is used because you can change the reference from one ActiveX control to another during runtime, and you can implement any code here that is needed to respond to that change. OLEExceptionOLEException is a subclass of RuntimeError. It doesn't implement any new methods, and it works just like other RuntimeError subclasses. WordApplication ClassThe Office object model is composed of collections and objects, both of which have properties, methods, and events. A collection is basically an object array, or an indexed list of objects. One important collection in Microsoft Word is the Documents collection. This represents all the open documents for the current application. You can use the Documents collection to get a reference to a particular document. It's important to understand that it is not a real array, so you can't do array-like things with it, such as using the For Each statement. In VisualBasic, you can do the following: For Each aDoc In Documents aName = aName & aDoc.Name & vbCr Next aDoc MsgBox aName In REALbasic, you have to do it this way: Dim count, x as Integer Dim doc as OLEObject count = WordApplication1.Documents.Count For x = 0 to count - 1 doc = WordApplication1.Documents(x) // do something with doc Next A particularly cool part about all of this is that the Word application doesn't have to be visible. This means that you can use all the tools available from Word in your application without Word ever being visible to the user. Figure 11.6 shows an abbreviated illustration of the Word object model: Figure 11.6. Word object model. At the top of the object model tree is the WordApplication object. If you have dragged the WordApplication control onto a Window, this can be referenced as WordApplication1. There are a few properties of the object, but the important one to consider now is the Documents object, which is a collection. Documents CollectionA Word application can have more than one document open at a time, which explains why there is a Documents collection. Each open document has to have a unique name. This gives you two ways of referencing the document, either through the title of the open document or by its index position in the collection of Documents: Documents(title as String) as Document Documents(index as Integer) as Document Because you may not know in advance the names of the documents that are open, you are provided with a Count property that lets you know how many documents are open, which means you can iterate through all the open documents. Documents.Count as Integer Documents.ActiveDocument as DocumentThe Documents collection also has a property called ActiveDocument, which points to the front-most document for the Word application. Activate the document by calling the Activate method on a particular Document object: Document.Activate Documents.Add as DocumentThe Add method adds a new, untitled Document to the Documents collection and returns a reference to it. Documents.Open(aPath as String)When you want to open an existing Document, you use the Open method, passing to it an absolute path to the location of the file you want to open: WordApplication1.Documents.Open("C:\MyFolder\Sample.doc")The path is the only required parameter, but the Open method contains a long list of optional parameters. The method signature according to the documentation in Microsoft Word is as follows:
The following table identifies each parameter, shows its position, and describes what kind of value it is expecting. The position is used when using the OLEParameter class to send a optional parameter to the method.
Opening a Word document is different from opening other files in REALbasic because you do not necessarily need a FolderItem reference, just a path. The following example shows you how you can let your user select the Word document to open using the GetOpenFolderItem function and then use the reference to the FolderItem to open the Word document itself: Dim f as FolderItem Dim ap as OLEParameter f = GetOpenFolderItem(WordDocs.DOC) ap = new OLEParameter ap.Position = 1 ap.Value = f.AbsolutePath WordApplication1.Documents.Open(ap) As you can see, I created an OLEParameter instance, and I set the value for Position to be 1 and the Value to be the absolute path of the FolderItem. I did this because the FileName is the first parameter in Open's signature and it takes a path as its value. I then pass the OLEParameter instance to the Open method to open the document. Documents.CloseThe signature for the Close method is this: Documents.Close(SaveChanges, OriginalFormat, RouteDocument)
The following instruction closes the document named "Report.doc" without saving changes. Dim param as OLEParameter param = New OLEParameter param.Position = 1 param.Value = Office.wdDoNotSaveChanges WordApplication1.Documents("Report.doc").Close(param)Document.SaveThe complete signature: Document.Save(NoPrompt, OriginalFormat)
To save a particular document: WordApplication1.Documents("MyTest.doc").SaveTo save a particular document without prompting the user for changes: Dim param as OLEParameter param = New OLEParameter param.Position = 1 param.Value = True WordApplication1.Documents("MyTest.doc").Save(param)To save all open documents: WordApplication1.Documents.Save Documents.SaveAsIf you look up the SaveAs method in the VisualBasic Help in Microsoft Word, you'll see that the signature is as follows:
By "expression," the documentation means an expression that returns a Document object, so one example of how this would work in REALbasic is this: Dim wd as WordDocument wd = WordApplication1.Documents("ThisOpenFile.doc") wd.SaveAs(...)
In the documentation, the description of the FileFormat parameter says that the value can be any WdSaveFormat constants, and it lists the constants. In REALbasic, all the available constants are members of the Office object, so you would refer to the WdSaveFormat constants using the following signatures:
The following example assumes that a WordApplication control has been dragged onto the Window. It uses the WordApplication object to create a new document, inserts HTML, and then saves the document as a web page. The WordApplication object itself is never visible, so it's an example of using Word without actually launching the Word application and making it visible to the user. Dim x,y as Integer Dim buffer(-1) as String Dim wd as WordApplication wd = WordApplication1 wd.Visible = False wd.Documents.Add wd.ActiveDocument.Range.Text = "<html><body>Test</body></html>" wd.ActiveDocument.SaveAs "Test", Office.wdWebPage Every Word document can be assigned properties using the BuiltInDocumentProperties object, which is a collection. If you do not happen to know how many properties are in the collection, however, you might run into a problem because you need to reference them by their indexed position. The following example iterates through all the properties and compiles them into a list. Dim wd as Word Application Dim x as Integer Dim buffer(-1) as String wd = WordApplication1 x = 0 While True x = x + 1 Try buffer.append(wd.ActiveDocument.BuiltInDocumentProperties(x).Value) + ":" buffer.append(wd.ActiveDocument.BuiltInDocumentProperties(x).Name) MsgBox Join(buffer, EndOfLine) Catch MsgBox "Error at " + str(x) Exit End Wend |
EAN: 2147483647
Pages: 149