Opening Documents in Mac OS X
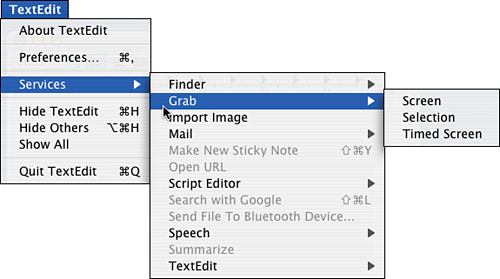
Understanding and Using Standard Mac OS X Application MenusJust like under all versions of the Mac OS, Mac OS X applications designed to work on the Mac follow certain conventions when it comes to the menus they provide. Although applications can provide more menus than the core set of standard menus, they are not supposed to provide fewer. CAUTION The information in this section is based on standard Mac OS X menus for Cocoa applications. Classic applications provide Mac OS 9 menus, whereas carbonized applications provide a mixture of the two sets of menus. For example, all carbonized applications provide an Application menu, but not all provide Cocoa's Format menu. If you have used a Mac before, which I have assumed you have, some application menus under Mac OS X aren't much different from those under previous versions of the OS, such as the File and Edit menus. In the following sections, you will learn about some standard application menus that are new or revised for Mac OS X. Working with Mac OS X Application MenusAll Mac OS X applications have an application menu, which provides the commands you use to control the application itself as well as to interact with the OS (see Figure 6.3). Figure 6.3. This TextEdit menu is typical of the application menu provided by Mac OS X applications.
Typical commands on an application's application menu are the following:
One of the more interesting commands on the application menu is the Mac OS X Services command. This command enables you to access functions provided by other applications to add information or perform functions while you are using the current application. Although it is not supported in all applications, when it is supported, it can be quite useful. NOTE Game applications are the most likely to not provide standard menus, and that is okay. After all, who needs a Format menu when you are shooting bad guys? There are various uses for the Services command, but as an example, suppose you are having trouble understanding an error message you are getting in a certain application and you want to send an email to the technical support organization to get some help. That email might be a lot more meaningful if you can include an image of the actual error dialog box that you see with your explanation. Using the Services commands from within the Mail email application, you can do just that:
The specific services offered on the Services menu depend on the application you are using and the data with which you are working. You should explore Services options that you have with the applications you use most often. Most Apple applications do provide some services, but even with those, support for Services can be spotty. The only way to know is to explore the Services menu for the applications you use. Even though Apple's basic Mac OS X text editing application, TextEdit, isn't all that great for word processing, it does provide a great example of how many Services commands can be supported. For a list of the Services commands available in TextEdit and what they do, see Table 6.1.
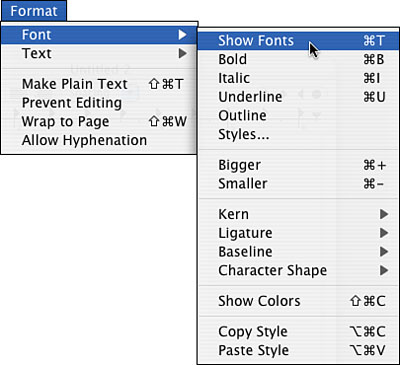
NOTE Some third-party applications can add their own commands to the Services menu. For example, QuicKeys, which enables you to create and run macros, adds a command to the Services menu that enables you to create a macro from within any application. Working with Mac OS X Format MenusAs you might expect from its name, the Format menu provides commands that enable you to format the file with which you are working. The specific commands on the Format menu depend on the particular application you are using. NOTE The Mac OS X Format menu, including the Fonts panel, is available only in Cocoa applications that are designed to use it. Many Mac OS X applications provide format and font commands that are specific to those applications. One of the most useful commands on most applications' Format menus is the Font command. This command enables you to work with the fonts you use in a document (see Figure 6.4). In addition to the commands you expect to see, such as Bold, Italic, and so on, you also will see the Show Fonts command, which opens the Font panel. Figure 6.4. TextEdit's Font command is typical of this command on many applications' Format menus.
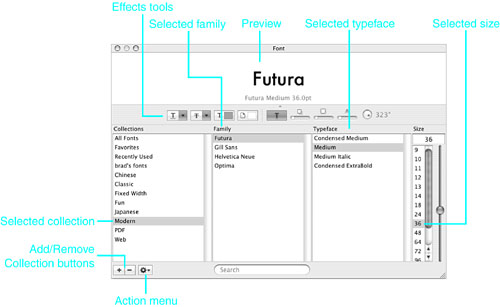
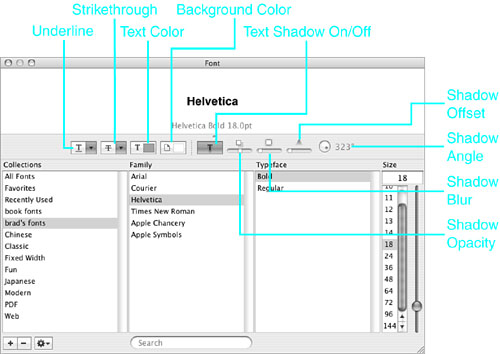
The Mac with OS X Font panel enables you to choose and work with the fonts installed on your Mac. The Font panel provides control over the particular font used in your documents as well as enables you to manage the fonts installed on your Mac (see Figure 6.5). Figure 6.5. The Mac OS X Font panel provides much more control over your fonts than was possible under previous versions of the Mac OS.
TIP In most applications, you can open the Font panel by pressing CAUTION Not all applications support Mac OS X's Font system. If an application doesn't use this system, it provides its own set of formatting tools that you use to format a document. For example, Microsoft Word X for Mac, service release 1 does not support Mac OS X's font system so you can't access the Font panel from within the application. You have to use its own font tools instead. The Font panel has a number of panes, and you can choose to display some panes while others are always visible. The various panes of the Font panel are the following:
A couple of the default collections are worth some additional detail. The PDF collection contains font families that are suited to the creation of PDF documents (PDF is a native file format under Mac OS X). The Favorites collection is empty by default and is a collection designed for you to be able to create a customized set of your favorite font families, typefaces, and sizes so you can reapply specific text formats by selecting the Favorites collection and clicking the text formatting you want to apply (this is similar to styles in some applications). The Recently Used collection automatically gathers the families, typefaces, and sizes you have recently used so you can reapply them easily. The Web collection contains fonts that are designed to be used on the Web. The Action menu at the bottom-left corner of the panel provides access to the following commands:
Previewing FontsIf you select Show Preview on the Action menu, a new pane appears at the top of the panel. This pane provides a preview of the currently selected family, typeface, and size. You can use this preview to help you make better selections more quickly. To hide the Preview pane, select Hide Preview on the Action menu. Using Font FavoritesWhen you select a font family, typeface, and size and then use the Add to Favorites command on the Action menu, that font is added to your Favorites collection. When you select the Favorites collection in the Font panel, you can quickly choose one of your favorite fonts to use; this saves you a couple of steps (see Figure 6.6). Figure 6.6. When you add a font, typeface, and size to your Favorites collection, you can easily apply that formatting to selected text in a document.
Creating or Removing Font CollectionsYou can add or remove font collections from the Font panel. When you do so, the font collection is also added or removed to the Collections available in the Font Book application (which contains all the fonts installed on your Mac).
From the Font panel, you can make the following changes to the collections shown in the Collections list:
CAUTION If you select a collection and click the button to delete it, the collection is removed from the Font Book, which means the included fonts are deleted from your Mac. Using the Font Book, you can disable both font collections and individual fonts from within collections. This is the best technique because you can prevent collections and fonts from being available within an application but maintain those collections and fonts on your Mac. Applying Effects to FontsUsing the Effects tools, you can apply the following effects to selected text:
NOTE You can also apply color effects by selecting Color on the Action menu. To apply effects to text, do the following steps:
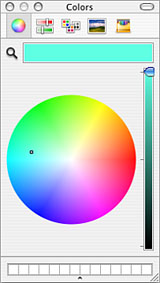
NOTE Unfortunately, you won't see the effects you apply in the Preview pane. You need to be able to see the document on which you are working to see the results of the text effects you apply. Choosing ColorsWhen you choose to apply color from the Font panel, you use the Color Picker (see Figure 6.8). As with the other versions of the Mac OS, you use the Color Picker to define and choose the color to apply to specific items in this case, text effects. Figure 6.8. You can control the color applied to fonts using the text effects tools using the Color Picker.
TIP You can open the Color Picker directly by pressing Shift- As an example of how the Color Picker works, the following steps show you how to use the Color Picker to choose the color of underline:
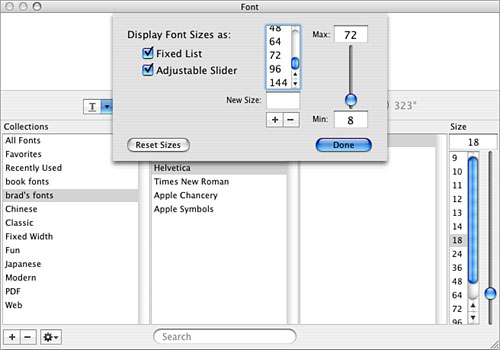
TIP You can drag the color you select to the palette at the bottom of the Color Picker so you can easily apply it again later. This palette serves as a place in which you can store your favorite colors so you can apply them again easily. Editing the Sizes Available on the Size PaneIf you select Edit Sizes on the Action menu on the Fonts panel, you will see the Font Size sheet, which you can use to change the sizes that appear in the Size pane of the Font panel (see Figure 6.9). Figure 6.9. You can control the specific sizes of font that appear in the Fonts panel using the Font Size sheet.
Using the Font Size sheet, you can perform the following tasks:
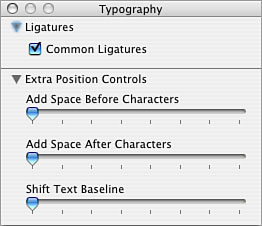
Save your changes by clicking the Done button. The sheet disappears and the changes you made are reflected in the Size pane. Applying Typography Effects to FontsThe Font panel enables you to apply some basic typography effects to text. To do so, use the following steps:
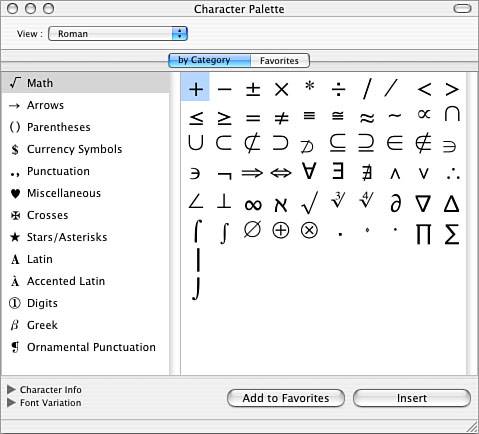
Working with the Character PaletteSpecial characters can be a pain to enter because remembering which font family the character you need is part of is often difficult. The Character Palette is designed to help find special characters in various languages and quickly apply those characters to your documents. You can also add characters you use frequently for even easier access. NOTE If you are a longtime Mac user, you probably remember the Key Caps application you could use to locate and use special characters. The Mac OS X Character Palette is like that application, but it is much more powerful. You can open the Character Palette from within applications that use the Mac OS X Font panel, or you can install the Character Palette menu on the Mac OS X menu bar. To open the Character Palette from the Mac OS X Font panel, select Characters on the Action menu. The Character Palette opens (see Figure 6.11). Figure 6.11. The Mac OS X Character Palette enables you to efficiently work with special characters.
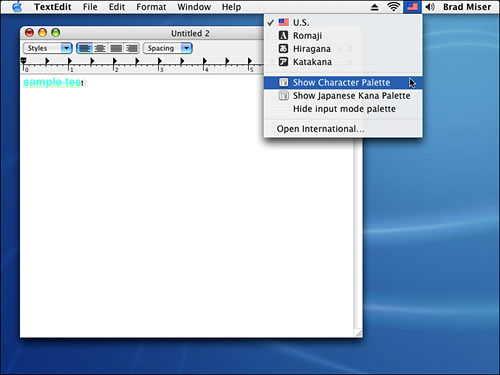
Installing the Character PaletteYou can also install the Character Palette on the Input menu on the Mac OS X menu bar so it is available in all applications, whether they use the Mac OS X Font panel or not. To install the palette, perform the following steps:
After you have installed the Character Palette on the Input menu, you can open it by selecting Input menu, Show Character Palette. Using the Character PaletteThe Character Palette has two tabs. The "by Category" tab enables you to select and insert characters you need. When you find a character you use regularly, you can add it to the other tab, which is the Favorites tab, so you can grab it easily and quickly. To find and use a character, carry out the following steps:
NOTE If you don't apply a font to the character, the Insert with Font button is just the Insert button.
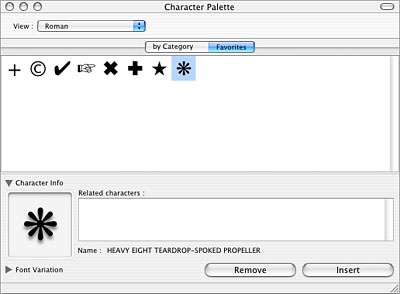
Setting Up Character FavoritesYou can create a set of favorite characters on the Character Palette to let you quickly choose a character to insert into a document. This is especially useful when you have applied specific fonts to a character. To create favorite characters, take the following steps:
To insert a favorite character from the Favorites tab into a document, perform the following steps:
You can remove a character from the Favorites tab by selecting it and clicking Remove. Working with Mac OS X Application Window MenusAlthough some previous applications running in Mac OS provided a Window menu, it was not the standard Window menu as it is now under Mac OS X. When applications can have more than one window open at the same time, you can use the Window menu to manage those open windows. You can do the following:
Using the Window menu is simple. To bring an open window to the front, select it on the menu. To use one of the Window commands, select it. NOTE Some applications mark the frontmost window with a check mark or diamond symbol; however, this behavior is not consistent. In many cases, the frontmost window is marked with some sort of character. Windows that are open and minimized also appear on the Window menu. If you use the Bring All to Front command, minimized windows remain on the Dock (windows on the Dock are always at the front). |
 To learn about installing and maintaining fonts on your Mac using the Font Book application,
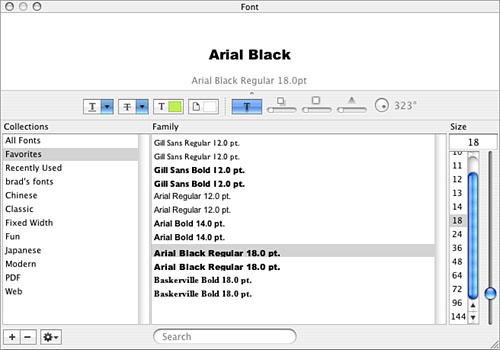
EAN: 2147483647
Pages: 273