Finding Files and Folders on Your Mac Under Mac OS X version 10.3, there are several ways to search for files or folders. Searching for Files and Folders from Finder Windows  | You can search for folders and files from within any Finder window using the Search tool on the Finder toolbar. To do so, use the following steps: |
Open a new Finder window. Click the Magnifying Glass icon in the Search tool (see Figure 4.14). You see the Search location pop-up menu. Figure 4.14. You can use the Finder window's Search tool to search in different locations on your Mac. 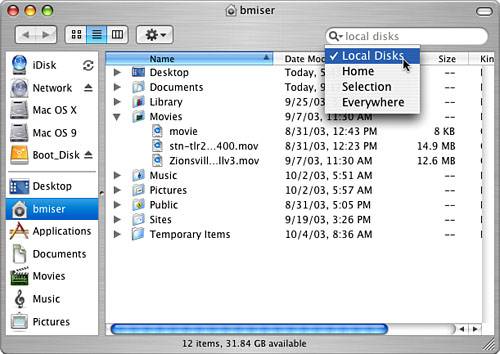
Select the area on your Mac that you want to search. Your options are Local Disks, which searches all the disks physically installed in or connected to your Mac; Home, which searches in your Home folder; Selection, which searches in the selected folder; or Everywhere, which searches everywhere you can access (such as network volumes). NOTE The currently selected area is shown in faint text in the Search field after a search area has been selected. Start typing in the Search tool. As you type, the items that include your search text are shown in the Search Results window, which appears in List view. The search continues as you type. The more specific you make the text, the more specific your results will be. The status of the search is shown at the bottom of the window. NOTE The Search Results window always appears in List view. You can configure the view using the View Options tool. For each found item, you see its name and the object that contains the found item. To see where an item is located, select it in the upper pane. The path to it is shown in the lower pane (see Figure 4.15). Figure 4.15. Selecting an item in the search results pane presents the path to it in the lower pane. 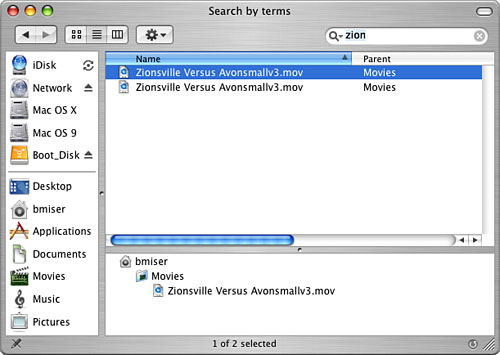
To clear the search and return the Finder window to its previous state, click the Clear button (the x located on the right side of the Search text field).
NOTE You can open folders and files in either pane of the window. You can also open an item's contextual menu in the upper pane of the window.
Searching for Files and Folders Using the Find Command There are two ways to use the Find command to search for files and folders on your Mac. The first is to search by attribute, such as name, creation date, or size. The second is to search by content. You can now mix and match search types as necessary. Finding folders and files by attribute is useful when you know an item exists but just can't remember where it is, what it is called, and so on. Finding files by content is a great help when you know that a file exists on a machine that contains a word, phrase, sentence, or topic, but you can't quite remember what the name of the file is or even when it was created. You can also use the Find by Content feature to locate all the files you can access that relate to a specific topic or concept. Finding Folders and Files by Attribute The most common type of search you are likely to do is search by attribute, such as name or creation date. You can search by one or more attributes at the same time. NOTE In the context of searching by attribute, filename is synonymous with folder name.
To search by attribute, use the following steps: From the Finder, select File, Find (or press  -F). You see the Find window (see Figure 4.16). -F). You see the Find window (see Figure 4.16). Figure 4.16. The Mac OS X Find function is both powerful and flexible. 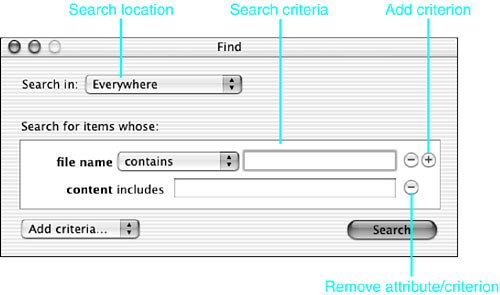
Select the location in which you want to search on the Search in pop-up menu. You have the following options: Everywhere This option searches in all the volumes mounted on your Mac, including its internal drives and removable discs and volumes on your network. Local disks This option searches only those volumes physically installed on your Mac (including removable discs). Home This option searches only in your Home directory. Specific places This option enables you to select the volumes you want to search; when you select this, an additional pane appears. Check the check boxes for the volumes you want to search. Click the Add button and select individual folders to search specific folders (the volume on which those folders are located does not have to be selected).
The filename criterion is included in the search by default. If you don't want to search by filename, click the Remove attribute/criterion button next to the filename field and skip to step 10. NOTE You can't remove a criterion if it is the only one contained in the search. Select the operand for the filename on the pop-up menu. By default, this is "contains," but you can change it to "starts with," "ends with," or "is." The meaning of these operands is self-explanatory. Enter the text or numbers for which you want to search in the field. The more information you enter, the more specific your search will be, no matter which operand you select. If you want to add more criteria for the filename, click the Add button. An additional pop-up menu and field appear. NOTE A limitation of the Find tool is that all criteria for an attribute are connected with an "and." This means that all criteria for that attribute must be met for an item to be found. Unfortunately, no easy way exists to do "or" searches, such as this filename or that one. You'll learn a workaround later in this section. Use the pop-up menu to select the operand for the second filename. Enter the second filename for which you want to search in the field. Repeat steps 6 8 for each filename for which you want to search. Select the next attribute by which you want to search on the Add criteria pop-up menu. Your options are "date modified," "date created," "kind," "label," "size," "extension," "visibility," "type," and "creator." You see only those attributes that aren't already included in the search on the pop-up menu. The attribute you select appears in the window along with any tools you use to define its search criteria. If applicable, use the pop-up menu to select the operand for the attribute you selected. For example, if you chose "date modified," the available operands are "is today," "is within," "is before," "is after," or "is exactly." Use the attribute's field, if one appears, to enter the value for which you want to search. For example, if you selected the "date modified" attribute and the "is after" operand, enter that date for which you want to search. If you want to add more criteria for the attribute, click the Add button. An additional pop-up menu and appropriate fields appear. Use the pop-up menu to select the operand for the criterion you added. Enter the value for which you want to search in the field if applicable. Repeat steps 13 15 for each criterion you want to add for the attribute. Repeat steps 10 16 for each attribute you want to include in your search. Click the Remove attribute/criterion button for any attributes you are going to search on. For example, remove the content attribute if you are not including it in your search. Review the Find window to ensure that the search is configured properly (see Figure 4.17). Figure 4.17. This search finds all files for this book (the filename contains 2904) that were modified after 8/1/02 and that are less than 1MB. 
Click Search (or press Return). A separate Search Results window appears. The top of the window shows the number of places being searched and the progress of the search. You can cancel the search by clicking the "x" button that appears in the window's status bar. When the search is complete, the "x" becomes the Refresh Search button and the items that met your search criterion appear (see Figure 4.18). The results window contains two panes. The upper pane lists all the files that meet your criteria, whereas the lower pane shows the location of items selected in the upper pane. To resize the panes, drag the resize handle in the middle of the separating line between the panes. Figure 4.18. A number of files that met my search parameters were found. 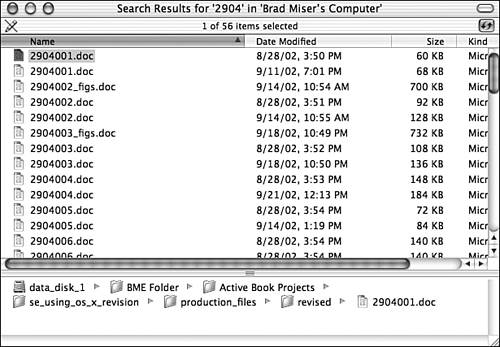
The Search results window works just like a Finder window in List view. For example, you can sort it, open items from within in, and so on. You can view the location of any found item by selecting it. The path to that item appears in the lower pane. Following are some additional tidbits about searching with the Finder: The Find window and the results window produced are independent. You can move the windows around so you can see both of them at the same time. Each time you click the Search button, a new results window appears. You can run the same search as many times as you want. For example, you can refine a search by running it, viewing the search results, moving back to the Find window and modifying the search, and then rerunning it. This also enables you to perform pseudo-or searches. Perform the first search. Then move back to the Find window, revise the search (such as by changing the filename), and run it again. The two results windows show you the files that meet both sets of criteria. You can rerun a search by clicking the Refresh Search button (the double-arrow icon) in the status bar of the results window. Unfortunately, you can't save your searches. If you want to run the same search again, leave the results or Find window open. If you close both of these windows, the search is lost and you must re-create it to run it again.
Finding Files by Content Performing content searches is similar to performing attribute searches. The only significant difference is that any sources you are going to search by content must be indexed first. When a volume is indexed, all the files it contains are searched and a list of keywords is built. CAUTION To index a server or folder that is shared, you must be the server's administrator or the folder's owner. If these conditions aren't true, the Index Status column shows Not indexable. This indicates that you can't index the volume, so you won't be able to search it for files by content.
To index sources you want to search, carry out the following steps: Select the source you want to index and press -I to open the Info window. Expand the Content index section (see Figure 4.19). The current index status is shown. Figure 4.19. You can index a source using the Content index section of the Info window. 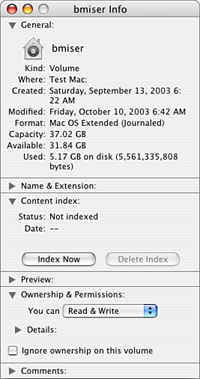
Click Index Now.
The progress of the indexing process is shown in the window. If there are many items to be indexed, this process can take a while. You can abort the process by clicking the Stop Indexing button. When the process is complete, the status information is updated accordingly. The source is then ready for content searches. Indexes are created when you execute the Index Now command. As files change, the index becomes out of date. If you search by content regularly, you should reindex your sources periodically to keep the indexes current. NOTE Unfortunately, you can't schedule indexes to be run periodically as you could when Sherlock was used to search for files and folders. To automate the indexing process, you need to use AppleScript or another automation tool.
After you have created an index, performing content searches is not difficult: Create a search as explained in the preceding section. Add the Content attribute to the search. (You can search for only a single content criterion at a time.) Enter the content for which you want to search in the field. Configure other attributes for the search. Execute the search. Items that include the content you specified and meet the other search criteria are listed in the results window.
|