Organizing Your Music with the iTunes Library, Standard Playlists, and Smart Playlists So far, listening to music with iTunes isn't that much different from using a regular CD player (aside from the ability to store all your music in one place and download music from the Internet and the iTunes Music Store, that is). The real power of iTunes is in the capability to completely customize your music. Understanding Where iTunes Stores Your Music Before getting into how to do that, it can be helpful to understand how and where iTunes stores the music you have added to the Library. The Library doesn't actually contain any music its contents consist of a listing of pointers to MP3, AAC, and other files stored on your Mac. However, each track is actually a file stored on your machine. The files that make up the iTunes Library are organized by artist and album and by default are stored in the following directory: Home/Music/iTunes/iTunes Music/ You can find the location of any song in your Library by selecting it and selecting File, Show Song File ( -R). A Finder window showing the song's file opens and the file is highlighted. -R). A Finder window showing the song's file opens and the file is highlighted. TIP If you have added songs to your library that are scattered all over your Mac, select Advanced, Consolidate Library to have iTunes place copies of all your music in the iTunes folder. This organizes all your music files in a single step.
Keeping Music Files Organized The music files you download from the Internet are stored wherever you have set files to be downloaded. You should organize music you download in a central location. If you are going to add the songs you download into iTunes, you should store them in the iTunes Music folder, just as iTunes would do if it encoded the files for you. This helps keep your music organized in a consistent fashion. You can use the iTunes Music Folder Location preference on the Advanced pane of the iTunes Preferences dialog box to change the location of your iTunes Music folder. For example, if you want to share the music you encode with other users of your Mac, you should store it in your Public folder. Other users can then add that music to their iTunes Libraries and create their own playlists. Or, you might want to do this if your startup volume doesn't have a lot of room and you want to store your music elsewhere, such as on an external drive. A couple of other preferences on the Advanced pane are related to keeping your music well organized. Set these with the following steps: Open the iTunes Preferences dialog and click the Advanced button to open the Advanced pane (see Figure 16.13). Figure 16.13. Use the settings on the Advanced pane of the iTunes Preferences dialog box to keep your iTunes music organized. 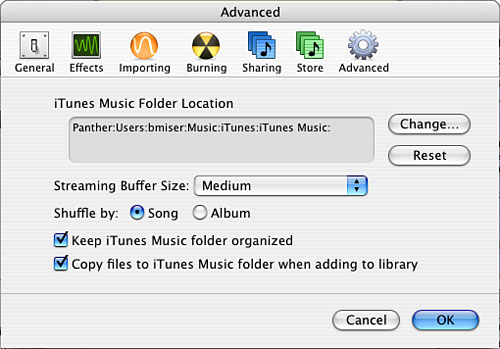
If you want to change the location in which iTunes stores music in the Library, click the Change button. Use the resulting Change Music Folder Location dialog box to move to and select a new folder. Click Open. From that point forward, iTunes will store music in the folder you selected. TIP If you want to change where your existing iTunes Music folder is located, copy it to the new location before you do step 2. Then, when you do step 2, select the Music folder you just copied. After you have confirmed that the new folder contains all your music, you can delete the original one. Make sure the "Keep iTunes Music folder organized" preference is selected. This keeps all your music organized according to the standard iTunes scheme. Check the "Copy files to iTunes Music folder when adding to library" check box. This causes iTunes to make a copy of any tracks you add to the Library (rather than importing them) and place the copies in the iTunes folder just like music you import. Click OK.
TIP To return the Music folder to its default location, move your music folder to the original location and click the Reset button on the Advanced pane of the Preferences dialog box.
Listening to the Library After you have added songs to your Library, you listen to them just like songs on an audio CD: Select the Library as the source. Click the Browse action button to place iTunes in the Browse mode if it isn't already. Select the Genre in which you are interested; leave All selected if you want to browse all genres of music in your Library. Click an artist or album that contains the songs you want to hear. The lower pane of the window shows the contents of whatever you select in the upper pane of the window. For example, to see all the albums by an artist, click that artist's name. In the Album pane, all the albums for that artist are shown. To see the tracks on that album, click its name in the Album column. In the Content pane of the window, all the tracks on the selected album are listed. To see all the contents of a selected item again, click All. In the lower pane, select the song you want to listen to and click the Play button, or just double-click the song.
TIP In the panes of the Browse window, you see All at the top of each list. When you select All, all the items in that part of the window are selected (and played if you click the Play button). For example, if you select an artist in the Artist column, select All in the Album column, and click Play, all the albums by that artist are played. Similarly, if you select All in the Album window and then click Play, all your albums are played.
The other controls work just as they do for a CD, such as the check box, Shuffle button, and so on. You can also use the check box to skip songs and play a song by double-clicking it just as you can when you listen to a CD.  | If iTunes can't find a song you have added to the Library, see "iTunes Can't Find a Song in My Library" in the "Troubleshooting" section at the end of this chapter. |
Understanding Playlists The benefit of creating and using pointers to music files in the Library is that you can create customized sublibraries, called playlists, of songs you want to hear. These playlists act like albums they contain specific sets of songs. There are two types of playlists: playlists and smart playlists. Playlists contain a fixed set of songs you select. Smart playlists use a set of criteria you define to select a playlist's contents, and the contents of smart playlists can be dynamic, meaning they change over time. Creating and Using Playlists You can create your own playlists and add any songs in your Library to them. The contents of a playlist remain the same until you change them manually. You can add the same song to more than one playlist and add the song to the same playlist more than one time. To create a playlist and add music to it, do the following: Click the New Playlist button or select File, New Playlist (press -N). You see a new, untitled playlist in the Source pane. Name the new playlist the name is highlighted and ready to edit immediately after you create it. (You can also edit playlist names by clicking them and waiting a second or so until the name becomes highlighted.) TIP A great way to get a playlist started is to select the songs you want it to contain and then select File, New Playlist From Selection (or press Shift--N). A new playlist is created and the songs you selected are added to it. Click Library to select it as the source. Browse or search your Library to locate songs you want to add to the new playlist. Drag the tracks you want to add from the Content pane of the Library onto the name of the playlist you created (the playlist is highlighted when the track is on top of it). Continue adding tracks to the playlist. Select the playlist in the Source pane to see its contents (see Figure 16.14). Figure 16.14. This playlist contains songs from several movie soundtracks. 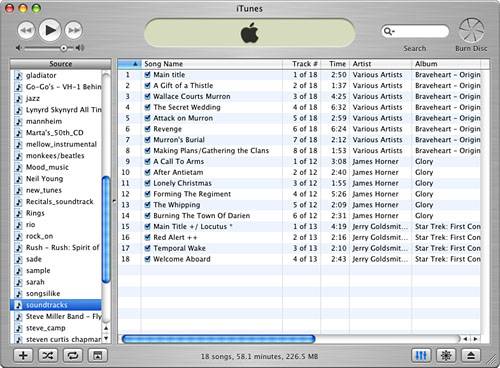
Set the order in which the tracks will play by dragging them up or down in the Content pane.
NOTE As you can see in Figure 16.14, iTunes doesn't always get correct information, especially for music collections and movie soundtracks. (The artist shown for the music from the movie Braveheart in Figure 16.14 is Various Artists when it should be the soundtrack's creator.) If the incorrect information bothers you, use the Info window to correct it (you'll learn about that later in this chapter).
At the bottom of the iTunes window, the number of songs in the playlist, their total playing time, and the size of the files you have referenced in the playlist are shown. Because a playlist contains only pointers to tracks, its file size is quite small. However, this size information for the files it references is useful when you want to place the playlist on a portable MP3 device or when you want to burn a CD. You can use the size information to ensure that the playlist will fit in the device's available memory. Listening to a playlist is just like listening to a CD. Select the playlist you want to hear and use the iTunes playback controls to listen to it. You can delete entire playlists, delete specific songs from a playlist, or remove songs from the Library by selecting the items you want to remove and pressing Delete. You then see a warning dialog box; if you click OK, the playlist or song is removed (when you remove a song from a playlist, the original file is not affected). If you select a track in the Library to remove the related file you created using iTunes, you see a second dialog box asking whether you want iTunes to place the original file in the Trash. If you click OK, the file is also moved to the Trash. If you click Cancel, the original file remains on your Mac (you can add it back to the Library if you want to listen to it again). Creating and Using Smart Playlists Playlists are cool because they enable you to create custom albums for your listening pleasure. However, listening to the same playlists over and over can get a bit dull. This is where smart playlists come in. These playlists are generated by defining a set of criteria for the music you want to be included in the playlist rather than selecting individual songs. Even better, each time you play that playlist, the specific songs included can be determined dynamically by applying the playlist's criteria to your library. For example, iTunes comes with the Recently Played smart playlist. By default, this playlist contains the songs you have played in the past two weeks. The contents of this playlist change over time as you listen to different music, and, unless you listen only to this playlist, it will never be exactly the same twice. The criteria you use for a smart playlist can be based on one or more attributes, and you can limit the size of the playlists to a specific number of songs. Different icons are used to differentiate smart playlists from standard ones (see Figure 16.1). To create a smart playlist, follow these steps: Hold down the Option key and click the New Playlist button; select File, New Smart Playlist; or press Option--N. The Smart Playlist window appears (see Figure 16.15). Figure 16.15. The Smart Playlist dialog box enables you to create a complex playlist based on multiple criteria. 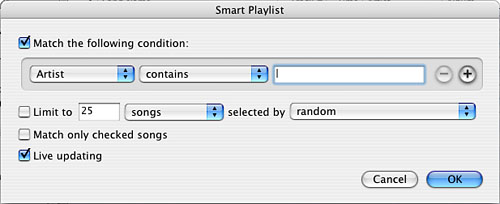
Check the "Match xx of the following condition" check box. The pop-up menus and text box become active. Select the criterion on which you want to base the condition on the first pop-up menu. For example, select Genre to base it on the condition on the music's genre. Select the operand on which you want to base the condition on the second pop-up menu. The operands available depend on the condition you selected. For example, if you choose a text condition, such as Genre, your choices include contains, is, is not, and so on. If you choose a numeric condition, such as time, your choices include is, is not, is greater than, is in the range, and so on. Enter the text or numbers for the condition in the check box. For example, if you selected Genre, you could enter Jazz or Rock. If you selected time, you could enter the length of the songs you want to be included. Click the Plus sign. Another condition is added to the smart playlist. A new pop-up menu appears next to the check box at the top of the window. On the new pop-up menu, select All if you want all the criteria to be met or select any if only one of the criteria has to be met for a song to be included in the playlist. Repeat steps 3 5 to configure the new condition. If you want to add another condition, click the plus sign again. Repeat steps 3 5 to configure that condition. TIP To remove a condition from a smart playlist, click the minus sign next to that condition. Keep adding and configuring conditions until you have added all that you want to include. If you want to limit the playlist to a certain number of songs, amount of time, or file size, check the "Limit to" check box. Enter the value you want to use for the limit. Select the parameter by which you want to limit the playlist on the pop-up menu (for example, select songs to limit it to a specific number of songs), and then choose how you want the songs to be selected on the "selected by" pop-up menu. Suppose you want to include only 50 songs in the playlist and want them selected by those that are most played. Your input would be 50 in the text box, songs on the first pop-up menu, and most played on the second pop-up menu. If you want the playlist to include songs you have skipped (by unchecking their check boxes), uncheck the "Match only checked songs" box. If this check box is checked, skipped songs are also skipped by the playlist. If you want the content of the playlist to change over time, check the Live Updating check box. Each time you play the playlist, iTunes selects the songs it plays based on the latest information. For example, if the playlist is based on genre and you add a new album from the genre to your Library, that album would be added to the playlist automatically. If you don't check this check box, the playlist contains songs based on the music as it existed in your Library when you created the playlist. Review the conditions to make sure you have defined them as you want them (see Figure 16.16). Figure 16.16. This smart playlist plays 50 jazz songs I have rated four or five stars and have played most recently. Because it is updated live, as I listen to music that meets the criteria, that music is added to the playlist automatically. 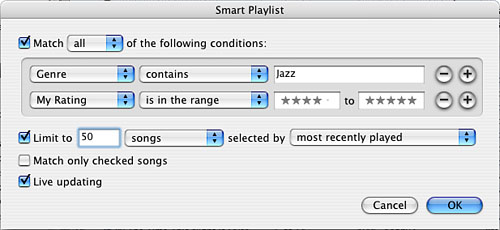
Click OK, and a new smart playlist appears in the Source pane. Rename the smart playlist as needed (iTunes attempts to name the playlist based on its conditions; this might or might not result in the name you want to use). Select the playlist. Its current contents are displayed in the Contents pane (see Figure 16.17). Figure 16.17. The current contents of the selected playlist are shown in the Content pane. Because it is updated live, the tracks included in the playlist change over time. 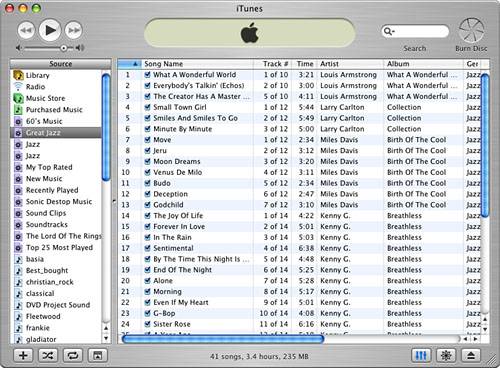
You can also edit the default smart playlists Apple has provided for you or smart playlists you create: Select the smart playlist you want to edit. Select File, Get Info (-I) or select File, Edit Smart Playlist. The Smart Playlist dialog box appears. Use the controls to edit a smart playlist in the same way as when you create a smart playlist. When you are done making changes, click OK. The playlist uses the updated conditions the next time you play it.
NOTE The Purchased Music source is actually a smart playlist that collects all the music you have purchased from the Music Store. As you purchase music, each song you buy is added to the Purchased Music playlist automatically. (In case you are wondering, you can change this playlist.)
Browsing Playlists You can browse playlists just as you browse your entire library: Select the playlist you want to browse. Select Edit, Show Browser (or press -B). The Browse pane appears at the top of the window, and you can view the genre, artist, and album information for the songs included in the playlist.
Opening Playlists If you double-click a playlist, it opens in a separate and independent iTunes window. This makes working with playlists easy, especially when you are building them. You can open a playlist's window and more easily drag tracks from the iTunes window onto the playlist's window to add them to it. You can also use a playlist window to reorganize it, play it, and perform other playlist tasks. Configuring Views for Sources You can customize the columns shown for each source in the Source pane, including playlists, CDs, and so on: Select the source whose view you want to configure. Select Edit, View Options (or press -J). The View Options dialog box appears; the name of the selected source appears at the top of the dialog box. Check the check boxes for the columns you want to see in the Content pane when you select that source. You can select from among many options, including Album, Artist, Comment, Date Added, Genre, and so on. Uncheck the check boxes for those columns you don't want to see. Click OK. When you select the source, you see only the columns you selected.
TIP You can also customize the view for a source by holding down the Control key while you click in a column heading. A pop-up menu appears and you can quickly add or remove individual columns. You can also have iTunes automatically size one or all columns in the window.
The custom view you create is saved and returns each time you select that source. You can have different view options for each source you view (meaning your library, every playlist, each CD, and so on). Using the iTunes Information Window The iTunes Information window is a powerful tool you can use to get information about tracks and control specific aspects of those tracks. For example, you can associate an Equalizer preset with a specific song, among many other things. The Information window contains the following panes (see Figure 16.18): Summary Use this tab to get general information about the song, such as title, artist, album, encoding method, and so on. Info This tab enables you to apply various tags to the song, such as its artist, album, year, track number, and genre. You can also add comments about the song. The tags are what are searched when you perform a search using the iTunes Search tool. Options Using this tab, you can change the relative volume level of the song, apply an Equalizer preset, and control the start and stop playback time. Artwork This tab shows any artwork associated with the song. For example, when you purchase music from the Music Store, the album artwork is downloaded along with the song. You can also add artwork to or remove artwork from a song by using the Add or Delete button on the Artwork tab. You can even associate multiple graphics with the same song and cycle through them with the slider.
Figure 16.18. The iTunes Information window enables you to add or change information related to music in your Library. 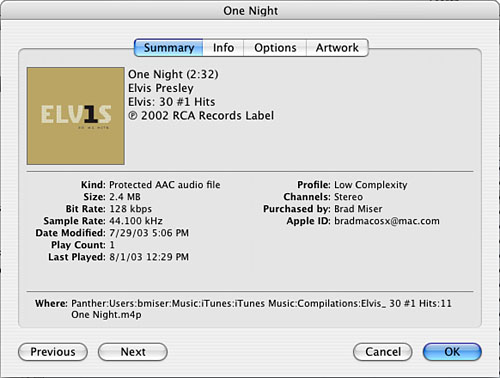
TIP If you open the Artwork pane located under the Source pane and artwork is associated with the song currently playing, it appears in this pane.
To access a song's information, use the following steps: Select a song. Select File, Get Info, (-I). (You can also point to the song, Control-click, and select Get Info from the contextual menu.) The Song Information window opens. Click the Summary tab if it isn't selected already. Information about the selected song appears (refer to Figure 16.18). The Summary tab provides detailed information (despite being called the Summary tab) about a song, such as where it is stored and the technical information related to how it was encoded. To see the next or previous song in the selected source, click the Previous or Next button, respectively. Click OK when you are done viewing this information. The Information window closes.
To make browsing and searching efficient, you should ensure that your music has the appropriate information associated with it. If you need to edit a song's information, use the following steps: Select a song. Select File, Get Info (-I). (You can also point to the song, Control-click, and select Get Info from the contextual menu.) The Song Information window opens. Click the Info tab to see the information that is currently applied to the selected song (see Figure 16.19). If you have imported the song from a CD or purchased it from the iTunes Music Store, the name of the song (which appears at the top of the Song Information window), artist, album, track number, and genre were likely filled in when you added the song to your Library. In many cases, that is all the information you need. Figure 16.19. The Info tab of the Song Information window provides detailed tags for a song; these are useful for categorizing your music. 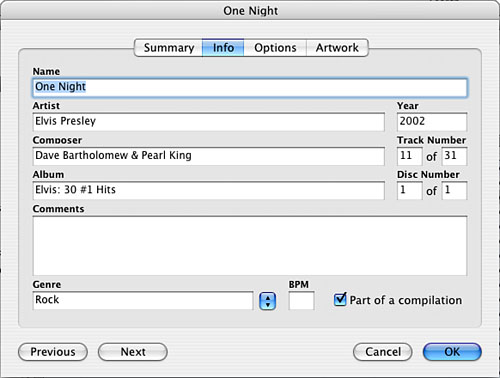
To change any of the song's tags, enter or edit the information shown in the various fields. For example, you can change the song's name or add comments about the song in the Comments field. You can associate the song with a genre by selecting a genre on the Genre pop-up menu. TIP You can add your own genres to the Genre pop-up menu. Open the menu and select Custom. The Genre field then becomes editable, and you can type the genre you want to add. It is added to the menu, and you can associate it with songs just like the genres included by default. Click OK to save your changes
You can configure some specific options for a song by using the Options tab of the Song Information window: Open the Song Information window for a song and click the Options tab (see Figure 16.20). Figure 16.20. The Options tab enables you to set a song's relative volume, equalizer, and other settings. 
To change the relative volume of the song, drag the Volume Adjustment slider to the right to make the song play louder than normal or to the left to make the song play quieter than normal. This is especially useful when you include songs in playlists from a variety of sources because you can equalize the relative volume levels of those songs. To apply an Equalizer preset to the song, use the Equalizer Preset pop-up menu. (You'll learn more about the Equalizer later in this chapter.) To apply a rating to the song, click the dot in the My Rating field for the number of stars you want to give the song, from one to five. NOTE You can apply a rating to the songs in your Library to indicate how much you like or dislike them. You can use these ratings to sort the Contents pane, and you can use them in smart playlists. To rate a song from the iTunes window, Control-click it and select My Ratings on the contextual menu. Select your rating for the song (from one to five stars). To start playing the song at some point other than its beginning, check the Start Time check box and enter the start time in minutes and seconds. When you play the song, it starts at the time you input. Using the Start Time option is a great way to get rid of interviews or talking at the start of a track. This content can be interesting once or twice, but probably not every time you hear the song. Just set the song to start when the talking is done and you won't ever have to hear it again. To stop playing the song before it reaches its end, check the Stop Time check box and enter the time at which you want the song to stop in minutes and seconds. When the song reaches this point, it stops playing. Click OK to apply the options to the song.
TIP Many of the items in the Song Information window can be applied to multiple songs simultaneously. For example, you can select several songs, open the Song Information window, and apply a genre to all the selected songs at the same time (you are prompted to make sure you understand you are changing multiple songs). Doing this saves a lot time when you need to apply the same information to a group of songs.
|