| Your Mac's hard drive is one of its most important devices, and its performance and operation have a major impact on the performance and operation of your system. At some point, you will probably want to increase the amount of hard disk space available to you. Adding more hard drive space is relatively simple in most cases, and offers many benefits to you. Choosing a Hard Drive When it comes to choosing a hard drive, you should consider the following factors: Will your Mac support additional internal hard drives? If you use a G4 Power Mac or other desktop Mac, the answer to this question is yes. If you have an iMac, Power Mac G4 Cube, PowerBook, or iBook, the answer is no. Should you go with an external drive instead? If your Mac won't support the addition of another internal hard drive, you will likely want to add more hard drive space by using an external hard drive. Even if your Mac can handle an additional internal hard drive, you might choose to go with an external drive instead because external drives are simpler to install and easier to use with different machines. For example, you can share the same external hard drive among several Macs. What drive interface does your Mac use? For internal drives, the choices are ATA or SCSI. For external drives, the choices are FireWire, USB 2, or SCSI. NOTE You will also find some external hard drives that use the USB 2 interface. However, because USB 2 is slower than FireWire, you should not use a USB 2 drive for data you actively work with. For an inexpensive backup or portable drive, a USB 2 drive might be an acceptable choice. However, in most cases, FireWire external drives should be your first choice.
What size drive do you need? Drives come in various sizes; generally, you should get the largest drive you can afford in the format you select. Do you need to meet specific performance requirements? If you intend to use the drive for high data rate work, such as DV, typically, you need to get a drive that spins at least 7,200rpm. Some drives spin even faster, which means that they can transfer data at a greater rate. (Some drives that spin at slower rates are also acceptable; check with the drive's manufacturer to see what data rate the drive can sustain.)
NOTE If you have a Mac with room for only one internal hard drive, you can replace that drive with one of a higher capacity. For PowerBooks and iBooks, this is a relatively simple operation. For iMacs, this is a more complex task, and is not recommended unless you are very comfortable working with hardware.
 To learn about the various interfaces related to hard drives, see Chapter 20, "Understanding Input and Output Technology," p. 623. To learn about the various interfaces related to hard drives, see Chapter 20, "Understanding Input and Output Technology," p. 623.
After you have answered these questions, you should have a good idea about the type of drive you need, such as an internal drive with at least 45GB that offers performance suitable for DV work. Head to your favorite retail site (one of mine is www.smalldog.com) to research or purchase hard drives (see Figure 23.1). Figure 23.1. This IBM DeskStar 120GB drive is a relatively inexpensive way to add more hard drive space to a Power Mac G4.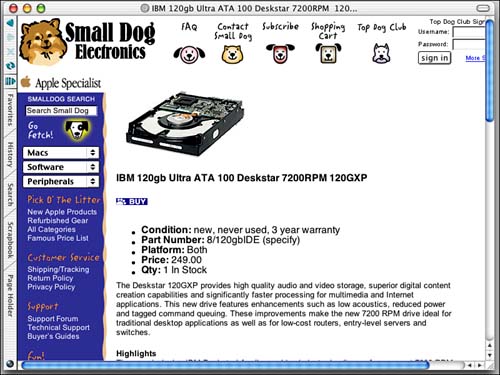
CAUTION Before you purchase a drive, check the owner's manual for your Mac to make sure that the specifications for the drive are compatible with your Mac.
To begin using a drive, you must complete the following tasks: -
Install the drive. -
Initialize and partition the drive.
Installing an External Hard Drive Installing an external hard drive is about as simple as things get. You connect the power supply to the drive, if needed (some FireWire drives take their power from the FireWire interface). Then, connect the FireWire, USB 2, or SCSI cable to the drive and your Mac. If you install a SCSI drive, you must make sure that it has a unique SCSI ID number for the external SCSI bus to which you are attaching it. You also need to make sure that the drive is properly terminated.  | If your Mac won't restart after connecting a SCSI drive to it, see "My Mac Won't Start Up After I Connect a Drive to It" in the Troubleshooting section at the end of this chapter. |
For more information about SCSI, see "SCSI," p. 637. CAUTION Remember that SCSI devices, unlike FireWire or USB devices, are not hot-swappable. You must power down your system before adding or removing a SCSI drive.
NOTE Most modern Macs require a SCSI PCI card to be added to be able to use external SCSI drives. Unless you specifically need SCSI for some reason, a FireWire drive is a better choice.
Installing an Internal Hard Drive Installing an internal hard drive is a bit more complicated than installing an external drive, but it is still relatively easy to do. NOTE Because I don't recommend that most users replace a hard drive in most Macs, this section provides information only on adding additional hard drives to a Power Mac G4. If you are comfortable enough with working inside a Mac to be able to replace a hard drive, you probably don't need any help doing so. The following steps describe how to install an internal ATA drive in a Power Mac G4. Installing a SCSI drive is similar, although it uses the SCSI interface and cables rather than ATA cables as this example shows. These steps are provided only as an example; you should follow the instructions provided with your Mac.
Before you get started, read through the instructions contained in your Mac's user manual. -
Get the drive ready to install by configuring it as a slave drive; see the instructions that came with the drive for help with this. Typically, this involves configuring jumper clips on specific pins at the back of the drive (see Figure 23.2). Most of the time, these pins are already set in the appropriate configuration. Figure 23.2. This photo shows the back of a hard drive; the jumper clips are configured to make this drive the slave.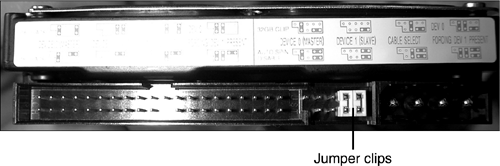
-
Back up the data on your Mac (just in case). -
Power down your Mac. -
Open the case. -
Locate the bay in which you are going to install the drive; in Power Mac G4s, this bay is located at the bottom of the machine toward the back (see Figure 23.3). Figure 23.3. The hard drive that came with this G4 Power Mac is installed in the lower part of the drive carrier located in the drive bay; an additional drive can be added to the upper part of the carrier.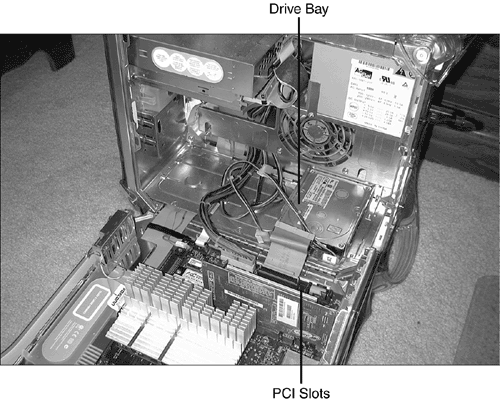
-
Unplug the power cable from the motherboard and both cables from the existing drive. -
Remove the screw that holds the driver carrier in place. -
Install the new drive in the upper part of the drive carrier; use the screws that were included in the accessory kit that came with your Mac. -
Install the drive carrier back in the Mac. -
Connect the power and data cables to each drive. -
Reconnect the power cable to the motherboard. -
Close the Mac and power it up.
The Mac should restart normally. When it boots up, you won't notice any difference because you can't use the drive until you initialize it. Initializing and Partitioning a Hard Drive Before you can use a hard drive, whether it is internal or external, you must initialize it. You can also partition it in order to create multiple volumes on a single drive (for example, you might want to be able to install more than one version of the Mac OS on a single disk). -
Launch Disk Utility (Applications/Utilities). In the Disk Utility window, you will see two panes. In the left pane, you see the drives that are installed in your system (the drives are labeled by their capacity). At the top of the right pane, you will see five tabs; each tab enables you to view data about a drive or to perform a specific action. -
Select the drive with which you want to work. When you select a drive, the information for that drive will be shown on the Information tab. You can expand a drive to see the partitions that it currently contains (see Figure 23.4). Figure 23.4. Disk Utility can see two drives; the lower drive has just been installed in this Mac and needs to be initialized and repartitioned.
-
Click the Partition tab. -
Select the number of partitions you want to have on the drive by using the Volume Scheme pop-up menu. Each partition will be represented by boxes in the Volumes pane of the window. The partitions will be called Untitled, Untitled 2, and so on. -
Select a volume by clicking it on the Volumes pane. The information for that volume will be shown in the Volume Information area. TIP You can divide a volume into two partitions of the same size by selecting the partition and clicking the Split button. -
Name the volume by typing a name in the Name box. -
Choose the format type from the Type pop-up menu. You should almost always choose Mac OS Extended. NOTE The other format options are Mac OS Standard, Unix File System, and Free Space. These are useful in some special circumstances. For example, if you are going to run a Unix OS system (apart from Mac OS X) on your machine, you should use the Unix File System for one partition. -
Enter the size of the volume in the Size box. You can also set the size of a partition by dragging its Resize handle in the Volumes pane. If you check the "Locked for editing" check box, the information will be reset and locked (you won't be able to change it). -
If you are going to use the partition while booted up under Mac OS 9, leave the "Install Mac OS 9 Disk Drivers" check box checked. If you are using the partition for Mac OS X only, as a Unix drive, or for some other special purpose that doesn't involve Mac OS 9, you should uncheck this check box. The status of the disk with whichyou are working is shown in the lower-right corner of the window. For example, if you can initialize the disk, you will see a status message saying so. -
Select the next partition in the Volumes pane. -
Repeat Steps 6 through 10 for each of the volumes (see Figure 23.5). Figure 23.5. This drive will contain two volumes after it has been partitioned; one is called "Book Projects" and is about 16GB, and the other is called "DV Projects" and is about 27GB.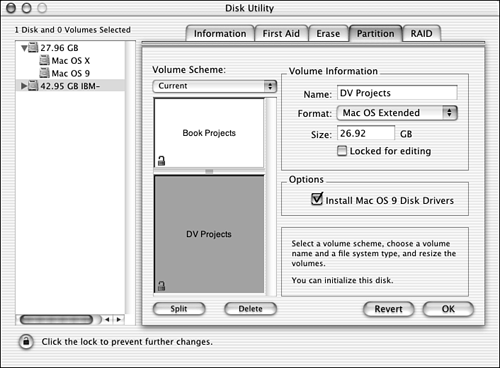
-
Click OK. -
If you are sure that you want to initialize and partition the drive, click Partition in the Warning dialog box. You will see a progress window showing you how things are proceeding. After a few moments, you will return to the Disk Utility window. -
Select the drive you partitioned, expand it, and click the Information tab. Confirm that the drive has been initialized properly (see Figure 23.6). Figure 23.6. The drive now has two partitions on it.
-
Select one of the partitions you just created. The Information tab will reveal information about that partition, such as the format, capacity, available space (which will be about the same as capacity immediately after you partition a drive), and so on. -
Explore each partition to make sure they are configured properly. -
Quit Disk Utility.
When you return to your desktop, you will see the new volumes that are ready for your data (see Figure 23.7). Figure 23.7. The Book Projects and DV Projects volumes are ready to use.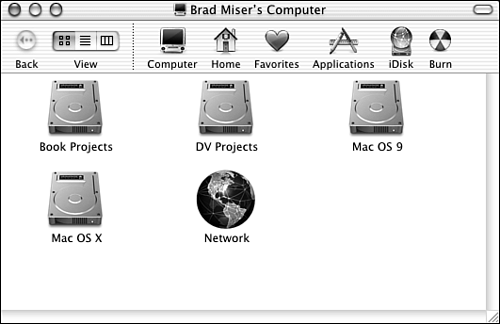
| Disk Utility can't see your new drive? See "Disk Utility Can't See My Drive" in the Troubleshooting section at the end of this chapter. |
You can also use Disk Utility for various other tasks, such as erasing a disk or a volume, disk maintenance, and creating a RAID disk. To learn how to use Disk Utility for disk maintenance tasks, see "Maintaining Your Hard Disks," p. 776. |