| Watching DVDs that others create is fun, but because you use a Mac, you aren't limited to taking what others give. With a Mac equipped with a DVD-R drive, such as an Apple SuperDrive, and Mac OS X, you can use the iDVD application to put your own content on DVD. You can view these DVDs on your Mac using the DVD Player application. But even better, you can play the DVDs you create on most standard DVD players, such as the DVD player connected to your TV. You can place the following two general types of content on DVD: Movies you have created with iMovie, or QuickTime movies you have created yourself or obtained from other sources Slide shows made up of images from iPhoto or from other sources
In addition to being able to place this content on DVDs, with iDVD you can create motion menus and buttons that enable you to showcase your content from the DVD's main menu; these menus work just like the menus on commercially produced DVDs. NOTE iDVD won't even open on your Mac unless you have a compatible DVD-R drive, such as an Apple SuperDrive.
When you use iDVD to create a DVD, you will use the following four steps: -
Prepare content that you are going to put on the DVD. -
Design the DVD. -
Preview the DVD and fix any problems you find. -
Burn the DVD.
Preparing Content for Your DVD As you learned earlier, there are two basic types of projects you can put on DVD: QuickTime movies and slide shows. In both cases, you should prepare your content before jumping into iDVD. If you prepare the content before you get into iDVD, the process of creating your DVD will go more smoothly and more quickly. When you place content on a DVD, it is encoded in the MPEG-2 format, which is the standard for DVD. MPEG-2 provides very high quality with relatively small file sizes (thus making digital movies on DVD possible). Fortunately, iDVD manages the encoding process for you in the background as you work. Your DVDs can contain up to 90 minutes of content. However, iDVD uses a higher-quality encoding scheme when the content in a DVD project is 60 minutes or less you should try to keep your DVDs within this limit, if possible. iDVD chooses the 90-min or 60-min format for you automatically based on the amount of content you add to the DVD. Preparing Movies for DVD Both QuickTime Player Pro and iMovie enable you to save your movies in both the QuickTime and the DV (Digital Video) formats. You should use the DV format whenever possible because your results will be the best possible (however, the results you get with movies in the QuickTime format will also be quite good, depending on the specific project you might not even notice the difference). To prepare your iMovie projects for iDVD, you can export the iMovie project for iDVD by choosing For iDVD on the Format pop-up menu in the Export dialog box.  To learn how to use iMovie to create projects for your DVD, see Chapter 18, "Making Digital Movie Magic with iMovie," p. 535. To learn how to use iMovie to create projects for your DVD, see Chapter 18, "Making Digital Movie Magic with iMovie," p. 535.
You can use QuickTime Player Pro to export your own QuickTime movies in various formats, including QuickTime and DV Stream. Either of these formats will work fine, but for best results use the DV Stream format. To learn how to export QuickTime movies using QuickTime Player Pro, see Chapter 17, "Viewing, Editing, and Creating QuickTime Movies," p. 499. Preparing Images for a Slide Show on DVD There are two ways in which you can place slide shows on a DVD. One is to create a QuickTime or DV movie version of the slide show. The other is to use iDVD's slide show tools to create the slide show within iDVD. There are many ways to create slide shows as QuickTime movies. You can use QuickTime Pro, iPhoto, and iMovie to do so; each tool has its own advantages and disadvantages. If you use iPhoto to store all the images you want to include in a slide show, you can export those images as a QuickTime movie. You can also export the images as individual files and use iDVD's slide show tool to construct the slide show. You can also build a slide show within iMovie and export it as a QuickTime movie. You place such QuickTime movies on a DVD just like other QuickTime movies. Yet another option is to use QuickTime Player Pro to build the slide show and then add that slide show to a DVD just as you do any other QuickTime movie. To learn how to create slide shows from iPhoto, see "Using iPhoto to Master Digital Images," p. 425. To learn how to use iMovie to create projects for your DVD, see Chapter 18, "Making Digital Movie Magic with iMovie," p. 535. To learn how to export QuickTime movies using QuickTime Player Pro, see Chapter 17, "Viewing, Editing, and Creating QuickTime Movies," p. 499. Last, but certainly not least, you can also use iDVD's own tools to create a slide show. Your slide shows can include images that you have captured using a digital camera and have exported from iPhoto or from many other sources. You can use images in the common image file formats in an iDVD slide show, including JPG, TIFF, and so on. Although you don't have to be too concerned about the file format of the images you include in an iDVD slide show, you do need to be aware of the resolution of the images you include. iDVD will scale your images to the 640x480 resolution when it creates a slide show. If an image does not have this proportion, black bars might appear at the top and bottom or left and right sides of the image when it appears on the screen. If this bothers you, you should resize your images to the 640x480 size before you place those images in iDVD. You can use an image editing application to do this, or you can choose to limit your images to this size when you export them from iPhoto. Designing a DVD After you have prepared content for your DVD, you are ready to design the DVD. First, plan the contents of your DVD. Then, create your iDVD project. After you start working with your project, you organize its contents by designing the DVD's menus. Then, you add the content to the DVD. Finally, you design and build your DVD's menus and buttons. The first step is to organize your content by menu. Think about a menu as being a folder for specific content, and you'll get the idea. Each menu appears in its own window on the DVD. For example, you might choose to group projects related to specific time periods on different menus, or you might want to put all of a DVD's movies on one menu while its slide shows appear on another. You can have up to six buttons on a single menu, so this is the maximum number of projects that can appear on a single DVD screen. A button can represent a project (such as a movie) or a submenu (analogous to a subfolder on your desktop) that contains additional projects or submenus. Create a list of each menu and its contents so that you have a guide to design your DVD. Each menu can have a name; use this name to help the viewer identify the type of content that is included under that menu. For each menu, list the specific files (as in QuickTime movie files), slide shows (that you will create with iDVD), or submenus that will appear on that menu. Create a folder in which to place the contents of the DVD you will create. Within that folder, create a folder for each submenu that you have planned for the DVD, and place the QuickTime movies and images that you will store on each submenu in their respective folders. This makes adding the right content to the right menu simple. For best DVD writing performance, make sure that all the media you will put on the DVD is located in the same folder on your Mac, preferably on your Mac's fastest internal hard drive. After you have added content to a DVD, don't move it until you have burned the DVD. Doing so can cause iDVD to lose track of the content (and thus it won't appear on the DVD). Later in this chapter, you'll learn how to check for missing content before you burn a DVD. After you have prepared your content and planned the DVD, you should open iDVD and get started building it. The iDVD Window When you launch iDVD, you see the iDVD window (see Figure 19.6). Like iMovie, iDVD automatically opens the last project you worked on. If you haven't used it before, you can create a new project. Figure 19.6. iDVD's window looks simple, but that simplicity provides tremendous power and capability.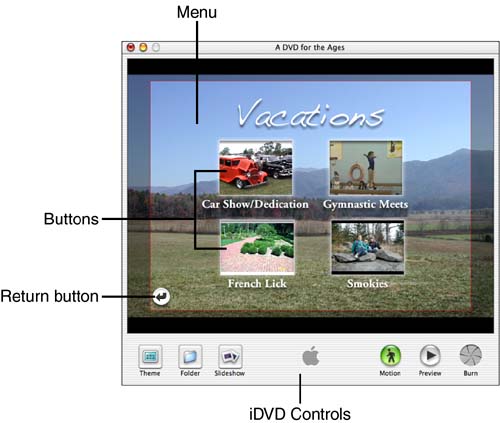
The top pane of the iDVD window is called the menu. This is the area that appears onscreen when the DVD is played. Buttons represent each project or submenu that has been placed on the DVD; you select a button to view the content with which it is associated. Each menu can include up to six buttons; a disc can contain multiple submenus so that you can store as many projects on a disc as you have room for on the DVD. Each menu has a theme that determines how the menu looks and sounds. At the most basic, a theme is simply a static image that is the menu's background. However, menus can contain motion, which means that a movie can play as the menu's background while the menu appears on the screen (if you have watched DVD movies, you have no doubt seen examples of motion menus). Motion menus can include a movie with sound, a movie without sound, or a static image with sound. You can apply one of iDVD's default themes to your menus, and you can create and save your own themes. Buttons can also have motion, which means that the content which is accessed by that button plays within the button itself while the button is being viewed. This type of motion provides a preview of the content without the viewer having to actually open it. (Again, if you have viewed commercially produced DVD movies, you'll know that sometimes the chapter buttons contain motion and show you part of the chapter associated with the button.) iDVD Controls Along the bottom of the iDVD window, you will see the six iDVD control buttons: Theme This button opens or closes the iDVD Drawer (the Drawer is covered in the next section). Folder When you click this button, you create a new folder that represents an additional submenu on the DVD. When you open a folder, you see the related submenu. Slideshow Use this button to create a slide show. When you click it, iDVD moves into the Slideshow mode. Motion This button toggles the motion effects (for both menus and buttons). When the button is "on," it is green and motion effects play. When it is "off," it is gray and no motion effects play. Because motion effects can be annoying while you are designing a DVD, it is helpful to turn them off. Turn them on again before you burn the DVD or to preview your work. Preview This button puts iDVD in the Preview mode that enables you to view the DVD as it will be when you burn it. In this mode, iDVD behaves just like DVD Player. Burn Click this one to burn the DVD after you have built it.
The iDVD Drawer The iDVD Drawer contains controls and information you use while you design a DVD. When you click the Theme button, the iDVD drawer appears (see Figure 19.7). Figure 19.7. You use the iDVD Drawer to design and apply themes to a DVD, to customize your DVD's appearance, and to monitor the status of your DVD project.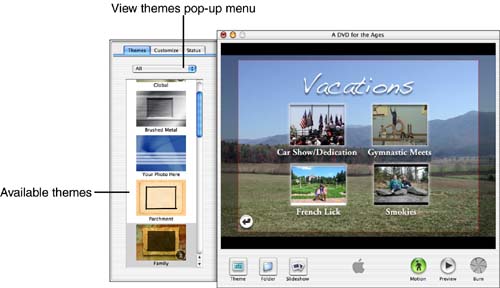
The iDVD Drawer has the following three tabs: Themes tab The Themes tab displays the themes that are available to you (see Figure 19.7). These themes include the default themes included with iDVD and any themes you have created and saved. You can choose the type of themes you want to see by using the View Themes pop-up menu; for example, if you choose Motion, you will see only those themes that include motion. Your other choices are All, Picture only, Picture with audio, or Favorites (favorites are themes you create). Customize tab The Customize tab contains controls you can use to design the themes and buttons that are used on your DVD (see Figure 19.8). You can set a menu's background and title and configure the buttons that appear on that menu. You can also configure the length of motion effects that play when the menu is displayed. Figure 19.8. You use the Customize tab to customize the appearance of your DVD's menus and buttons. 
Status tab The Status tab shows the total duration of the DVD you are creating, along with the encoding status of each project you have placed on the DVD (see Figure 19.9). (You'll more about encoding later in this chapter.) Figure 19.9. You use the Status tab to monitor the status of your DVD project. 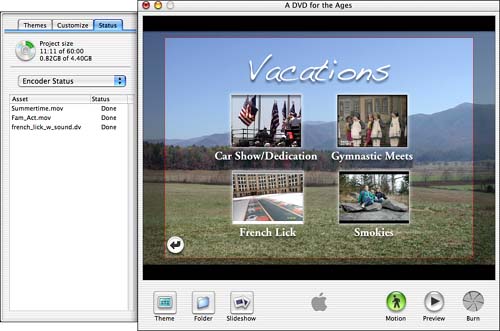
iDVD Modes When you work with iDVD, you will use the following three modes of operation: Design This is the mode in which you design the look and feel of your DVD. You see the contents of your DVD organized into its various menus, buttons, and so on. Slideshow In the Slidesh ow mode, you create slide shows from images that you place in the Slideshow window. You'll learn how to do this later in this chapter. Preview In the Preview mode, you see the DVD as it will be when you burn it and play it in a DVD player (see Figure 19.10). When you preview a DVD, a controller that simulates the controller used to view DVDs (on a computer or on a standard DVD player) appears. You use the controls on the controller to watch your DVD. This enables you to simulate how your DVD will perform before you burn it. Figure 19.10. The Preview mode enables you to view your DVD as it will be after you burn it. 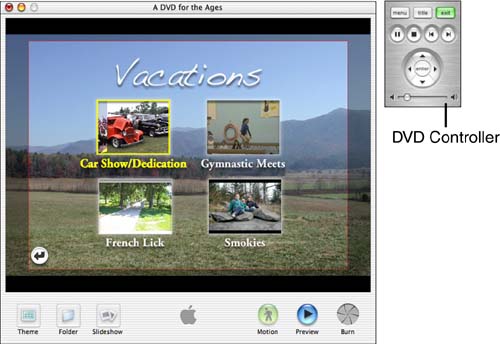
Burn When your DVD is ready for production, you use iDVD's tools to burn it.
iDVD Preferences You can use the iDVD Preferences command to set the following preferences: Delete rendered files after closing a project As iDVD adds content to a DVD, it encodes the content in the MPEG-2 format. iDVD calls this rendering the content. If you enable this preference, iDVD will delete the rendered files when you close a project. You should use this preference only if you always create and burn a DVD in a single session. It is better to let iDVD handle the rendering for you in the background so that you don't have to wait for all rendering to be complete when you want to burn your DVD. With this preference disabled, iDVD will keep encoding your project's files as you work with it. When you close and then open a project, iDVD picks up the rendering process where it left off. If you enable this preference, iDVD has to start over each time you close and then reopen a project. Show Watermark This option displays the Apple logo (checked) or doesn't display it (unchecked). If you want to proudly display your Mac colors on your DVDs' menus, you can leave this option turned on. However, for most projects, you will probably want to turn this off. Video Standard The National Television Standards Committee (NTSC) format is the primary video format in the U.S. Phase Alternating Line (PAL) is the primary video format in Europe. Each format has its own parameters, such as frame rates and such, but you really don't need to worry about the details. If you are creating projects that will be displayed on U.S. equipment, choose the NTSC radio button. If you are creating projects for display on European systems, choose PAL. If you change format, the change you make will apply to new projects, so make a preference choice before you start a new iDVD project. Add Slideshows to DVD-ROM With this preference enabled, any slide shows you create for your DVD will be added to the DVD-ROM "portion" of the DVD you create and so can be viewed outside of a DVD viewing application. For example, you could view the slide show in QuickTime Player Pro instead of just the DVD Player application. Always scale slides to TV-Safe area Because the proportions of images that are displayed on a monitor are different from what is displayed on most TVs, iDVD offers a TV-Safe area, which it presents as a red box on the screen. When you keep content inside this box, you ensure that all the image will be displayed when the DVD is viewed on a TV. If you enable this preference, iDVD scales images for slide shows to this safe area for you automatically. This can have unexpected results, so carefully review your slide shows to make sure that iDVD has scaled the images properly.
Creating and Organizing an iDVD Project When you create a DVD, you first create an iDVD project. The project contains all the content you will put on the DVD, along with its "look and feel." Creating an iDVD project involves three steps: -
Launch iDVD. -
Choose File, New Project (or press  +N). +N). -
Name your project, choose a location in which to save it, and click Save.
You can name your project anything you'd like because the name you choose won't appear when the DVD is played (names of individual menus on the DVD do appear). Where you save your project is an important consideration. The files that iDVD creates (and that you will put on DVD) can be quite large for a DVD with a significant amount of content on it. Make sure that the disk on which you store your project has plenty of room. Typically, you will need several GBs of disk space for the project folder that iDVD creates. Although the specific amount of disk space you will need depends on your content, you shouldn't try to store an iDVD project on a disk with less than 3 4GB available. This does not include the space required to store your content files; this amount is required for the rendered versions of your content that iDVD creates when it prepares a DVD. After you have created a new project, an empty menu window will appear this menu will have one of iDVD's default themes applied to it, but it won't contain any content (see Figure 19.11). If the theme for that menu includes motion, it will begin to play. Because this can be distracting, click the Motion button (located at the bottom of the iDVD window) to turn off the motion effects (the Preview button will turn gray to indicate that motion effects are turned off). Click the Theme button to open the iDVD Drawer. Figure 19.11. This is a new iDVD project, ready for content to be added.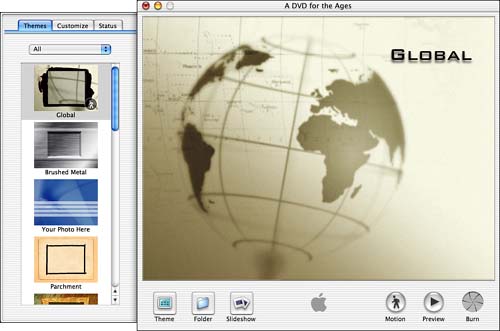
The title you see at the top of the menu window (in Figure 19.11, it is Global) is the name of the theme that was applied to that menu when you created the new project. How this default menu looks doesn't matter because you will redesign the menu later. The menu that iDVD creates when you create a new project is the main menu. This is the menu from which all content on the DVD will originate. Creating Submenus Your first task is to create and name all the submenus for the DVD. Refer to your DVD design document to determine what you will call the main menu, how many submenus you will need, and what the name of each submenu is. After you have this information, you can "flesh out" the DVD's contents by following these steps: -
Click on the main menu name, which by default is the name of the theme that iDVD applied to the main menu when you created the project. It will become highlighted. -
Replace the default theme name with the name of your DVD. The name you create will appear as the disc's title when you view it. Again, don't worry about the format of the text. Just get the structure in place for now. -
Click the Folder button. A new empty folder button will appear (it will be titled My Folder). In iDVD, folders represent submenus. So you will create a folder for each submenu contained on the main menu. Keep in mind that you can have up to six buttons on a single menu. The buttons you create include those for submenus as well as the content that is provided on that menu. -
Select the folder's name so that it becomes highlighted. A colored box will appear around the folder icon to show you that it is selected, and you will see a slider at the top of the icon. -
Type the submenu's name. This name will identify the button on which the viewer will click to move to that menu. -
Repeat Steps 3 through 5 until you have created all the submenus that appear on the main menu. Next, open each submenu and create the submenus that appear on that submenu. -
Double-click the folder icon for the submenu to which you want to add a submenu. The submenu will open, and you will see the default theme and menu title again. Because this is a submenu, you will see the Return button, which is a curved arrow. You click this button to return to the previous menu, which will be the main menu for the first level of submenus you create. -
Repeat Steps 3 through 6 to add submenus to the menu that is currently being displayed. -
When you are done, click the Return button to move back to the previous menu.
TIP To delete a submenu, select it and press the Delete key. The submenu and any submenus it contains will be deleted from the project.
Continue adding submenus to the DVD until you have added all the content your project plan calls for. Again, don't worry about how the buttons or menus appear; you will customize the appearance of the DVD later. Your purpose now should be to create the organization for the contents you will put on the DVD (see Figure 19.12). Figure 19.12. This DVD's main menu has three submenus.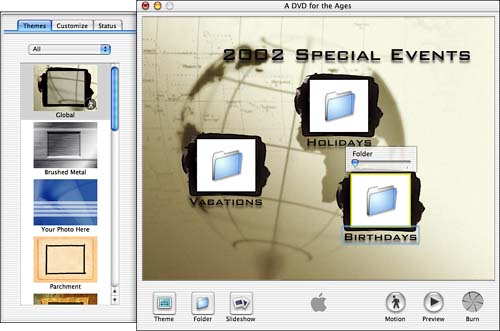
After you have created the DVD's organization, you can start to add content to it. Adding QuickTime Movies to the DVD Much of the content you place on a DVD will probably be in the form of QuickTime or DV movies. Adding QuickTime movies to a DVD is just a matter of dragging the files you want to add from the Finder onto the iDVD project window. -
Open the main menu or submenu to which you want to add a QuickTime movie. (To open a submenu, double-click its folder icon and you will view the contents of that submenu. To move back to a previous menu, click the Return button.) -
When you are viewing the submenu on which you want to place a QuickTime or DV movie, drag the movie file from your deskto p to the iDVD menu window. A button will be created on the menu; its icon will be the first frame in the movie. The name of the button will be the name of the movie file. NOTE Don't worry about the location of the movies as you place them on the submenu. iDVD will snap them to its design grid. You can change their location after you get all of your content into the iDVD project. That is the general pattern you should follow: organize your DVD project, add content to it, and then customize its interface. -
Click the Motion button to turn on motion effects. The first few seconds of the QuickTime movie will play inside the button, providing a preview of the movie. Any effects included in the theme applied to the submenu will also play. -
Click the Motion button again to turn off the motion effects because they can be distracting when you are designing the DVD. Later in this chapter, you will learn how to configure the motion effects for each button. -
Select the button/movie name to highlight it, and change the button name to be what you want to be displayed onscreen. You can name your DVD's buttons to be just about anything you want; however, you can't include a line break in a button name. The entire name will be placed on the same line. -
Repeat Steps 1 through 5 until you have placed all the QuickTime movies you want on the submenu. -
Click the Motion button to preview the menu (see Figure 19.13). Click it again when you are done previewing the current motion effects. Figure 19.13. This submenu (you can tell it is a submenu because of the Return button) now has three QuickTime movies on it.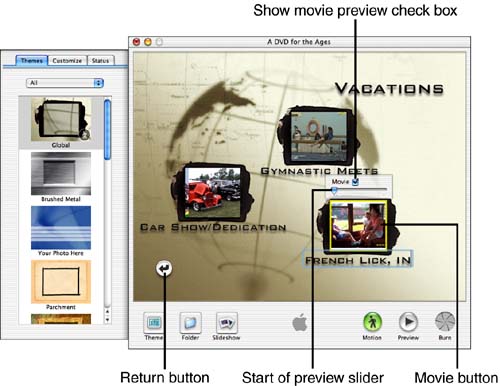
-
Repeat the previous steps until you have placed all your QuickTime and DV movies on the DVD.
As you place QuickTime movies on the DVD, iDVD begins to encode them automatically in the background (all content must be encoded before you can burn a DVD). Fortunately, iDVD handles this task for you, so you don't really need to think about it much. The encoding process goes on whenever iDVD is open until all the content has been encoded. You can assess the progress of the encoding process by following these steps: -
Open the iDVD drawer. -
Click the Status tab. On this tab, you will see movies you have added to the DVD. Each movie has a progress bar that displays the current state of the encoding process for that movie. At the top of the Status tab, you will see the amount of content that is currently on the DVD. For example, in Figure 19.14 you can see that the DVD currently has a little over 10 minutes of content. Figure 19.14. Three movies have been placed on this DVD so far; the encoding process is done for one movie, is in process for another, and hasn't started for the third.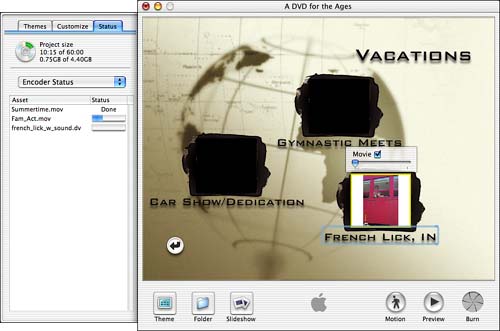
Each menu and submenu can contain up to six buttons (a button can represent a movie, slide show, or submenu). But you can add as many submenus as you need in order to place all of your content on the DVD. You can also add QuickTime content to the DVD by choosing File, Import, Video. In the resulting dialog box, move to the movie you want to add, select it, and click Open. The movie will be added to the DVD just like when you drag it there. The total length of content (movies and slide shows) must be 90 minutes or less. For maximum quality, keep the total content to 60 minutes or less. Use the information on the Status tab of the iDVD drawer to monitor the length of the DVD as you create it. Adding Slide Shows to the DVD You can use iDVD's tools to transform a set of images into a slide show that contains a soundtrack. NOTE You can also add a slide show to a DVD by creating the slide show as a QuickTime movie. You can do this by exporting images as a QuickTime movie from iPhoto, by using iMovie to create a slide show, or by using QuickTime Player Pro to create the QuickTime movie. You add a slide show QuickTime movie to a DVD just like any other QuickTime movie.
To get started, collect the group of images from which you want to create a slide show. If you keep your images in iPhoto, export the images as files. If you have images from other sources, gather those images as well. It will be easier to create the slide show if you place all of its images in the same folder. -
Open the menu or submenu on which you want to place a slide show. -
Click the Slideshow button. A button titled My Slideshow will appear (slide show buttons have two slides as part of their icon). -
Select the slide show name so that it becomes highlighted and rename the slide show with the name you want to appear on the menu. -
Double-click the slide show's button. You will see iDVD in the Slideshow mode; the name you gave the slide show's button will appear at the top of the window (see Figure 19.15). Just above the iDVD toolbar, you will see iDVD's slide show tools. Figure 19.15. This slide show is called Smokies.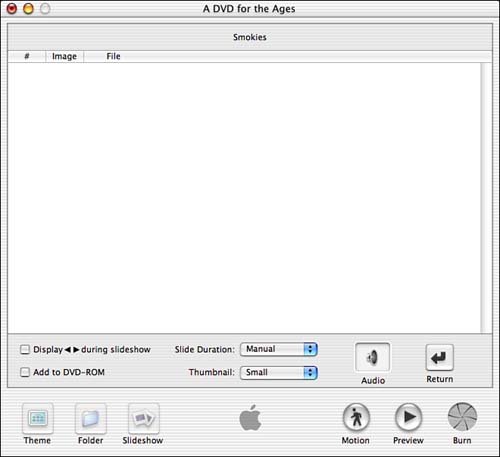
-
Drag the images that will be in the slide show from the folder in which you placed them on your desktop to the iDVD window. You will see a progress bar as iDVD processes the files. When the process is complete, you will see thumbnails of the images in the window. The order in which you place them in the iDVD window determines the order in which they appear in the slide show, with images at the top of the window appearing in the slide show first. The # column shows the order of the images as well. -
To make the thumbnails larger so that you can see the images better, choose Large on the Thumbnail pop-up menu. NOTE The filename of the images in the iDVD slide show window is the filename that the files have in the Finder. For example, if you exported the images from iPhoto, the filenames will be those that are associated with the images within iPhoto. You can rename the images before you import them into iDVD if you want. The names you give the files will appear in the File column in iDVD. However, the filenames have no effect on the slide show itself, so leaving them as you find them works too (and is easier). -
If you want to change the order of any images in the window (and thus in the slide show), drag the images up or down in the window and release the mouse button. As you move an image between other images, they will slide apart to "make room" for the images you are moving. -
To remove an image from the slide show, select it and press Delete. -
Continue reordering and deleting images until the window contains only the images you want in the show and they are in the order in which you want them to appear. -
Add a soundtrack to the slide show by dragging an audio file, such as an MP3 that you have created with iTunes, onto the Audio well that is located next to the Slide Duration pop-up menu. You should choose music that is about the length you want the slide show to be (you will match the duration of the slide show to the length of the soundtrack). When you add music to the slide show, the Fit To Audio option will become available and will be selected by default. The causes the slide show to play for the duration of the soundtrack you added. -
Now set the duration of the slide show. If you added a soundtrack and want the slide show's duration to match the length of the soundtrack, you don't need to do anything. For most slide shows you create, this is the best option. However, you can also choose the amount of time you want each image to appear onscreen by choosing a value on the Slide Duration pop-up menu (such as 3 seconds). If you choose a duration, the soundtrack might end before or after all the images have been displayed. I recommend that you use the Fit To Audio option for any slide show with a soundtrack. If you don't include a soundtrack, use the pop-up menu to set the image display time for the slide show. If you choose Manual, the person viewing the slide show will have to move through the slide show manually by clicking the Forward and Backward arrows. -
If you want the Forward and Backward arrows to appear while the slide show plays, check the "Display <> during slide show" check box. You can click these arrows to move ahead or backward through a slide show. -
If you want the slide show images to be accessible outside of DVD Player, check the "Add to DVD-ROM" check box. This creates a folder for the images that make up the slide show. When someone mounts the DVD, they can copy the image files to their computer to work with them. -
Click the Preview button. Your slide show will fill the iDVD window and you can watch it and listen to the soundtrack. -
To stop the slide show, click the Preview button again. You will return to the Slideshow mode window. -
Continue making changes to the slide show until it is done. -
Click the Return button to move back to the menu from which you started.
You can also import images into a slide show by choosing File, Import, Image. Use the resulting dialog box to select images you want to import and click Open. The selected images will be placed at the end of the slide show. You can import a soundtrack into a slide show by choosing File, Import, Audio. Use the resulting dialog box to select the MP3 file you want to import, and click Open. The selected audio will be placed in the Audio well, and you will see an MP3 icon located there. To remove a soundtrack, drag its icon out of the Audio well. It will disappear in a puff of smoke. You can create title slides for your slide show by adding text to images using an image editing application, such as Photoshop. Just drag the title images onto the slide show where you want the titles to appear. Solid black (or other color) screens with white text make nice title slides. If you want to also provide the images in the slide show as separate files on the DVD so that someone can copy and use those images individually, you can take advantage of the Add to DVD-ROM option so that these files are available on the DVD. If you choose this option, you can access the DVD-ROM portion of the disc by using the Status tab of the Drawer. -
Open the Drawer. -
Click the Status tab. -
On the pop-up menu, choose DVD-ROM Contents. The DVD-ROM contents of the DVD will be displayed. You will see a folder for the slide shows on the disc. -
Expand the Slideshows folder. You will see a folder for each of the slide shows on the disc. -
Expand a slide show's folder to see the image files it is made of (see Figure 19.16). Figure 19.16. Using the DVD-ROM Contents option, you can view the images in a slide show that will be accessible outside of the DVD Player application.
Creating Themes for DVD Menus You can customize the appearance of a menu by applying a theme to it. A theme can include two elements: a background and an audio track. The background can be a static image or a video clip. The audio track can be an MP3, AIFF, or other audio file. The audio track is optional. You can apply a different theme to each menu on the DVD or you can use the same theme for all menus on the disc. There are two sources for the themes you use on a disc. You can use the default themes that are part of iDVD. You can also create your own custom themes; you can save the themes you create as your favorites so that you can apply them to other menus on the same disc or to menus that are part of other iDVD projects. As you design your menus, it is a good idea to keep the viewing platform in mind. If you intend to view the DVD on a television, you should work in the iDVD TV Safe Area. By keeping all of your content in this area, you can be sure that the content will appear on the screen when the disc is viewed on a TV. (If you intend to view the DVD only on a Mac, you don't have to worry about this area because your Mac will display the entire contents of the iDVD window.) If objects are outside of this area, they might or might not be shown completely on a TV screen. To see the TV Safe Area, choose Advanced, Show TV Safe Area (or press +T). A red box will appear in the iDVD window; inside this box is the TV Safe area. (The area outside this box is shaded to better indicate the TV Safe Area.) Keep the buttons on the DVD in this area to ensure that they won't be cut off when the disc is viewed on a TV. Start the process of applying themes with the main menu. After you have completed its theme, apply a theme to each submenu on the DVD. These menus can be the same, similar, or completely different. It all depends on the look and feel you want for the DVD. Applying a default theme to a menu is quite simple. -
Open the menu to which you are going to apply a theme. -
Click the Theme button to open the Drawer. -
Click the Themes tab if it isn't selected already. The available themes will appear on the Themes tab and the theme currently applied to the menu will be highlighted. Themes that have motion effects have the Motion icon (the figure of a person) in the lower-right corner. -
Use the pop-up menu at the top of the tab to select the themes you want to view by category; your choices are All, which shows you all the available themes; Motion, which displays only themes that contain motion effects; Picture only, which displays themes that contain only a static image; Picture with audio, which displays only themes that have a static image and a soundtrack; or Favorites, which displays the themes you have created and saved. -
Use the tab's scrollbar to preview the available themes in the selected category. -
Apply a theme to the current menu by clicking it. After a moment, the menu's appearance will be updated to the new theme. -
If the theme you select has motion effects, click the Motion button to preview the theme (see Figure 19.17). Figure 19.17. This submenu now has the Family theme applied to it (you can see that the buttons are too close together that will be fixed when it is time to customize the buttons).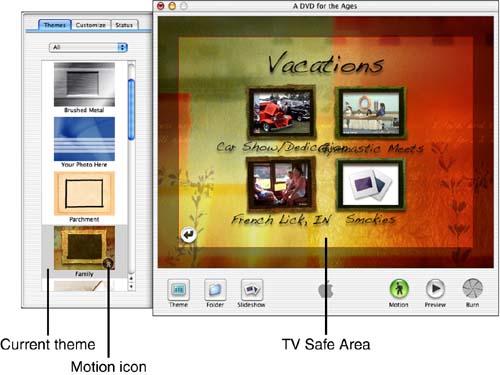
-
Continue applying and previewing themes until you find the one you want. -
To apply a theme to all the submenus, open each submenu and repeat Steps 4 through 8.
TIP If you want to apply the same theme to every menu on the DVD, apply the theme to the current menu and choose Advanced, Apply Theme to Project.
You can also create your own themes and apply them to your menus. For those themes you want to be able to reuse, you can save them as favorites so that they will be accessible on the Themes tab just like the default themes that are included in iDVD. TIP You can modify iDVD's default themes and then save those modified themes as favorites. If one of the default themes is close to what you want, use it as a starting point.
-
Open the menu for which you want to create a custom theme. -
Open the Drawer and click the Theme tab. TIP You can also open or close the drawer by choosing Project, Show/Hide Theme Panel, or by pressing Shift++B. -
Click the Customize tab. You can use the tools on this tab to design a theme. The tab is organized into three areas: Background, which you use to apply a background to your theme; Title, which you use to format the menu's title; and Button, which you use to design the menu's buttons (you'll learn about designing buttons in the next section). At the top of the tab, you will see the Motion Duration slider, which controls the length of time that motion effects play, if the theme has them. At the bottom, you will see the Save in Favorites button, which you use to save a customized theme on the Themes tab. -
To apply an image or a movie clip to the theme's background, drag an image or movie file from the desktop to the Image/Movie well. For the image, you can use files of the usual types, such as JPGs and TIFFs. For movie backgrounds, you can use QuickTime movie or DV files. The icon in the well will be replaced by a thumbnail view of the file you placed there. -
To apply a soundtrack to the menu, drag an MP3 or AIFF file onto the Audio well. An icon that represents the audio file will be displayed in the well. NOTE To remove a background movie, image, or soundtrack, drag its icon out of the respective well. To replace a background movie, image, or soundtrack, drag a new file onto the respective well. -
Either if the background is a movie or if you have included a soundtrack, use the Motion Duration slider to set the amount of time that the effects play until starting over the maximum is 30 seconds. If you use a clip or an audio file longer than 30 seconds, you can play only up to the first 30 seconds of the file. The motion effects will loop continuously while the menu is being displayed. For example, if you choose 10 seconds on the slide, the first 10 seconds of the background movie will play and then repeat. -
Use the Title Position pop-up menu to set the location of the menu title. You can choose a specific location, such as Top Center. Or choose Custom and then drag the title to place it anywhere on the menu. Choose No Title to remove the title from the menu. -
Use the Title Font pop-up menu to choose the font used in the menu title. -
Use the Title Color pop-up menu to set the color of the menu's title. -
Use the Title Size pop-up menu to choose the size of the text in the title. -
If your theme uses motion effects, click the Motion button to preview them. The background movie and soundtrack will play. -
Select another menu on the DVD and repeat Steps 4 through 11 to customize its theme. Continue customizing themes until you have done each menu on the disc (see Figure 19.18). Figure 19.18. I have created and applied a custom theme to this menu (compare the way it looks now to Figure 19.16).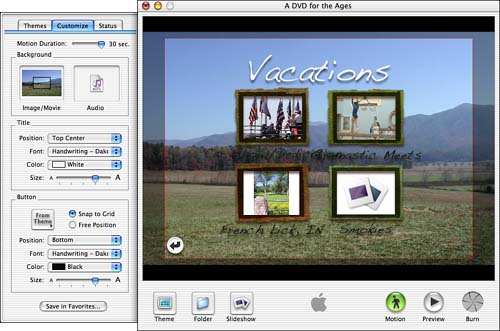
If you want to apply a custom theme to every menu on the DVD, choose Advanced, Apply Theme to Project. If you want to be able to reuse the theme, you can save it as a favorite (design its buttons first, though, so that your button design is part of the theme you save). You can use the commands on the File, Import menu (your choices are Audio, Image, and Background Video) to apply the background and soundtrack to a menu. TIP If a menu's buttons will contain motion, it is often better to use a relatively plain image as the background. Otherwise, the motion of each button and the background can be chaotic.
Customizing the General Appearance of Buttons You can also design the appearance of each button on each menu on the DVD. Remember that three types of buttons are available in iDVD. A button can represent a folder (a submenu), a movie, or a slide show. Designing buttons is quite similar to designing menus, but how you design a button also depends on what kind of button you are working with. First, design the general style for all the buttons on a menu; then configure each button individually. -
Open the menu containing the buttons you want to design. -
Open the Drawer and click the Customize tab. -
Use the pop-up menu in the Button area to select the shape of the buttons. If you choose From Theme, the shape will be based on the default theme that was most recently applied to the menu. Otherwise, the shape you choose on the pop-up menu will be applied to each button on the current menu. -
If you want to locate each button on the screen manually, click the "Free Position" radio button and drag each button to the position where you want it to appear. If you want the buttons to be organized according to iDVD's grid, click the "Snap to Grid" radio button. When you drag a button, it will snap to the grid when you release the mouse button. -
Choose the title position for each button on the Button Position pop-up menu. You have five position options that place the text in position relative to the button. For example, Bottom places the button's title on the bottom of the button. If you choose Text Only, buttons will contain only their title text. If you choose No Text, buttons will consist of an image only. -
Use the Button Font, Color, and Size controls to set the text properties of each button's title (see Figure 19.19). Figure 19.19. Now the buttons on the menu have a more appealing style and location (at least to my eye!).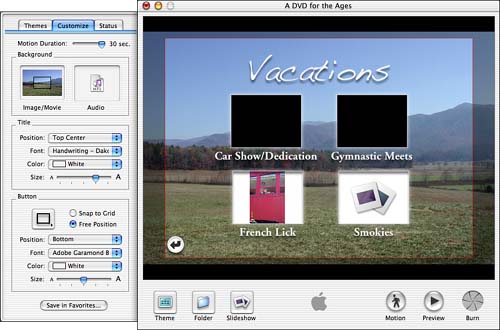
Saving and Using Favorite Designs To save a custom theme as a favorite so that you can use it again, perform the following steps: -
Open the menu that contains the custom theme you want to save. -
Open the Drawer, click the Customize tab, and click Save in Favorites. -
In the resulting sheet, name the custom theme you are saving. -
If you want the custom theme to be available to everyone who uses your Mac, check the "Shared for all users" check box. -
Click OK.
To see the custom themes you have saved, click the Themes tab and choose Favorites on the pop-up menu. You can apply your favorite themes to other menus just like you apply iDVD's default themes. There is no way to delete a favorite theme from within iDVD. To remove a theme you have created, open the following folder: Home/Library/iDVD/Favorites Drag the theme you want to delete to the Trash. Customizing the Appearance of Individual Buttons After you have done the general button design for a menu, you can design the contents of each button individually. How you do this depends on the kind of button you are working with. To design the button that represents a movie, carry out the following steps: -
Select the button for a movie. It will become highlighted and a slider and check box will appear above it. -
If you want the movie to play inside its button, check the "Movie" check box. If this check box is unchecked, a single frame of the movie will be displayed instead. -
Use the slider to set the frame at which the movie will begin to play (if the "Movie" check box is checked) or to select the frame that will be displayed in the button (if the "Movie" check box is not checked). If the "Movie" check box is checked, the movie will play inside the button when motion effects are on; the Motion Duration slider on the Customize tab determines the amount of the movie that will play before it loops.
To design the button for a slide show, perform the following steps: -
Select the slide show's button. A slider will appear above the button. -
Drag the slider to the image that you want to appear in the button.
TIP You can also drag an image file onto a slide show's button. That image will appear in the button.
You can design the buttons that represent a submenu by carrying out the following steps: -
Select the button you want to design. -
Drag an image or a movie file onto the button. -
If you place a movie file on the button, use the button's slider to set the beginning frame for the button's motion.
TIP When you select a button that represents a menu, you can drag the slider that appears to select an image from one of the projects that are contained on that menu.
You can apply the design of the buttons on a menu to all the folders on the DVD by choosing Advanced, Apply Theme to Folders. Continue designing the buttons for each menu until you have designed them all (see Figure 19.20). Figure 19.20. On this menu, I have selected the images I want to be displayed in the slide show buttons and the starting frame for the movie buttons.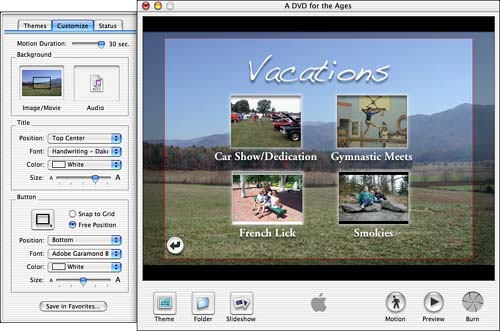
TIP To delete a button, which also deletes its contents from the DVD, select it and press the Delete key.
Preparing a DVD for Burning Before you burn the DVD you have created, you should preview it. Then, you can fix any mistakes or make changes to the appearance of the DVD, such as changing the location of buttons or improving the font used for buttons. -
Turn the motion effects on by clicking the Motion button. -
Click the Preview button. The Drawer will close, and you will see a DVD controller (see Figure 19.21). Use the controller's buttons to view the DVD. Most of the controls you see (Stop, Pause, Volume, and so on) are self-explanatory. Use the controller's arrow buttons to select various buttons on a menu; use the enter button to choose a button you want to view. If the button is a movie or a slide show, that item will play in the iDVD window. If the button is a submenu, that submenu will open. Figure 19.21. Using the Preview mode to check all the buttons and menus on the DVD is a good way to avoid wasting discs.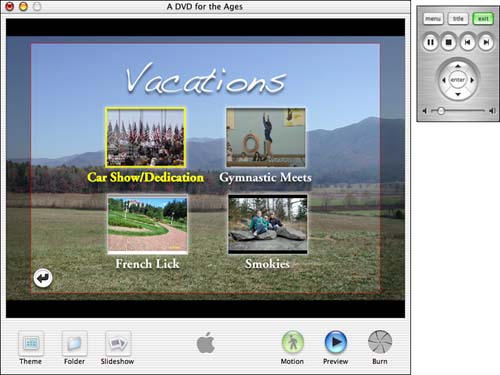
-
Continue previewing your DVD until you have seen all of its content. After you burn the DVD, you can't change it, so now is the time to fix any problems you find or to make improvements in the way the DVD looks and sounds. -
When you are done previewing the DVD, click Preview again.
When you preview a disc, make sure that the TV Safe Area is shown. This will often reveal problems with the content on the DVD, such as people's heads being cut off in images in a slide show. If you find such problems, you have to go back to the content source files and fix them. Then re-add the content to the DVD (you will also have to reset the content's button design). As a final check, make sure that all the media for your DVD is included in the project. -
Choose Project, Project Info. The Project Info window will appear (see Figure 19.22). Each file in your project will be listed along with its status. Figure 19.22. Use the Project Info window to ensure that your project has access to all the files used in it.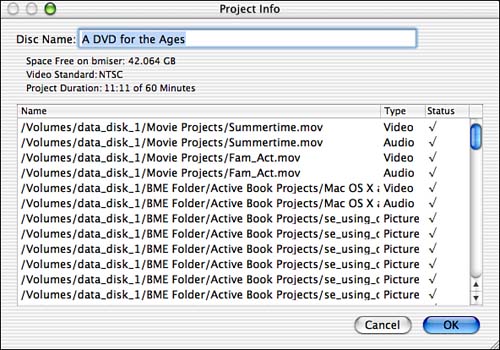
-
Scroll down the window and make sure that every file has a checkmark in the Status column. If it doesn't, you need to fix that file before you create the DVD. For example, if you have moved a movie file since you placed it on the DVD, iDVD won't be able to find it, and you will have to replace it on the appropriate menu. -
Click OK to close the window.
Burning a DVD Remember that you can write to a DVD-R disc only once. After you burn a disc, you can't change it if something is wrong, the disc you burned becomes a somewhat expensive coaster. Before clicking the Burn button, leave your project for a while and go do something else. After some time has passed, come back to the project and preview it again. Make any changes that are needed. Now you are ready to make it real. Burning a DVD is very Mac-intensive. Because the process also tends to be a bit finicky, you should make sure that iDVD has all of your Mac's resources available to it during the burning process. For the best chance at creating a good DVD, quit any other applications that are open (save your changes first), including the Classic environment. To burn the DVD, follow these steps: -
Open your project and make sure that the motion effects are on. -
Save your project. -
Click the Burn button. Its icon will become active. -
Click the Burn button again. -
At the prompt, insert a blank DVD-R disc into the drive. The burn process will start, and iDVD will manage it from start to finish. Expect the process to take some time, usually around three times the length of the content on the DVD. For example, if your DVD contains an hour of content, burning the DVD will take about three hours.
When the burning process is complete, your DVD will be ready to play. You can play it on your Mac using the DVD Player application, or you can play it in most standard DVD players. After you burn a DVD, check it out using your Mac's DVD Player. If it plays fine, you have created a good DVD. If it doesn't play properly, something went astray, probably in the burning process (for example, another application might have taken too many resources away from iDVD). Check out the project carefully to make sure that all the media are available. Preview it again to make sure that it plays okay within iDVD. Then try burning the disc again, being sure to use the list you read earlier to maximize your chances of creating a good disc. If you have limited disk space available, after you are sure that your DVD is right and that you have made all the copies you want, you can delete the iDVD project file. These files are large, so if you don't have the space to store them permanently, getting rid of them will free up disk space. You can also delete the individual content files if you no longer want to store them. Ideally, you will have a tape backup system to which you can archive this data, but if not, you will have to decide which is more important having more hard disk space or keeping all the files. Try to at least save the content files (such as your movies) if you can because you can more easily re-create the DVD project than you can re-create the individual content files.  | If the DVD you create behaves oddly when you play it in a standard DVD player, see "My DVD Isn't Working" in the Troubleshooting section at the end of this chapter. |
|