Installing and Using Mac OS X Fonts
| Mac OS X offers a lot of great features related to fonts. For example, the Quartz Extreme graphics layer renders Mac OS X fonts clearly at any size and makes using special font features such as kerning controls, ligatures, and so on easy. You can configure and select fonts within applications using the Font panel. The Font panel offers several useful features such as the ability to create and use sets of your favorite fonts.
Mac OS X includes a large number of high-quality fonts in the default installation. You can install additional fonts you want to use. You use the Font Book application to manage the fonts on your Mac. Understanding Mac OS X FontsOne difference between Mac OS X fonts and Mac OS 9 fonts is that in Mac OS 9, fonts contain both a resource and data fork, but in Mac OS X, fonts contain only a data fork. Fonts with the file extension .dfont are single-fork files, meaning all the data for that font is stored in the single fork of its file. This is the native Mac OS X font format. However, under Mac OS X, you can also install and use any of the following types of fonts:
NOTE One advantage of Mac OS X font files being able to provide all their information in a single fork is that these fonts can be shared with operating systems that do not recognize files with resource forks (Windows, Unix, and so on). There are two locations in which fonts are installed under Mac OS X. To make a font available to everyone who uses your Mac, it is installed in the directory Mac OS X/Library/Fonts, where Mac OS X is the name of your Mac OS X startup volume. Within this directory are at least three types of font files. Those with the filename extension .dfont are the single-fork font files; you'll also see TrueType fonts, which have the .ttf extension. You will also see fonts whose names do not have a filename extension. NOTE Under Mac OS X, you can install or remove fonts while applications are open; fonts you install instantly become available to the system and any applications you are running. To make a font available only to specific users, it is installed in the following directory: users/shortusername/Library/Fonts. A user's Library directory also contains the FontCollections folder. The FontCollections directory contains the set of font collections available to the user in the Font Book application and the Font pane. NOTE Any user can install fonts into the Fonts folder in the Library folder in her Home directory. If you have fonts installed on a Mac OS 9.2 volume that you want to be able to use with Mac OS X applications, you can use the Font Book to install those fonts so they are available under Mac OS X as well. Configuring Fonts with the Font BookThe Font Book enables you to manage all the fonts installed on your Mac. There are two levels of font groups you can use: libraries and collections. A library is a means of storing fonts on your computer or on a server; you can then access the fonts stored in those libraries. You can organize fonts into collections and then enable and disable individual fonts or font collections. When you open the Font Book application (Applications folder), you see three panes by default (see Figure 8.11). The Collection pane contains two sections. The upper section shows the libraries currently being managed by Font Book, while the lower section shows you the font collections on your Mac. (Collections are a means to gather fonts into groups to make them easier to select and apply. For example, when you work with the Mac OS X Font panel, its fonts are organized by collection. You can use these collections to group fonts into smaller, focused groups to make font selection easier and faster.) Figure 8.11. The Font Book application enables you to manage the fonts on your Mac.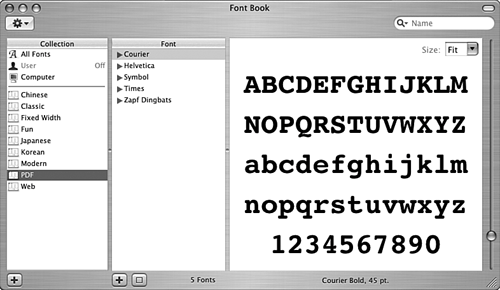 Three libraries are available to you by default. All Fonts contains all the fonts on your computer. User contains fonts stored so that only the current user can access them. Computer contains all the fonts on your Mac (in the default condition, these are the same as those in the All Fonts library). Many collections are installed by default, and you can create your own collections. The center pane is the Font pane, which shows the fonts that are part of the collection selected in the Collection pane. The right pane of the window is the Preview pane, which shows a preview of the font selected in the Font pane.
Working with Font LibrariesTo view the contents of a library, select it on the library list at the top of the Collections column. The fonts it contains will be displayed in the Font pane. You also perform the following library actions:
Working with Font CollectionsYou can use the default font collections included with Font Book and create your own collections. To view the fonts that are currently part of a collection, select that collection on the Collection list. The fonts it contains are listed on the Fonts pane. You can view the typefaces provided with font families shown on the Fonts pane by clicking the expansion triangle next to that font (see Figure 8.12). Figure 8.12. Here, you can see that I have created a collection called brad's fonts and placed the fonts I use most frequently in it.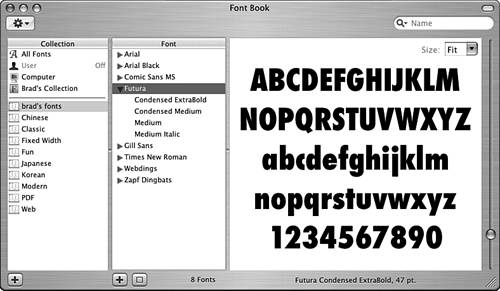 TIP If a bullet appears next to a font's name, multiple versions of that font are installed. To remove the multiple versions, select the font and select Edit, Resolve Duplicates. This causes Font Book to turn off the duplicate fonts (see Figure 8.12). TIP If you select a font or typeface listed under a font and select Preview Font on the Action menu, a separate window will appear that presents a preview of the selected font. This is useful because you can have multiple preview windows open at the same time, making it easier to compare different fonts. Adding a Font CollectionTo add a font collection, do the following steps:
TIP You can move multiple fonts at the same time by holding down the Editing Font CollectionsAfter you have created a collection, you can change it in the following ways:
TIP If you use specific sets of fonts in specific applications, consider creating a font collection for each application and placing the fonts you use within it. Then, you can easily choose fonts from this group by selecting the application's font collection. Configuring the Font Book WindowYou can also configure the Font Book window itself in the following ways:
TIP If you have trouble with a font, try validating it by selecting it and selecting File, Validate Font. Use the resulting Font Validation tool to check the font. When you do, the tool will report on the condition of the font. Installing Fonts with the Font BookYou can use the Font Book to install fonts by performing the following steps:
TIP To see where a font is installed, select it and select File, Show Font File ( |
 To learn how to work with fonts using the Fonts panel,
 EAN: 2147483647
Pages: 317