 | Mac OS X's Dashboard is a way to quickly access and use mini-applications, called widgets. Some widgets are separate applications, while others enable you to access other, full-blown Mac OS X applications. |
By default, the Dashboard application is always running so that its widgets are always available to you. Unless you remove it from the Dock, the Dashboard's icon is located to the immediate right of the Finder icon on the Dock (or below the Finder icon if you use a vertical Dock). To use the Dashboard, you activate it. When you do so, the widgets that you have configured to appear will open on your desktop in the foreground and all other windows will move into the background. After you have used the widgets you want to use, you deactivate the Dashboard again and the widgets become hidden and open windows come to the foreground again in the same condition as when you activated the Dashboard. Activating and Deactivating the Dashboard By default, you can activate the Dashboard in the following ways: Press F12 on the keyboard for desktop Macs. TIP If you use a mobile Mac, such as a PowerBook or iBook, open the Dashboard & Expose pane of the System Preferences application and look at the key listed on the Dashboard pop-up menu to determine what the default Dashboard activation key is on your Mac.
Click the Dashboard icon on the Dock. Open the Dashboard Dock icon menu and choose Show Dashboard. Double-click the Dashboard's icon in the Applications folder. Double-click a widget's icon.
When you activate the Dashboard, the widgets that are configured to open when it is activated will appear (see Figure 6.1). You can then use those widgets or see the information they provide. Figure 6.1. When you activate the Dashboard, you'll be able access the widgets that are configured to open with it. 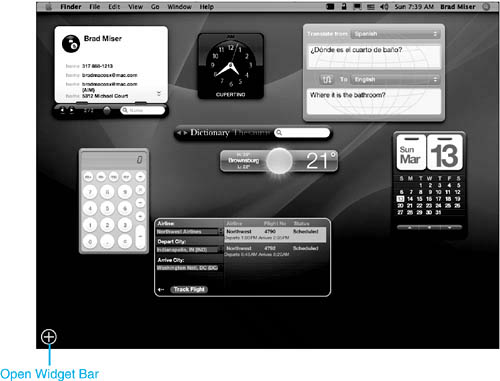
When you are done using widgets, you can deactivate the Dashboard again by pressing the default hot key, which is F12, or by clicking on the desktop outside of any open widget. All the widgets will disappear and you will return to your Mac's desktop. Configuring the Widgets That Open When You Activate the Dashboard You can configure the widgets that open when you activate the Dashboard by performing the following steps: 1. | Press F12 to activate the Dashboard. The widgets currently configured to open will appear along with the Open Widget Bar button (shown in Figure 6.1).
| 2. | Click the Open Widget Bar button. The Widget Bar will open and you will see all of the widgets that are currently installed on your Mac (see Figure 6.2). Widgets are shown in alphabetical order from left to right.
Figure 6.2. The Widget Bar shows all of the widgets that are currently installed on your Mac. 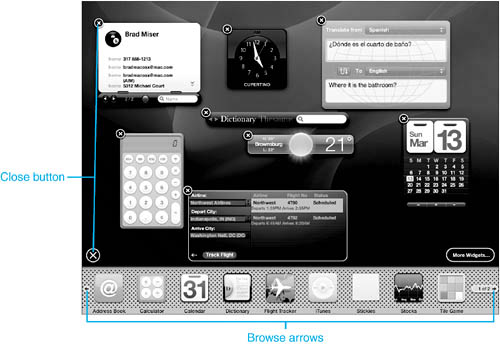
| 3. | Scroll through the installed widgets using the Browse arrows. At the bottom of each widget's icon, you'll see the widget's name.
| 4. | To have a widget open when you activate the Dashboard, click its icon on the Widget Bar. The widget will appear on the screen (see Figure 6.3).
Figure 6.3. If you compare this figure to the previous one, you'll notice that the iTunes widget is now open. 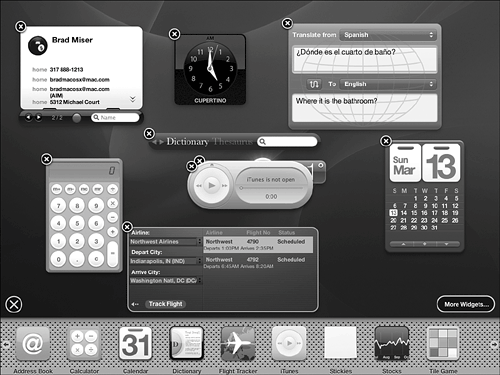
TIP You can open multiple instances of the same widget at the same time by continuing to click its icon. Each time you do so, a new version of that widget will appear. This is useful for some widgets such as the Weather widget if you are interested in information about the weather in more than one area. | 5. | Drag the open widget to the location on the screen at which you want it to appear when you activate the Dashboard.
| 6. | Close any widgets that you don't want to open when you activate the Dashboard by clicking the Close button, which is the "X" located in the upper-left corner of each widget's window.
| 7. | Continue opening and placing widgets that you do want to use and closing those that you don't want to use until the Dashboard is configured to suit your preferences.
| 8. | Close the Widget Bar by clicking the Close button, which is the X located just above the Widget Bar. The next time you activate the Dashboard, you will see and can use the widgets as you configured them.
|
TIP You don't need to close the Widget Bar. When you deactivate the Dashboard, the Widget Bar is closed automatically. The next time you activate the Dashboard, the Widget Bar will remain closed.
Using and Customizing Useful Widgets Mac OS X includes a number of useful widgets along with some that aren't so useful. In this section, you'll find a mini-review of some of the default widgets I think are worth using.  To learn how to remove widgets that you dont use, see "Removing Widgets from the Dashboard," 170 p. 170. To learn how to remove widgets that you dont use, see "Removing Widgets from the Dashboard," 170 p. 170.
To learn how to install widgets in the Dashboard, p. 171.
Using the Address Book Widget The Address Book widget enables you to access information in your Address Book more quickly than by using the Address Book application itself. The Address Book widget provides a number of useful tools as you can see in Figure 6.4 and in the following list: View a contact's information in the Address Book widget's window. If not all of a contact's information will fit in the window, use the scroll arrows that will appear to move up and down in the contact's information. Browse contact information by clicking the Previous or Next buttons Search for a contact by typing the name of the contact in the Search tool. As you type, the contacts in the window will be reduced to include only those that meet your search text. You can only search by name. To view information at a larger size, click it. It will be magnified on the screen. This works only for unlinked information, such as telephone numbers. Use the linked information for a contact to perform an action. Click an email address to send an email to the contact (when you do this, Mail will open and a message to the recipient will be created). If you click on an address, your web browser will open and the address will be shown on a Mapquest map.
Figure 6.4. The Address Book widget is a useful way to use your Address Book. 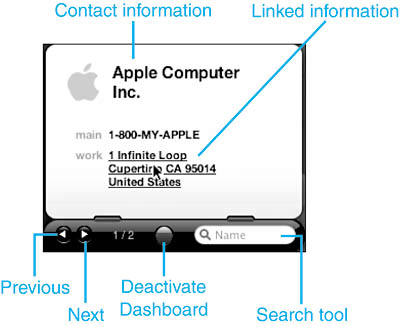
To learn how to configure contact information in your Address Book, p. 400.
TIP You can remove a widget from the Dashboard anytime the Dashboard is active by holding the Option key down while you point to the widget. When you do so, the Close button will appear; click the button to close the widget.
Using the Calculator Widget The Calculator widget is simple, but useful. When it appears on the screen, you can use it to perform basic calculations (see Figure 6.5). You can "press" the Calculator's keys using the mouse or the keyboard. Figure 6.5. It isn't much to look at, by the Calculator widget might be one of the more useful ones. 
Using the iCal Widget The iCal widget isn't the most aptly named one. From its name, you might think you can access your iCal calendar information from it. However, that isn't the case. This widget presents an on-screen calendar that you can use to view dates, such as today's date or any date in the past or future (see Figure 6.6). Figure 6.6. Too bad you can't view your iCal events by clicking on a date in the iCal widget. 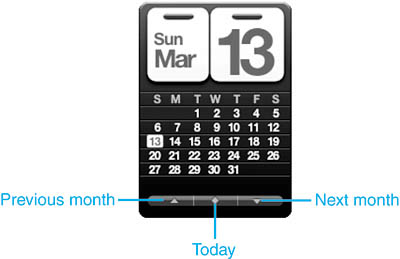
Following are some iCal widget pointers: Click in the month and date area at the top of the widget to collapse it so that the daily calendar disappears. Click it again to open the full widget. Move ahead or back by a month in the calendar using the Next or Previous buttons. View today's day and date by clicking the Today button.
Using the Dictionary Widget This is a very handy widget that you can use to access the Mac OS X Dictionary application. You can use the widget both for its dictionary and thesaurus functions. To use this widget, perform the following steps: 1. | Activate the Dashboard and click Dictionary to use the dictionary mode or Thesaurus to use that mode (this assumes you have configured the Dictionary widget to be part of the Dashboard of course).
| 2. | Start typing the word in which you are interested in the Search tool and press Return. The widget will find words that match your search text (see Figure 6.7).
Figure 6.7. If you can spell as well as I, you'll find the Dictionary widget very helpful. 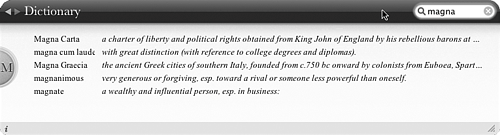
| 3. | Continue typing until the word you are interested in appears in the widget's window.
TIP The Dictionary widget is one of the few whose window you can resize by dragging its Resize handle. | 4. | If a list of words appears, click the word in which you are interested. It's definition will appear in the widget's window (see Figure 6.8). It will also be moved into the Search tool.
Figure 6.8. Ever had this term applied to you? 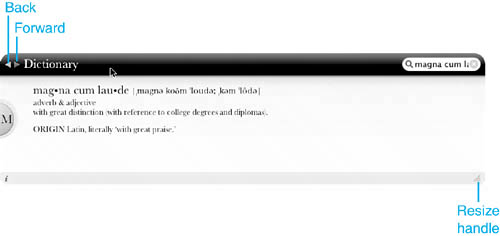
TIP You can clear your current search by clicking the Clear button that appears in the Search tool. | 5. | To move back to the list of words, click the Back button. Your original search term will appear in the Search box again.
| 6. | If the Scroll bar appears instead, use it to move up and down the window to view the entries that meet your search.
|
TIP To see which dictionary is being used, click the Info button, which is the "i" that appears in the lower left corner of the widget.
Using the iTunes Widget You can use the iTunes widget to view and control music playback via iTunes. To use it, open iTunes. When iTunes is running, you can use the iTunes widget to select and play music (see Figure 6.9). Figure 6.9. Use the iTunes widget to take control of your music. 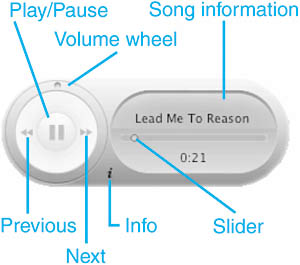
To use the iTunes widget, take heed of the following notes: To choose a playlist, click the Info button. The Select Playlist pop-up menu will appear. Use this to choose the playlist you want to hear. Click Done to move to the widget's controls. Use the straightforward Play/Pause, Previous, and Next buttons to control the music. View the song currently playing in the Song information area. Adjust the volume by dragging the Volume wheel clockwise to increase it or counter-clockwise to decrease it. Drag the slider to fast forward or rewind in a song.
Using the Unit Converter Widget If you ever need to convert from the English system to the Metric or vice versa or perform other such unit conversions, such as among different currencies, the Unit Converter widget can take all the work out of the process for you. To use this handy widget, perform the following steps: 1. | Access the Unit Converter widget.
| 2. | Choose the type of unit you want to convert on the Convert pop-up menu. There are many options from which you can choose, including Area, Currency, Energy, Time, and so on.
| 3. | Use the lower-left pop-up menu to choose the specific unit you want to convert. The options you see will depend on what you selected on the Convert pop-up menu. For example, if you choose Temperature, the options on this menu will be various units of temperature, including Fahrenheit, Celsius, and so on.
| 4. | Use the lower-right pop-up menu to choose the unit into which you want to convert the measurement.
| 5. | Type the data you want to convert in the lower left box. The converted measurement will be shown in the lower right box (see Figure 6.10).
Figure 6.10. Ever wondered when the temperature in Fahrenheit is the same as it is in Celsius? 
|
TIP If you choose a conversion for which data is provided by a third-party, such as Currency, click the Info button to see who is providing the data.
Using the Weather Widget The Weather widget displays current weather conditions and temperature forecasts for an area that you select. To use it, perform the following steps: NOTE Many widgets, such as the Weather and World Clock widgets, require an Internet connection to work. Others, such as the Calculator, don't.
1. | Open the Weather widget.
| 2. | Move the pointer over the widget. When you do, the Info button will appear.
| 3. | Click the Info button located in the lower-right corner of the widget's window. You'll see the configuration tools.
| 4. | Enter the city or ZIP Code for which you want to see weather information in the box. The simplest approach is to just enter the ZIP Code, but you can enter the city and state if you don't know the ZIP Code.
| 5. | Choose the unit of temperature you want to be displayed on the Degrees pop-up menu. The options are Fahrenheit and Celsius.
| 6. | If you want lows to be included in the 6-day forecast, check the "Include lows in 6-day forecast" check box.
| 7. | Click Done. You'll return to the widget. You'll see the city you selected and an icon representing the current weather conditions in that area. Also displayed will be the current temperature and the current day's temperature forecast (see Figure 6.11).
Figure 6.11. Ah, another lovely day in Brownsburg, Indiana. 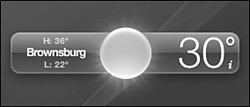
|
Following are a few tips to help you make the most of the Weather widget: To see a 6-day forecast, click the widget's window. It will expand and you'll see the latest predictions for the current day plus five days into the future. To collapse the widget again, click its window. You can track the weather in multiple areas at the same time by opening a Weather widget and configuring it for each area in which you are interested. When you activate the Dashboard, you'll see the weather in all your favorite spots (see Figure 6.12). Figure 6.12. Where would you like to be? 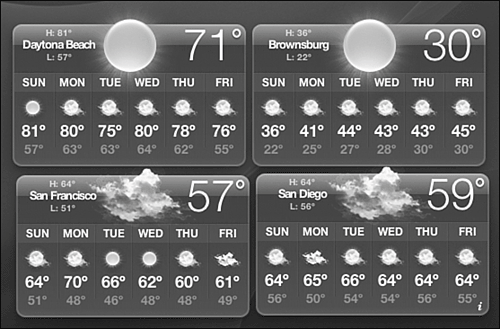
Click the city shown in the Weather widget window. Your default web browser will open and you'll move to the AccuWeather.com web page for that city. Here, you can get into the details of the weather, present and future.
NOTE The default city is Cupertino, California. I wonder what is important about that city?
Using the World Clock Widget This simple widget displays the current time in a city of your choice. 1. | Open the widget and click the Info button.
| 2. | Choose the continent in which you are interested on the Continent pop-up menu.
| 3. | Choose the city on the City pop-up menu.
| 4. | Click Done. When you return to the widget, you'll see the current time in the city you selected (see Figure 6.13).
Figure 6.13. Use the Work Clock widget to keep track of the time your favorite cities. 
|
NOTE As you explore other widgets, keep an eye out for the Info button. Some widgets have this and some don't. If a widget has it, make sure you open it to see where it leads. In many cases, this button will enable you to configure options for a widget.
|