 | Under Mac OS X version 10.4, the Finder's search tools have been replaced by smart folders. A smart folder displays its contents based on search criteria that you define as opposed to a "regular" folder that displays items that have been manually placed within it. Even better, you can save smart folders so that you can repeat searches simply by refreshing the smart folders you create. |
Just like Spotlight, smart folders search metadata so that there are many kinds of criteria you can use to search your Mac. Because of this, you can search by many different kinds of information, including the content of files and many attributes that aren't even displayed in the Finder. Smart Folder Versus Spotlight Spotlight and smart folders enabled you to do a similar tasksearching for files and folders on your Mac. However, these tools work differently, and which one you should use for a specific search depends on what you want to do with that search. If you want to save a search so you can run it again, a smart folder is your best bet. If you are performing a one-time search, which tool you use depends on how narrow you want the results to be. Although you can select general types of objects to search using the Spotlight pane of the System Preferences application, you can't focus the search all that tightly and are limited to only one search criterion at a time. Using smart folders, you can make your search as specific as you want and include multiple search criteria in a single search. Generally, use Spotlight for quick searches when you don't mind having to scan a large number of hits. Otherwise, a smart folder is probably the way to go. |
NOTE If you choose the Finder's File, Find command or press  -F, you'll see a New Search window. Except for the slightly different name ("New Search" versus "New Smart Folder"), these two search tools work very similarly. When you save a search you started with the Find command, you actually create a new smart folder so both tools end up with the same result. -F, you'll see a New Search window. Except for the slightly different name ("New Search" versus "New Smart Folder"), these two search tools work very similarly. When you save a search you started with the Find command, you actually create a new smart folder so both tools end up with the same result.
Creating and Saving a Smart Folder To search your Mac using a smart folder, perform the following steps: 1. | Choose File, New Smart Folder or press Option--N. A smart folder with the title "New Search" will appear (see Figure 4.18).
Figure 4.18. Don't let its simple looking appearance fool you; a smart folder lives up to its name. 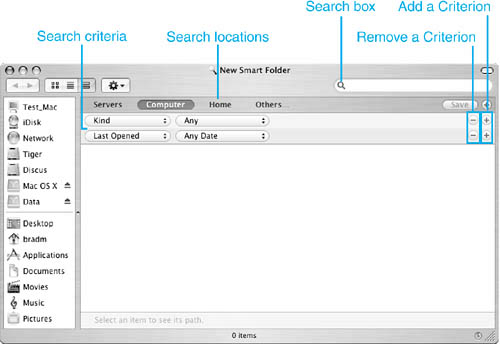
| 2. | Choose the location in which you want to search by clicking the appropriate Search location button. To search your entire Mac, click the Computer button. To limit the search to your Home folder, click Home. To limit the search to specific volumes, click Others and then choose the volumes you want to search using the resulting sheet. To search servers to which you are connected over a network, click Servers.
Next, you need to build the specific criteria that you want to use for the search.
| 3. | Click the first Search Criteria button, which shows Kind by default. When you do, you'll see a pop-up menu that lists a large number of options including Kind, Last Opened, Last Modified, Created, Keywords, Color Label, Name, Contents, Size, and Other.
Choose the first criterion by which you want to limit your search. For example, to limit the search by the date something was last changed, choose Last Modified.
If you choose the Other option, you'll see a sheet that enables you to select from a very large number of options (see Figure 4.19). You can browse this list to see all of the criteria that are possible. A brief description is provided in the sheet for these options.
Figure 4.19. When you choose Other on a Search Criteria pop-up menu, you can choose from any of the possible search criteria. 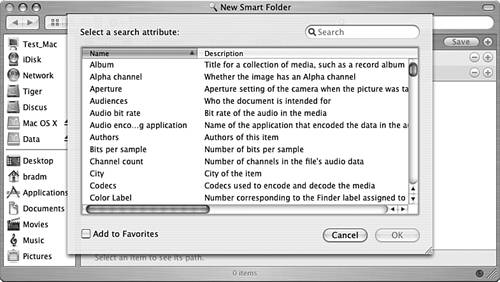
To choose a criterion on this list, select it and click OK.
TIP You can search for a criterion by typing text in the Search box at the top of the Other sheet. As you type, the criteria shown in the sheet will be limited to those that match your search. To add a criterion to the Search Criteria pop-up menu, select it and check the "Add to Favorites" check box. After you have selected a criterion, controls appropriate for that criterion will appear. For example, when you choose a text criterion, a text box will appear. When you select a date criterion, a pop-up menu of options appears. If you choose Kind, a list of kinds of files appears as a pop-up menu.
| 4. | Configure the criterion you selected by entering text, making a choice from the pop-up menu, and so on.
In some cases, making a choice will result in additional tools you can use to configure the criterion. For example, if you choose Before for a date criterion, a date box will appear so that you can enter a date.
| 5. | If an additional tool has appeared, such as a date box, complete the data for the criterion.
As you define criteria, the location you selected will be searched and items that meet the current search criteria will be shown in the Results section of the folder.
| 6. | Click the "Add a Criterion" button, which is the "+" at the end of each criterion's row, to add another criterion to the search; two criteria appear by default so you only need to do this if you want to include more than two criteria.
TIP You can also add criteria to a smart folder by clicking the + that appears next to the Save button at the top of the folder. | 7. | Configure the next criterion with the same steps you did to configure the first one (steps 36).
| 8. | To remove a criterion from the search, click the "Remove a Criterion" button, which is the "-" at the end of each criterion's row. That criterion will be removed from the smart folder and will no longer impact the search.
| 9. | Continue adding, configuring, or removing criteria until you have fully defined your search (see Figure 4.20).
Figure 4.20. This search will find all items created by "Miser," last opened before 12/22/2004, that include the word "Dock," and that are less than 50MB in size. 
| 10. | When the search is configured, click the Save button. You'll see a Save sheet.
| 11. | Name your search, choose a location in which to save it, and determine if it will be added to the Places sidebar by checking or unchecking the "Add To Sidebar" check box, and then click Save (see Figure 4.21).
Figure 4.21. You can name and save the smart folders that you create so that you can repeat searches easily. 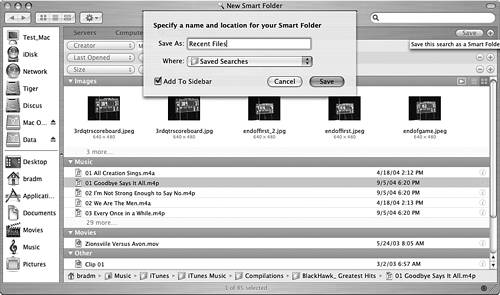
You'll return to the smart folder, which will now be named with the name you entered. If you opted to have the search added to the Places sidebar, you will see it there as well.
|
Following are some points to ponder when you are working with smart folders: If you don't want to limit your search, don't configure any search criteria and instead just type the text or numbers for which you want to search in the Search box at the top of the smart folder's window. This can be literally anything from text contained in documents, resolution of images, dates associated with documents, people's names, and so on. As you start to type, your Mac will begin its search and documents, folders, bookmarks, and anything else that meets your search text will appear in the results section of the folder. Like other areas, you can collapse or expand the sections in the results area by clicking the expansion triangle next to a group heading. You can open any item found by double-clicking on it. You can use any action or contextual commands on items as well, just as you can in a regular folder. For some groups, such as Images, the Icon and List view buttons will appear. Click the button for the view in which you want to see that section. If a group contains images, you can click the Play button to view the images in a slideshow. If you click the information button (the "i") associated with an item, you'll see a preview of it in the window. Click the collapse button (a upward facing arrow inside a circle) to hide the preview again. If a group includes the "more" link, click it to see all of the items in that group. When you select an item in the results area, the path to its location will be shown at the bottom of the window. You can double-click on any part of the path shown to open that part. For example, if the Pictures folder is part of the path shown, double-click on the Pictures icon to open that folder. If you close a smart folder without first saving it, you'll be prompted to do so. After you have saved a smart folder and then opened it again, the search tools will be replaced by the text smart folder and you'll see the Edit button. Click the Edit button to change the criteria used for that smart folder. You can renew a search by clicking the Refresh button located in the lower-right corner of a smart folder's window. The default save location for smart folder searches is the Saved Searches folder within the Library folder that is within your Home folder. If you want to remove searches, open this folder and delete any smart folder files you want to remove from your computer. If you also added the smart folder to your Places sidebar, you'll need to remove its icon by dragging it off the sidebar.
TIP Want to find all the documents on your Mac that have changed recently so you can back them up? Create and save a smart folder with search criteria of Last Modified Since Yesterday and Kind Documents. The results will display all documents that have changed since yesterday.
Using Smart Folders After you have created a smart folder, you can perform the search again by opening the smart folder. If you choose to add it to your Places sidebar, click its icon. You'll see the current results of the search. Click the Refresh button to ensure that a smart folder's window shows the most current results of a search. NOTE When you save a smart folder, you save the search criteria, not the results. This means that each time you use the smart folder, the search is repeated. If something has changed such that an item now meets the search criteria, it will appear in the smart folder.
There are several ways to search with a saved smart folder: Place it on the Places sidebar and click its icon. Drag the smart folder from its saved location onto the Dock. You can run the search by clicking the icon on the Dock. Select a smart folder's icon and choose File, Open or press -O. Double-click the smart folder's icon.
TIP For immediate access to all your smart folders without cluttering up your Places sidebar, add the Saved Searches folder to the sidebar instead of each individual smart folder. Then you can click that folder's icon to view all your smart folders and then double-click a smart folder to perform the search.
Changing Smart Folders You can change an existing smart folder, such as to change one or more of its search criteria. 1. | Open the smart folder you want to change. Notice that the Save button has been replaced by the Edit button.
| 2. | Click Edit. The search criteria tools will appear again.
| 3. | Reconfigure the search by changing existing criteria, adding new ones, or removing them. You can also change the search location.
| 4. | Click Save. The smart folder will now contain the revised search criteria.
|
|