Using a Hardware DHCP Server to Share an Internet Account
| One of the best ways to share an Internet account is to use a hub device that provides DHCP services to the network. These devices have the DHCP software built in and handle the administration of IP addresses for the network automatically. In addition to basic DHCP services, some of these devices also include special features, such as built-in firewall protection for your network. The general steps for installing and using such a device are the following:
Choosing and Installing a DHCP HubChoosing a DHCP hub is similar to choosing an Ethernet hub. For example, these hubs offer different numbers of ports, different speeds, and so on. In addition to the DHCP services they provide, the major difference between standard Ethernet hubs and DHCP hubs is that DHCP hubs also offer a variety of other special features.
NOTE AirPort base stations (including the AirPort Express base stations) are DHCP hubs; their most special feature is that they can communicate with other devices wirelessly. One of the most important of these special features is a firewall. Installing a DHCP hub that includes a firewall protects the devices on your network from being attacked by hackers coming to your network from the Internet. One form of firewall is the NAT standard. Using NAT, there is one IP address used by the hub that connects your local network to the Internet. By providing NAT services, the hub shields the devices on your network by using a set of internal IP addresses for those devices. Thus, hackers trying to attack the only IP address that they can see get the hub device, which is typically immune to such attacks. Thus, your network is protected from external attack. Many such devices are available, such as the Asante DSL/Cable Router (see Figure 34.3). Figure 34.3. This Asante hub enables you to share an Internet account with multiple computers.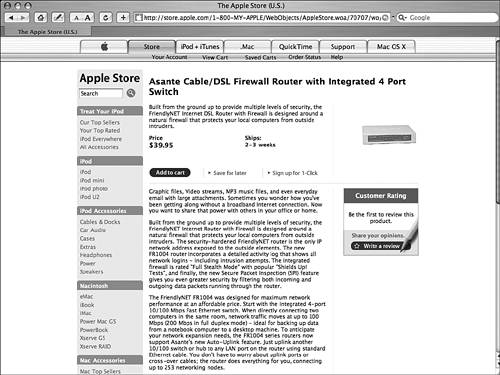 Some of my favorite sharing and networking hubs are produced by Linksys (see Figure 34.4). Linksys hubs provide excellent features and are easy to install and configure. These hubs enable you to share an Internet account and provide NAT protection for your network. Figure 34.4. Linksys produces excellent sharing hubs that are easy to install and configure.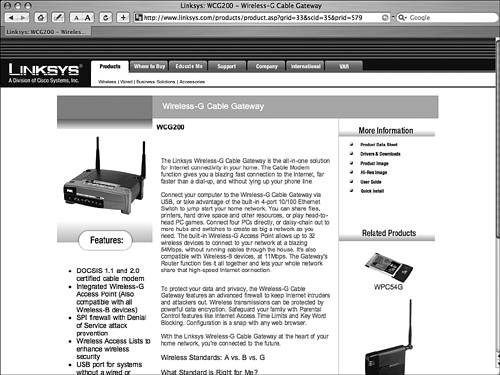 Many sharing hubs also offer wireless services and so are similar to an AirPort base station. Because AirPort is based on standard wireless protocols, AirPort services are compatible with any wireless device that meets these same standards. However, because AirPort technology is integral to the Mac, I recommend that you stick with an AirPort base station if you want to obtain and use a wireless sharing hub. However, AirPort hardware is also considerably more expensive than similar devices from other companies. So, if you can't afford to purchase an AirPort base station, check out the offerings from other companies, such as Linksys, that you might be able to afford. NOTE
The XRouter Pro is another example of a sharing hub that is simple to install and configure. For most homes or home offices, the XRouter is an excellent choice. NOTE
Because of space limitations, I will be focusing on XRouter Pro in the remainder of this section. However, other devices, such as the Linksys hubs, can be installed and configured in a fashion similar to the XRouter Pro. Installing a DHCP ServerInstalling a DHCP hub is similar to installing a standard Ethernet hub. Follow these steps:
NOTE You can attach the XRouter Pro to an existing Ethernet hub to provide its services to more than four devices at a time. To do so, connect one port on your current hub to the crossover port on the XRouter and use the crossover switch to select the crossover mode. In the same way, you can also chain multiple hubs together to share an Internet account among more than four devices. For example, you can connect an AirPort base station to the hub to add AirPort-equipped devices to the network. Configuring Mac OS X Macs for DHCP ServicesAfter the physical connections are made, you need to configure each computer on the network to use DHCP for TCP/IP services. NOTE Consider creating a location for each TCP/IP configuration you use. This makes switching between configurations simple and fast.
To configure machines on a network to connect to a DHCP server, follow these steps:
Configuring a DHCP HubAfter the hub is physically connected to your network and the other devices are installed and configured, you need to configure the hub to connect to the Internet using your cable or DSL modem. How this is accomplished varies among devices, but most devices enable you to use a standard Web browser to configure the hub. To install a typical DHCP hub, do the following:
Make sure you explore the configuration options your hub provides. For example, some hubs enable you to assign fixed IP addresses to certain devices. These addresses are provided in a range of addresses your hub provides (the first three sets of numbers in the IP address are the same for all the devices on the network, but you can choose the fourth set from a specific range of numbers). One use for this is to enable file sharing across those devices. Because you use IP addresses to share files under Mac OS X, having a fixed IP address enables you to connect to the same machine each time. If you allow the server to assign addresses, the address for each machine can change as machines connect to and disconnect from the network. The machines on your network should be capable of accessing the Internet using a single account. If your hub provides NAT services, your network is relatively secure from outside attack because the internal IP addresses of devices are not exposed to the Internet. NOTE If your hub provides additional firewall protection, explore its configuration page to control how your network access is configured. Typically, you can limit the access to specific URLs or direct all traffic to a specific machine on your network. |
 For help choosing and installing an Ethernet hub,
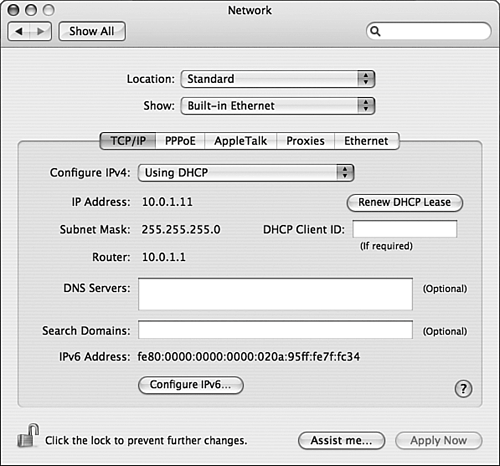

EAN: 2147483647
Pages: 317