Finding, Installing, and Configuring a Keyboard
| The keyboard is one of the most fundamental, and at the same time, simplest devices in your system. You are likely to spend most of your "Mac" time pounding on its keys, so it pays to make sure you have a keyboard you like. Choosing and Installing a KeyboardAll Macs come with a keyboard of one type or another, so if you are happy with the keyboard that came with your Mac, there is no need to consider another type. The most recent Apple keyboard, the Apple Pro Keyboard, is widely recognized as an excellent keyboard because it combines a very nice feel with good ergonomics and features. The Apple Pro Keyboard also provides several control keys, which are the mute, volume, and eject keys; these are located along the top of the number pad. And it looks pretty cool, too. However, other types of keyboards are available, such as those designed for maximum ergonomics, to provide additional controls (such as an Internet button), and so on. Many modern keyboards use the USB interface, so installing a keyboard is a trivial matter of plugging it in to an available USB port. (And remember that, as you read in Chapter 28, "Understanding Input and Output Technology," USB devices are hot-swappable so you can connect and disconnect them without turning off the power to your Mac.) Some keyboards are wireless; two basic types of these devices are available. One type includes a transmitter you plug in to an USB port. The other type, such as the Apple Wireless Keyboard, uses Bluetooth. The advantage of Bluetooth is that you don't consume an USB port and can communicate with many Bluetooth devices at the same time. The disadvantage is that your Mac must have a Bluetooth module built in or have a Bluetooth adapter installed. If at all possible, you should obtain a wireless keyboard; being without wires is very freeing, especially if you move your keyboard or mouse around much. And who needs all the clutter that so many wires bring? If you use a USB-based wireless keyboard, you connect its transmitter to a USB port and then use its controls to get the transmitter and keyboard communicating. If you use a Bluetooth keyboard, you use the Bluetooth configuration tools to install and configure it.
If the keyboard you select includes additional features, such as additional buttons and controls, it probably also includes software you need to install. This typically adds a new pane to the System Preferences application that you use to configure the device. An example of this is provided in the next section. Configuring a KeyboardWith the default pane of the System Preferences application, you can change the key repeat rate and the delay-until-repeat time. You can also configure the function keys and set the language in which your keyboard is configured. Here's how:
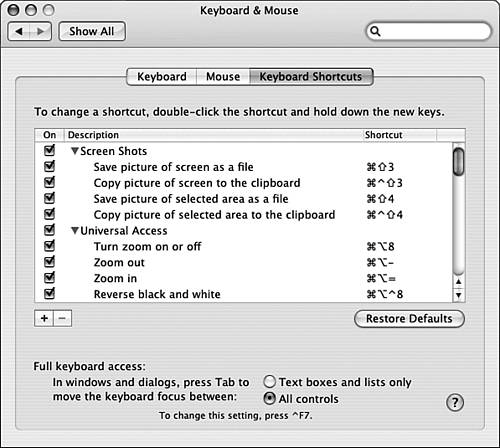
NOTE The greatest Mac OS X feature ever (okay, that is a bit of an exaggeration) might be the ability to disable the Caps Lock key. I have never discovered a real use for this key, but have accidentally turned it on thousands of times and found myself TYPING IN ALL CAPS which is very annoying for readers and it seems like you are shouting. Finally, I can disable this most annoying of keys without additional software! Configuring Keyboard ShortcutsOne of the best things you can do to increase your personal productivity is to learn to use keyboard shortcuts. In the "OS X to the Max" sections of other chapters in this book, you will find many lists of keyboard shortcuts. You should take the time to learn and practice the shortcuts for the OS, as well as shortcuts for any applications you use frequently. The Mac Help Center also lists some keyboard shortcuts if you need to look one up. Using the Keyboard Shortcuts tab of the Keyboard & Mouse pane, you can configure many of the available keyboard shortcuts. You can enable or disable some of the standard keyboard shortcuts and add keyboard shortcuts for commands in applications you use. Using the Full Keyboard Access feature, you can access the interface elements with the designated keys. Open the Keyboard & Mouse pane of the System Preferences application and click the Keyboard Shortcuts tab (see Figure 29.2). You will see a list of standard OS keyboard shortcuts in a number of areas, such as screen shots, universal access, keyboard navigation, and so on. Figure 29.2. Use the Keyboard Shortcuts tab to configure your own keyboard shortcuts.
Disable any of the listed shortcuts by unchecking the shortcut's On button. Typically, you would do this when that shortcut conflicts with a shortcut in an application you use. For example, the default shortcut to capture the screen to a file is Shift-
In the Keyboard Navigation section, the commands start with the phrase "Move focus to." Moving the focus means highlighting the item to which you want to access via the keyboard. For example, if you want to use the keyboard to access a menu command for which a keyboard shortcut isn't defined, you can press Control-F2 to highlight the first item on the active menu bar, which is always the Apple menu. Then use the Right arrow key to select the menu you want to open. Then press the Down arrow key to open the menu move to the command you want to activate. Press Return to activate the command. Configuring Your Keyboard's Language Settings and the Input MenuYou can configure the languages you use for the keyboard along with other input preferences using the International pane of the System Preferences application. You can also configure the Input menu, which enables you to quickly choose among languages and select some other handy keyboard tools:
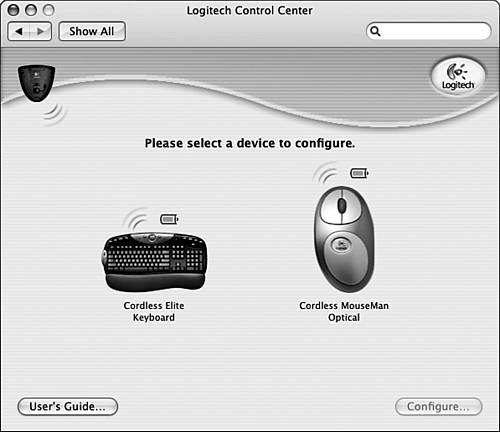
When you open the Input menu, which is indicated by a flag representing the language you have made the default, you will see the items you configured there (see Figure 29.4). You can change the current input source, which is indicate by the check mark, to a different one by selecting a different source on the menu. You can open the Character Palette or Keyboard Viewer by selecting the command from the Input menu for the item you want to show. If you select Show Input Source Name, the source name appears as the menu title in addition to the flag icon. Figure 29.4. The Input menu enables you to select the language setting for your keyboard and open palettes and viewers related to the keyboard. Configuring a Third-Party Input DeviceIf you use a non-Apple keyboard and it includes software, you can use it to configure that keyboard. Open the System Preferences application and then open the pane relating to the keyboard you are using (see Figure 29.5). Figure 29.5. I use a Logitech Cordless Elite keyboard and mouse; the Logitech Control Center pane enables me to configure many aspects of these devices.
Use the controls provided by that pane to configure the device (see Figure 29.6). Figure 29.6. Here you can see some of the many additional controls provided on the Logitech Elite keyboard; you can customize the keys to perform many actions.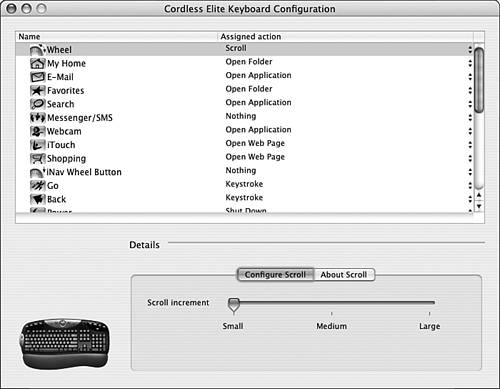 |
 To learn more about Bluetooth devices,
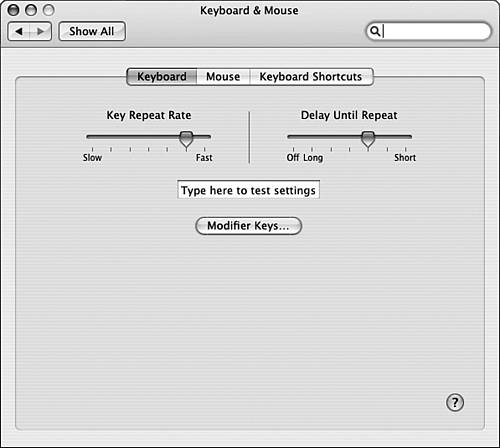

EAN: 2147483647
Pages: 317
- Chapter V Consumer Complaint Behavior in the Online Environment
- Chapter VII Objective and Perceived Complexity and Their Impacts on Internet Communication
- Chapter IX Extrinsic Plus Intrinsic Human Factors Influencing the Web Usage
- Chapter XIII Shopping Agent Web Sites: A Comparative Shopping Environment
- Chapter XVIII Web Systems Design, Litigation, and Online Consumer Behavior