| We all have busy lives and, if you are like me, you have trouble remembering where you are supposed to be and when you are supposed to be there. Fortunately, Mac OS X's iCal calendar application can help you keep your schedule under control. With this tool, you can maintain multiple calendars at the same time, such as a work calendar, family calendar, and so on. Even better, you can share your calendar with others so coordinating activities is much easier. You can also access other people's calendars to see how your schedule meshes with theirs. Configuring iCal You don't need to configure many preferences in iCal, but if you open the General tab of the iCal Preferences dialog box, you will see the following options (see Figure 27.1): Week Use the "Days per week" and "Start week on" pop-up menus to configure how iCal manages and displays weeks. You can select 7- or 5-day weeks and set the start day of the week. Day Use the pop-up menus in this area to set the start and end times for your days and to chose how many hours are displayed at a time. Month The "Show time in month view" check box determines whether the time is displayed next to events when you are viewing your calendar in the Month view. Birthdays If you have stored birthdays for your contacts in the Address Book, check the "Show Birthdays calendar" check box to display the Birthday calendar that shows those birthdays. Synchronization As with other applications, such as Address Book, you can use .Mac to synchronize calendar information on different Macs. Use the "Synchronize my calendars with other computers using .Mac" check box and the .Mac button to configure this.
Figure 27.1. Configuring iCal isn't hard to do. 
 To learn how to use .Mac, p. 493. To learn how to use .Mac, p. 493.
If you open the Advanced pane of the iCal Preferences dialog box, you'll see the following options: Time Zone iCal's Time Zone Support feature enables the application to add time zone information to your calendar. You can then associate events with specific time zones and change the time zone for which you are viewing events. This feature is most useful when you are using iCal while traveling. As you change time zones, you can set iCal to use the time zone you are currently in. Then, it adjusts the time for each event so it is appropriate to the time zone you are in. To activate this feature, check the "Turn on time zone support" check box. If you leave this check box unchecked, time zone is ignored. Events and To Do items Use the "To Do" and "events" tools to configure how events and To Do items are managed. The "Hide To Do items with due dates outside the calendar view" check box enables you to hide any To Do items that don't need to be done during the period you are currently viewing. The "Hide To Do items" check box and text box enable you to have iCal hide To Do items after they are completed and to set the number of days that must pass until completed items are hidden. Use the "Delete events" and "Delete To Do items" check boxes and text boxes to determine whether iCal deletes these items and, if so, the number of days after they occur that must pass before these items are deleted from your calendar. Alarms If you check the "Turn off alarms when iCal is not open" check box and iCal is not running, you won't be notified of events or To Do items via iCal alarms. Invitations Check the "Automatically retrieve invitations from Mail" if you use Mail and want iCal invitations you receive to be retrieved automatically.
Using iCal Like other i applications, iCal is pretty simple to use. If you have used other calendar applications, you probably will have an easy time moving to iCal. By default, the iCal window has three panes (see Figure 27.2). Figure 27.2. iCal provides all the tools you need to manage your own calendar and share your calendar with others. 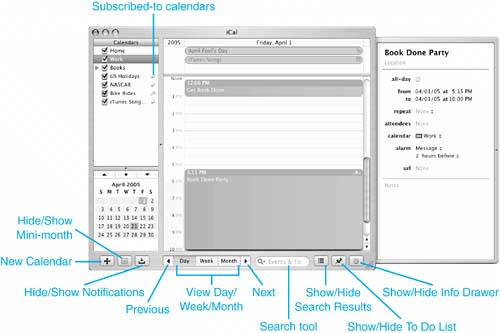
Along the upper-left side of the window is the Calendars pane. In this pane, you see each calendar you have created along with those to which you have subscribed. If a calendar's check box is checked, its events are being displayed. If not, they are hidden. The lower-left pane contains the Mini-month pane, which shows you a month at a glance, or the Notifications pane, which shows you information about notifications. You choose the pane you want to view by clicking the related button. In the center pane is the calendar itself. There are three views for this: Day, Week, and Month. Along the bottom of the window are the following tools: New Calendar Click this to create a new calendar. Hide/Show Mini-month This shows or hides the mini-month tool. When you are viewing the mini-month, you can move back in time by clicking the Previous button (the upward-facing arrowhead above the mini-month), forward by clicking the Next button (the downward-facing arrowhead), or to the current month by clicking the Current Month button (the diamond). TIP You can drag the Mini-month pane's Resize handle to show more than one month in it.
Previous Use this to go back by a day, week, or month (whichever is currently displayed). Day/Week/Month Use these three buttons to change the view of the calendar window. Next Use this to go forward by a day, week, or month (whichever is currently displayed). Search tool Use this to search for events. This tool works similarly to the Search tool in other areas, such as iTunes or the Finder. To search, click the Magnifying Glass pop-up menu to open it and choose the kind of search you want to do (if you don't select anything, all calendar items are searched). Enter your search text; as you do, items that match your search will be found. When you enter search text, iCal's Search Results pane opens automatically, which leads right into the next bullet. Show/Hide Search Results Click this to open the search results pane, which appears just under the calendar pane (see Figure 27.3). This pane lists all the events that meet your search criterion. Figure 27.3. Here, I have searched for items related to the term "lowe"; because I have subscribed to the NASCAR calendar online, I found information relating to races associated with Lowes along with other items that weren't so relevant. 
Show/Hide To Do List This button opens the To Do Items pane, which shows the To Do items on your plate. This pane will appear to the right of the Calendar pane. Show/Hide Info Drawer Clicking this opens the Info Drawer that provides detailed information about a calendar, an event, or a To Do item you have selected (see Figure 27.4). Figure 27.4. In this example, I have selected a very important item on my To Do list and opened the Info Drawer so I can see and configure the details for that event. 
TIP If you turn on the Time Zone preference, the Time Zone pop-up menu appears in the upper-right corner of the iCal window. Use this to select the time zone for the current calendar. The default is the time zone set in the System Preferences application. You can select Other on the pop-up menu to open the "Change time zone" window and use its tools to change the time zone for the calendar.
Creating, Configuring, and Working with Calendars As you read earlier, you can manage multiple calendars within the iCal application. For example, you might want to create separate calendars for home and work activities, for special projects, and so on. Each calendar can include its own events and To Do items. To create a new calendar, do the following steps: 1. | Click the New Calendar button. A new, untitled calendar will appear in the Calendar pane.
| 2. | Enter the name of the new calendar and press Return.
| 3. | Select Window, Show Info ( -I), or click the Show Info button. The Info drawer will open. At the top of the Drawer, the name of the calendar is shown so that you know which calendar you are getting information about. -I), or click the Show Info button. The Info drawer will open. At the top of the Drawer, the name of the calendar is shown so that you know which calendar you are getting information about.
| 4. | Click the word Description and enter a description of the calendar.
| 5. | Use the Color pop-up menu to associate a color with the calendar. When you add events to the calendar, they appear in the color your select. Having different colors for different calendars is useful because you can easily see which events came from which calendars when you are viewing multiple calendars at the same time.
|
To include a calendar's events and To Do items in the calendar being displayed, check its check box. If you uncheck a calendar's box, its events and To Do items are hidden. Working with Events You can use iCal to track life events of all kinds. You can associate events with specific calendars, set reminders, and so on. To create an event, do the following steps: 1. | Select the calendar and then the day on which you want the event to appear.
| 2. | Select File, New Event (-N), or open the contextual menu on the day on which you want the event to appear and select New Event. A new event will appear on the selected date.
TIP You can also create an event by dragging on the day on which the event occurs. | 3. | Type the name of the event and press Return.
| 4. | Open the Info Drawer by clicking the Info button. The Info Drawer will show the new event you have created.
TIP If you don't like the Info Drawer configuration, choose Window, Detach Info. The Info Drawer will become a separate window you can move around on the desktop independent of the iCal window. | 5. | Enter information about the location of the event by replacing the word location that appears under the event's title.
| 6. | Check the "all-day" check box if the event is an all-day event.
| 7. | If it isn't an all-day event, use the "from" and "to" fields to set a start and end time for the event.
TIP You can also change or set the date of the event using the "from" and "to" fields. | 8. | If you want the event to repeat, use the "repeat" pop-up menu. You can choose a standard frequency for the event or select Custom to set a custom frequency. When you choose a frequency, the "end" pop-up menu appears. Use this to choose an end date for the repeating event.
| 9. | Enter attendees for the event in the "attendees" field. You can type in names or drag them from your Address Book. To show people in your Address Book, select Window, Address Panel (Option--A). You can drag people from the Addresses window onto the "attendees" list. To enter multiple attendees, press Return after each name.
| 10. | If you want to change the calendar on which the event appears, use the "calendar" pop-up menu to do so.
| 11. | If you want to set an alarm for the event, use the "alarm" pop-up menu. Your options for the alarm are the following: None, which has no alarm; Message, which displays a text message; "Message with sound," which displays a text message and plays a sound; Email, which causes an email to be sent to you; "Open file," which opens a file of your choice; "Run Script," which causes a script you select to run; or "Display a message 12 hours before," which does just what it says. If you select an alarm with sound, the sound pop-up menu appears. If you choose any type of alarm, a pop-up menu that enables you to set the alarm time appears. If you select Email, a pop-up menu that enables you to select the email address to which the alarm should be sent appears.
TIP The email addresses that appear on the "alert" pop-up menus for events or To Do items are those that are on your card in the Address Book application. To add more addresses, add them to your card. | 12. | Select the sound for the alarm if applicable and the amount of time before the event that you want the alarm to be activated.
| 13. | If a URL is associated with the event, enter it in the "url" field.
| 14. | Enter any notes about the event in the Notes field.
| 15. | If you want to send email invitations for the event to the people on the attendees list, click the Send button.
| 16. | Review the event and make any necessary changes; then close the Info window if you want to (see Figure 27.5).
Figure 27.5. Here's an event worthy of being in iCal. 
|
To view or change the details of an event, click the event in the calendar and then click the Show Info button (if the Info Drawer is closed). Make changes to the event as needed and the changes are saved automatically. Here are some additional tips for working with events: You can change the date on which an event occurs by dragging it from one date in the calendar to another. You can change the calendar on which an event occurs by opening its contextual menu (Control-click the event) and selecting the event's new calendar. You can duplicate an event by opening its contextual menu and selecting Duplicate; selecting Edit, Duplicate; or pressing -D. You can drag the copy onto a different date. You can email an event to others by opening its contextual menu and selecting "Mail event." Your default email application will open and the event will be included as an attachment (see Figure 27.6). The recipient can then drag the attachment, which has the extension .ics, onto iCal to add it to his calendar. Figure 27.6. You can email events to others so they can easily add them to their own calendars. 
If you have turned on the time zone feature, the "time zone" pop-up menu appears in the Info Drawer when you view the event. You can use this to set the time zone for the event. This is especially useful if you will be inviting people who are not in your current time zone.
Working with Your To Do List To create a To Do item, use the following steps: 1. | Either open the To Do pane, open its contextual menu, and select New To Do or select File, New To Do (-K). A new To Do item appears on the To Do list.
| 2. | Type the name of the To Do item and press Return.
| 3. | Open the Info Drawer if it isn't open already. Information about the event will appear.
| 4. | Use the "priority" pop-up menu to set the To Do item's priority.
| 5. | If the event has a due date, check the "due date" check box and use the date fields that appear to set the due date.
| 6. | If you want to set an alarm for the event, open the "alarm" pop-up menu and select the alarm you want to set. The options are the same as those for an event.
| 7. | Select the calendar with which the To Do item should be associated on the "calendar" pop-up menu.
| 8. | If a URL is associated with the To Do item, enter it in the "url" field.
| 9. | Enter any notes for the To Do item in the Notes field.
|
Following are some tips for working with To Do items: You can change a To Do item by selecting it and opening the Info Drawer. Then use the tools to change the item's information; these work just like when you create a To Do item. When you have completed a To Do item, mark it as complete by checking the box next to its name or by checking the "completed" box on the Info Drawer. The priority of a To Do item is indicated by the number of bars that appear to the right of its name on the To Do items list (see Figure 27.7). Figure 27.7. You can use iCal to manage your To Do list (hopefully, your list has more meaningful items than mine does). 
Sort the order in which To Do items appear on the list using the pop-up menu at the top of the To Do pane. Open a To Do item's contextual menu to duplicate it, change the calendar with which it is associated, mark its priority, email it, or change the sort order for the To Do items pane. When the due date for an item passes, its complete check box becomes a warning icon to indicate that the item is overdue.
TIP When you email an event or a To Do item to someone, the recipient can add the item to his calendar by clicking its link or by dragging it onto the iCal window. If the "automatically retrieve" preference is enabled and the recipient uses Mail, the iCal information will be added automatically.
Printing from iCal From iCal, you can print calendars, To Do lists, and mini-months. Open the Print dialog box to view and set the many options for printing calendar information (see Figure 27.8). Figure 27.8. iCal offers flexible printing options. 
Synchronizing Your Calendar in Multiple Locations If you use more than one Mac, you will probably want to keep your iCal calendar on each machine synchronized. To do this, you use iSync. To learn how to synchronize information on multiple machines, p. 512.
Sharing Your iCal Calendar One of the cool things about iCal is that you can publish your calendars online so other people can view them. You can choose to share an iCal calendar via your .Mac account or use any other server. TIP Because you can access a shared calendar over the Web, sharing your calendar provides a way for you to view your calendar even if your Mac isn't available. As long as you can access the Web, you can get to and view your calendar.
To publish your calendar, use the following steps: 1. | Select the calendar you want to share.
| 2. | Select Calendar, Publish. The Publish sheet will appear (see Figure 27.9).
Figure 27.9. You can easily publish your calendars via .Mac. 
| 3. | Type the name of the calendar as you want it to appear online; by default the calendar's name is entered, but you can change this if you want to.
| 4. | Choose how you want to publish the calendar on the "Publish calendar" pop-up menu. Select "on .Mac" to use your .Mac account or "on a Private server" to choose a different server. If you chose the latter option, you need to enter the server's URL along with your username and password for that server.
NOTE If you haven't configured your .Mac account when you start to publish your calendar using .Mac, you will be prompted to do so. | 5. | If you want changes you make to your calendar to be published automatically, check the "Publish changes automatically" check box. In most cases, you should check this so your calendar is always up-to-date.
| 6. | If you want both the title and notes associated with an item to be published, check the "Publish titles and notes" check box.
| 7. | If you want the alarms and To Do items to be published, check the "Publish alarms" and "Publish To Do items" check boxes.
| 8. | Click Publish. When the calendar has been published, you will see the confirmation dialog box. This dialog box provides the URL for the calendar and enables you to visit the calendar online or send an email announcing the calendar (see Figure 27.10).
Figure 27.10. Even though this shared calendar isn't too interesting, it can be viewed on the Web at any time. 
| 9. | Click the button for the action you want to take, such as OK to close the dialog box and return to iCal.
|
Following are some more pointers on sharing your calendars online: When a calendar is shared, the shared icon (which looks like a dot radiating waves) appears next to the calendar's name. If you open a shared calendar's contextual menu, you see several interesting commands. These include Unpublish, which removes the calendar from the Web; Send publish email, which enables you to send an email announcing the published calendar and its URL; Copy URL to Clipboard, which copies the calendar's URL to the Clipboard so you can easily paste it into documents; Refresh, which publishes any changes you have made to the calendar; and Change Location, which enables you to move the calendar to a different site. People can subscribe to your shared calendars so they appear in their iCal windows. More on this in the next section. You can view your own shared calendar at any time from any computer by moving to its URL. This is a great way to maintain access to your own calendar when you aren't at your Mac. You can change a shared calendar by selecting and opening the Info Drawer. Use the controls in the Drawer to make changes to the calendar's settings.
Subscribing to Other Calendars You can subscribe to other calendars to add them to your iCal window. You can also subscribe to other personal calendars or public calendars. Subscribing to Personal Calendars You can add other personal calendars to your iCal window by doing the following steps: 1. | Select Calendar, Subscribe (Option--S). The Subscribe sheet will appear.
| 2. | Enter the URL for the calendar to which you want to subscribe and click Subscribe. The Subscribing sheet will appear.
| 3. | If you want the calendar's information to be refreshed automatically, check the Refresh check box and select the frequency at which you want the refresh to occur on the pop-up menu.
| 4. | If you don't want the calendar's alarms to appear in your iCal window, check the "Remove alarms" check box.
| 5. | If you don't want the calendar's To Do items to show up in your iCal window, check the "Remove To Do items" check box. You usually don't want to display the To Do items on a calendar to which you are subscribing unless you have To Do items on it.
| 6. | Click OK. The calendar will be added to your iCal window, and you can view it just like your own calendars. iCal indicates that it is a subscribed-to calendar by the curved arrow icon next to the calendar's name. If you set the calendar to be refreshed automatically (refer to step 3), it is kept current.
|
TIP If you don't set a calendar to be refreshed automatically, you can refresh it manually by opening its contextual menu and selecting Refresh.
NOTE You can't make any changes to a calendar to which you are subscribed. You can only view it.
Subscribing to Public Calendars Many public calendars are available to which you can subscribe. For example, most professional sports teams have calendars that show games and other events. You can also find DVD release calendars, TV schedules, and many other types of calendars to subscribe to. Just like personal calendars, when you subscribe to public calendars, the events on those calendars are shown in your iCal window. To find and subscribe to public calendars, do the following steps: 1. | Select Calendar, Find Shared Calendars. Your default web browser will open and move to Apple's Calendar library (see Figure 27.11).
Figure 27.11. This web page provides all sorts of interesting calendars to which you can subscribe. 
| 2. | Click the calendar to which you want to subscribe. You move into iCal and the Subscribe To sheet appears. The relevant information is filled in automatically.
| 3. | Click Subscribe. The Subscribe sheet will appear.
| 4. | Review the subscription options and change them as needed.
| 5. | Click OK. The calendar will be added to your iCal window, and you can view its events.
|
Using the Calendar Widget You can also access your calendar information via the Dashboard Calendar widget. To learn about the Calendar widget, p. 164.
|