| iDVD is part of the Apple iLife suite of applications. To use iDVD, you need to obtain and install the iLife suite (see the following sidebar). Obtaining and Installing iLife Apple's iLife suite includes five amazing applications, four of which are not part of the standard Mac OS X installation (GarageBand, iPhoto, iMovie, and iDVD) and are must-haves for any Mac OS X user. (iTunes is part of the standard Mac OS X installation and is also included in the iLife suite.) There are two ways you can get a copy of iLife. One is to buy a new Mac because iLife is installed on all new Macs. The other is to purchase the suite from Apple or from an authorized Apple reseller. Priced at $79, this suite is an excellent bargain, too. Installing the iLife applications is simple: You just place the appropriate disc (DVD or CD) in your Mac and run the iLife installer. Use the standard installation to install all parts of each application, or use the Customize option to select parts not to install (such as the themes from previous versions of iDVD). Each application will be installed within the Applications folder. Before you start using these applications, run the Mac OS X Software Update application (choose Apple, Software Update) to ensure that you are using the most current version of each application. |
iDVD has different modes for different parts of the DVD creation process. You use different sets of tools while working in each mode. Understanding the iDVD Window When you launch iDVD, you see the iDVD window (see Figure 26.1). Similar to iMovie, iDVD automatically opens the last project on which you worked. If you haven't used iDVD before, you can create a new project. Figure 26.1. Don't let the simple appearance of the iDVD mislead you; iDVD is a powerful application. 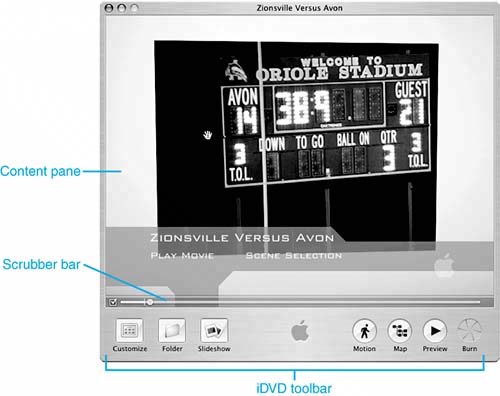
The largest pane of the window is the Content pane. What you see and do in this area depends on the mode in which iDVD is operating. When you are in the Design or Preview mode, the Content pane shows a menu of buttons on the DVD. Buttons represent each project that has been placed on the DVD, or they can lead to another menu. When viewing a DVD, you click a button to view the content or menu with which it is associated. When you are in Map mode, each menu on the DVD is represented by a box and the links between the menus are shown with lines. Each menu also has a theme that determines how the menu looks and sounds. At the most basic, a theme is simply a static image that is the menu's background. However, menus can contain motion, which means a movie can play as the menu's background while the menu appears onscreen (if you have watched DVD movies, you have no doubt seen examples of motion menus). Motion menus can include a movie with sound, a movie without sound, or a static image with sound. You can apply one of iDVD's default themes to your menus, and you can create and save your own themes. Menus can also contain drop zones, which are areas in which you can display images or movies that are shown when the menu appears on the screen. Multiple drop zones can be part of the same menu, and some themes include multiple drop zones that dynamically change. Buttons can also have motion, which means the content accessed by that button plays within the button itself while the button is being viewed. This type of motion provides a preview of the content without the viewer having to actually open it. (Again, if you have viewed commercially produced DVD movies, sometimes the chapter buttons contain motion and show you part of the chapter associated with the button). Along the bottom of the iDVD window is the toolbar that contains seven buttons (see Figure 26.2). Each of these enables you to perform a specific task. Figure 26.2. The buttons along the bottom of the iDVD window provide access to its tools. 
The available iDVD buttons are Customize This button opens the iDVD Drawer (also called the Customize Panel). You'll learn more about this in the next section. Folder This button adds a folder button, which represents a menu on the DVD. After you add a folder, you can place content on the menu that the folder's button represents. Slideshow This button adds a slideshow to the menu you are currently viewing. Motion This button turns background and button effects, called motion effects, on or off. When the button is green, motion effects are on and are displayed on the screen. When the button is gray, motion effects are off and aren't displayed. Map When you click this button, iDVD moves into the Map mode (you'll read more about this mode later in this chapter). Preview When you click this button, iDVD moves into the Preview mode (you'll read more about this mode later in this chapter). Burn When you are ready to create a DVD, you click this button to write the project to a DVD.
When you click the Customize button, the iDVD Drawer appears (see Figure 26.3). The Drawer contains controls and information you use while you design and build a DVD. Figure 26.3. The Customize Drawer enables you customize various aspects of an iDVD project. 
Along the top of the Customize panel are four buttons: Themes Themes are sets of formatting options you can apply to a menu. A number of standard themes are provided with iDVD. You can also create and save your own themes and use them just like iDVD's standard themes. Settings The Settings tools enable you to customize the appearance of a menu from adding background images or movies and sound to formatting the menu's title to formatting the buttons' locations and titles. Media You use the Media tools to access the music stored in your iTunes Music Library, photos stored in your iPhoto Library, and movies located in your Movies folder (you can add other locations as well). You can add any of these items to a project from the Media pane. Status The Status tools enable you to assess the status of the content you place on a DVD. This includes both the movies you add to the DVD as well as any other files you want to include on it, such as high-resolution versions of the images contained in a DVD's slideshows.
Understanding iDVD Projects Similar to iMovie, when you create a DVD, you first create a project. The project determines what content will appear on the DVD as well as its look and feel. The content you place on a DVD can include movies or slideshows. Because you can place any iMovie or QuickTime content on DVD, there is really no limit to the type of movie content you can place on a DVD. You can create slideshows from still images in the usual image formats, such as JPEG, TIFF, and so on. Again, because iDVD supports all the standard formats, you can add just about any image to an iDVD slideshow. Because it is integrated with the other iLife applications, you can access your iPhoto images, iMovie movie projects, and iTunes music directly from within iDVD. You can also add content to an iDVD project that can be accessed only when the disc is used in a computer; this content is called DVD-ROM content. Examples might be high- resolution versions of images in slideshows on a disc or other kinds of files or web pages. When you place content on a DVD (by adding to a project), it is encoded into the MPEG-2 format, which is the standard for DVD. MPEG-2 provides very high quality with relatively small file sizes (thus making digital movies on DVD possible). Fortunately, iDVD manages the encoding process for you and does so automatically. A DVD created with iDVD can contain up to 90 minutes of content. However, iDVD uses a higher-quality encoding scheme when the content in a DVD project is 60 minutes or lessyou should try to keep your DVDs within this limit, if possible. (You might think that 60 minutes isn't much, but you will find that creating 60 minutes of good content takes a bit of doing.) Again, iDVD manages this for you; the application selects the 90-min or 60-min format for you automatically. NOTE One of the nice things about iDVD version 5 or later is that you don't have to have an Apple SuperDrive in your Mac to be able to use it. The application will run on any Mac that supports all the iLife system requirements. When it comes time to put the project on disc, you can save it as a disk image and then use just about any DVD writer to create the DVD.
Understanding the Design Mode The Design mode is the one in which you add movies and other content to a DVD. You also use this mode when you are designing the look and feel of a DVD by applying background images, background sounds, titles, motion effects, and so on to a DVD on which you are working. Some of the major elements of the iDVD window in the Design mode are shown in Figure 26.4 and explained in the following list: Project title The project title is the name under which you save the iDVD project file. This is the name of the file you open to work on a project. It does not actually appear when the DVD is viewed. Menu The Content pane of the iDVD window represents a menu that appears onscreen when the DVD is viewed. Menu title Each menu can have a title to identify it. You can format menu titles in a variety of ways. Menu background Each menu can have an image as its background. Or you can use a movie as a background; when the menu appears onscreen, the background movie plays. You can also add background sounds to any menu. Buttons Onscreen buttons represent movies, slideshows, or other menus on a DVD. Buttons can be text; images; or previews of the content to which a button points, such as a movie. Button titles Each button is identified by a title. When a button contains an image or a preview, the title appears next to the button; when a button is text only, the button title is the button itself. You can format button titles in a number of ways. Drop zone Some menus contain a drop zone in which you can place images or movies that are displayed while the menu that contains the drop zone is onscreen. Some themes include multiple motion drop zones that change over time. You can place different content into each drop zone.
Figure 26.4. You will spend most of your time in the Design mode, in which you add content to a DVD and design its interface. 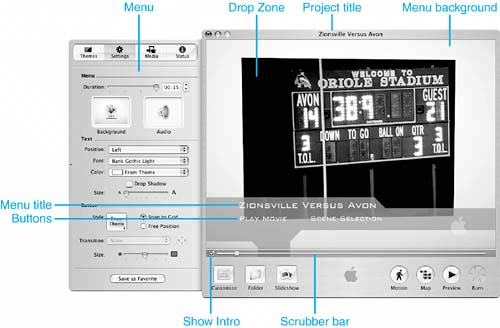
DVDs that you produce with iDVD, just like those produced commercially, can include multiple levels of menus. Each menu can contain content buttons (such as for movies or slideshows) or menu buttons that lead to other menus. All DVDs contain at least the main menu, which is the menu that appears when the DVD is played. The main menu is also the one that appears when you open an iDVD project. You can add menus to the main menu and then add submenus to those menus to build a multitiered structure for a DVD. You can use the Map mode to design the layout of an iDVD project. Each menu can contain up to six buttons, with each button representing either content (a movie or slideshow) or a submenu. A DVD can contain up to 36 menusyou aren't likely to want to actually include that many, however. In the Design mode, you can move among menus using the folder, Back, and Forward buttons. Understanding the Slideshow Mode In the Slideshow mode, you can create slideshows from images contained in your iPhoto Photo Library or anywhere else on your Mac. You can control the order in which the images appear, the amount of time each image appears onscreen, the transition effect between images, and the soundtrack that plays while the slideshow plays. In the Slideshow mode, the iDVD window provides the tools you need to create your slideshows, as shown in Figure 26.5 and explained in the following list: Images The images contained in the slideshow are displayed in the Content pane in the order in which they will appear during the slideshow. The order is also indicated by the number iDVD places in the lower-right corner of each image. You can add images to the slideshow by opening the Media pane, selecting Photos on the pop-up menu, selecting the source you want to use (such as a photo album), and then dragging images from the Drawer into the Content pane. You can also drag images from the Desktop onto the pane or use the File, Import, Image command. "View as List" When you click this, the images in the slideshow are displayed in a list (see Figure 26.6). For each image, you will see a thumbnail and the filename. The images appear in the order in which they will appear from top to bottom. Figure 26.6. You can also view the images in a slideshow in a list. 
View Thumbnails Use this button to see the images as thumbnails only. "Loop slideshow" If you check this check box, the slideshow will continue to play until the viewer clicks the Stop or Pause button or returns to the DVD menu. Display Navigation Check this check box to have iDVD display Previous and Next arrows on the screen to remind viewers to click the corresponding buttons on their remote controls to view the previous or next image in the slideshow. You usually use this only when you set the slideshow to play manually. "Add files to DVD-ROM" Check this check box to have iDVD add the image files to the DVD-ROM part of an iDVD project. When you do this, the high-resolution versions of the images will be accessible when the disc is used in a computer. Slide Duration Use this pop-up menu to set the amount of time each image appears on the screen. The options are a set amount of time (1, 3, 5, or 10 seconds), Fit To Audio (which displays the images in the slideshow so it will last as long as the soundtrack you choose for it), and Manual (the user must manually move forward in the slideshow using the remote's controls). Transition Use this pop-up menu to choose the transition effect that will be used to move from slide to slide. If the transition you choose has a direction component, click the Transition Direction button to set the transition's direction. Audio well You place the sound file you want to use as the slideshow's soundtrack here. Scroll tools You can use the scroll tools to browse the images shown in the window when there are too many to be displayed in the Content pane. Return Click this button to move back to the menu on which the slideshow is contained; it also returns iDVD to the Design mode.
Figure 26.5. Using the Slideshow mode, you can create slideshows from images in your iPhoto Library or from any other source. 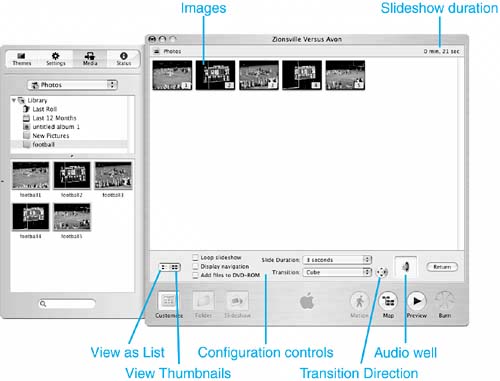
Understanding the Map Mode As you create a DVD, you will likely add many menus to it. You want your DVDs to make sense to the person who is viewing them; the Map mode presents a graphical layout of your DVD so you can visualize its contents (see Figure 26.7). Each menu, movie, or slideshow is represented by a box on the map. The paths among these items are shown by the lines connecting them. You can also create the basic layout of your DVD by adding menus, slideshows, and movies to it. In fact, using the Map to design your DVD is often the best way because it gives you a good overall view of your project. Figure 26.7. Use the Map mode to plan the layout of a DVD. 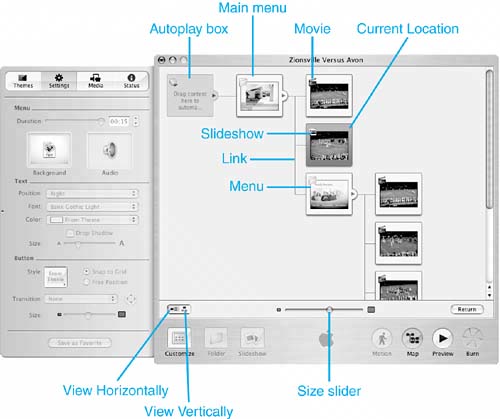
TIP You can scroll around the map by dragging in the iDVD window.
When iDVD is in Map mode (called Map view in official iDVD lingo), you will see the following elements: Autoplay box Place content in this box (a movie or an image) to have that content play automatically when the disc is inserted into a player. When that content is done, the viewer will move to the disc's main menu. Menus A menu box has the folder icon in its upper-left corner. The main menu is always the one linked to the Autoplay box. Movies Movies are represented by a box with the iMovie icon in the upper-left corner. Movie boxes can't be linked to anything except the menu on which the movie is placed. A movie is always the "end" of its branch of the map. Slideshows Slideshows are represented by a box with the slideshow icon in the upper-left corner. Slideshows can't be linked to anything except the menu on which the movie is placed and are always the "end" of their branch of the map. Current location Your current location in the project is indicated by the highlighted box. When you click the Return button, you will move back to this spot on the disc. View Horizontally Click this button to choose the horizontal map layout. View Vertically Click this to view the map in the vertical layout (see Figure 26.8). Figure 26.8. Same map, different view. 
Size slider Use this slider to change the size of the boxes on the screen. Drag it to the left to make the boxes smaller so you can see more of them at the same time or to the right to have the opposite effect. Return Click this button to move back to the current location.
In addition to being useful to see how your project is laid out, you can also do the following tasks: Add autoplay content to the disc by dragging a movie or an image on the Autoplay box. Jump to any location in the project by double-clicking its box. When you do this, you'll move back into Design mode for the location you choose, such as a menu. Add content to the project. You can add menus, movies, and slideshows to the project by clicking the appropriate button. You can only use the buttons that are active given your current location. For example, you can only add a menu using the Folder button when another menu is your current location. Likewise, you can only add a movie or slideshow when a menu box is selected. Remove content from the project. Select a box and press Delete to remove the selected content from the project. If you select a menu box, it and all the submenus or contents linked to it are also deleted. Design menus. You can select a menu and use the design tools to customize it. You can design multiple menus at the same time by selecting them and using the design tools, such as applying a theme to them.
Understanding the Preview Mode iDVD enables you to preview a DVD before you burn it. In the Preview mode, iDVD behaves just like a DVD player; it even presents an onscreen remote control you use to control the DVD. You use the Preview mode to watch a DVD before you actually burn it to a disc. Previewing a DVD enables you to find and fix mistakes so you don't waste time and money burning discs that have problems. In the Preview mode, the iDVD window looks like that shown in Figure 26.9 and contains the elements explained in the following list: Content window This window contains the content displayed onscreen when the DVD is played on a standard DVD player or on a computer. Remote control The iDVD remote control simulates the remote controls used by many DVD players and includes most of the primary controls you use to view the DVD. Menu controls These buttons perform menu tasks; for example, click the Menu button to move to a DVD's main menu. Playback controls Use these buttons to play a DVD. Cursor controls Use these controls to make selections in the DVD window. You can use the direction arrows to move the cursor and press the Enter button to choose what you have selected. Volume slider Drag this to the right to increase the volume or to the left to decrease it.
Figure 26.9. Using the Preview mode can prevent you from creating coasters. 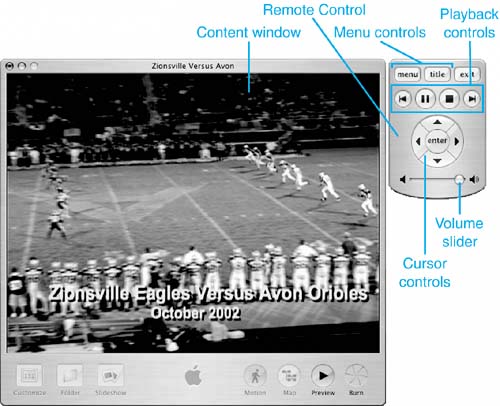
Understanding the Burn Mode This is the mode you use when you burn a DVD. In this mode, the iDVD window displays a progress bar that shows you the current status of the burn process (see Figure 26.10). Figure 26.10. You can use the Burn mode to monitor the process of placing an iDVD project on disc or saving it as a disk image file. 
|