| Listening to audio CDs with iTunes is fine, but for that purpose, any old CD player works about as well. iTunes' real power comes when you add all your music to the Library so it is always available to you. In addition to letting you find and listen to your music more easily, after it is in the Library, you can do all sorts of cool things with it, such as creating custom playlists and CDs. Importing Audio CDs into Your iTunes Music Library Adding CDs to your iTunes Library is called importing them. The steps to import CDs are simple, except for the choice of format you use. Understanding Import Formats All digital audio files are stored in a specific format. To work effectively with digital music, you don't need to understand all the technical details of these formats. However, you do need to understand them enough to know which format you want to use when you add your own CDs to your iTunes Library. The digital music revolution began with MP3. MP3 is the acronym for the audio compression scheme called Moving Picture Experts Group (MPEG) audio layer 3. The revolutionary aspect of the MP3 encoding scheme was that music data could be stored in files that were only about one twelfth the size of unencoded digital music without a noticeable degradation in the quality of the music. A typical music CD consumes about 650MB of storage space, but the same music encoded in the MP3 format shrinks down to about 55MB. Put another way, a single 3 1/2-minute song shrinks from its 35MB on audio CD down to a paltry 3MB or so. This small file size opened up a world of possibilities. While MP3 is the format that caused digital audio to become part of everyone's digital life, other more modern formats have also come into play. The formats that iTunes supports are shown the Table 18.1. Table 18.1. Digital Audio Formats Supported by iTunesFormat Abbreviation | Format Name | Filename Extension | Description |
|---|
AAC | Advanced Audio Coding | .m4a .m4p | This format is part of the larger MPEG-4 specification. Its basic purpose is the same as the MP3 format: to deliver excellent sound quality while keeping file sizes small. However, the AAC format is a newer and better format in that it can be used to produce files that have better quality than MP3 at even smallerfile sizes. The AAC format also enables content producers to add some copy- protection schemes to their music. Typically, these schemes won't have any impact on you (unless, of course, you are trying to do something you shouldn't). One of the most important aspects of the AAC format is that all the music in the iTunes Music Store is stored in it; when you purchase music from the store, it is added to your computer in this format. | AIFF | Audio Interchange File Format | .aiff .aif | This format provides high-quality sound, but its file sizes are much larger than MP3 or AAC. Unlike AAC or MP3, this format does not compress audio files, so they are quite large. As you can probably guess from its name, this format was originally used to exchange audio among various platforms. | None | Apple Lossless Encoder | .m4a | As you can tell from its name, this format was developed by Apple specifically for digital music. Its purpose is to provide the highest quality sound, but with slightly smaller file sizes than AIFF or WAV. | MP3 | MovingPicture Experts Group (MPEG) audio layer 3 | .mp3 | You've already read about this one. Until AAC, this was the standard format for encoding digital audio files. It still has some uses, but for most of your music, you should choose AAC instead because you will achieve better quality with smaller file sizes. | WAV | Windows Waveform | .wav | This is a standard audio file format for Windows computers. It has been widely used for various kinds of audio, but like AIFF, it is not a compression scheme so WAV files are quite large. For that reason, WAV files typically contain short sound clips, such as from movies. There are millions of WAV files available on the Internet that you can play and download. |
NOTE Songs you encode with the AAC format using iTunes will have the filename extension .m4a. Those you purchase from the iTunes Music Store will have the .m4p format, which indicates the file is protected.
Generally, you should choose AAC when you import your CDs into iTunes. You will get great sound quality with relatively small file sizes (better than with MP3). There are a few situations in which one of the other formats might be useful to you. For example, if you are moving music to a music player that doesn't support AAC, you would need to use MP3 instead. If you demand the best in the sound quality of custom CDs you create using iTunes and don't care about disk space usage, choose the Apple Lossless Encoder. Your files will be much larger than with AAC, but you will get the best possible quality. You'll likely use AIFF or WAV only when creating sound clips to use in other applications. TIP You can also use iTunes to convert existing music files into any of these formats in case you need a version in multiple formats for some reason, such as needing an MP3 version of a song you purchased from the iTunes Music Store. You'll learn how to do this at the end of this chapter.
When you convert music into one of these formats, you use an encoder (not surprisingly, each format has its own encoder). With some encoders, such as the MP3 encoder, you can configure some specific details about how the encoder works, such as the quality level, which changes the amount of data stored per second of music. Obviously, storing more data makes for better audio quality, but also for larger files sizes. In most cases, you will use one of the existing quality levels for an encoder, but you can also create custom settings if you want to meet more exacting specifications. The quality level you should use depends on several factors, which include the following: Your sensitivity to imperfections If you dislike minor imperfections in music playback, you should use higher-quality encoding settings. If you don't mind the occasional "bump" in the flow of the music, you can probably get away with lower-quality settings. The music you listen to Some music hides flaws better than others. For example, you are less likely to notice subtle problems in the music while listening to grinding heavy metal music than when you listen to classical music. How you listen to music If you use a low-quality sound system with poor speakers, you probably won't notice any difference between high-quality and low-quality encoding. If your Mac is connected to high-fidelity speakers, the differences in music quality will be more noticeable.
Choosing and Configuring the Format for Your iTunes Music Before you add CDs to your Library, you need to choose the encoder you will use while importing that music. The encoding settings iTunes uses are accessed with the Preferences command: 1. | Select iTunes, Preferences.
| 2. | Click the Importing button to open the Importing pane (see Figure 18.9).
Figure 18.9. The Importing pane of the Preferences dialog box enables you to control the encoding settings used for your music. 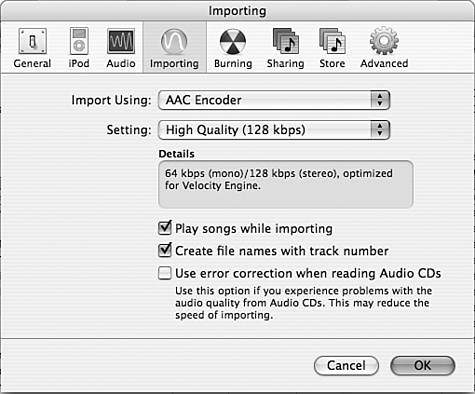
| 3. | Use the Import Using pop-up menu to select the particular encoder you want to use. In most cases, you should choose AAC Encoder, but occasionally you might want to use one of the others.
| 4. | Use the Setting pop-up menu to select the quality level of the encoding. Some encoders, such as AAC, have only one option. Others have multiple quality levels. The Details area of the pane provides information about the encoding setting you have selected.
| 5. | Check the "Play songs while importing" check box if you want to hear music as you import it. The encoding process is much faster than the playing process, so music continues to play after the encoding is done. This can be a bit confusing.
TIP If you select the "Import Songs and Eject" option on the On CD Insert pop-up menu in the General pane of the iTunes Preferences window, the CD is ejected when the encoding is done. This is a good reminder that you are ready to encode the next CD. (The music from the previous CD continues to play.) | 6. | Check the "Create file names with track number" check box if you want the files iTunes creates to have the track number included as a prefix in the filename.
TIP If there are sound quality problems when you play or import music from CD, check the "Use error correction when reading Audio CDs" check box on the Importing pane of the Preferences window. It is unlikely you will need to do this, but in some cases, this setting can clear up quality problems you experience. | 7. | Click OK. The next time you import music into the Library, it is encoded according to the settings you selected.
|
TIP You can vary the encoder and quality level you use from album to album or even from song to song. For example, if you want to play certain songs on a portable music player, you might want to use a lower level for those songs so you can download more of them to the player.
When you open the Setting pop-up menu, in addition to the standard quality levels, you'll see the Custom option. You can use this option to create and use custom encoding levels if the standard choices aren't acceptable to you. You configure custom encoding with the same steps you use for standard encoding. The difference is that you select Custom on the Setting pop-up menu. When you do that, a dialog box will appear that enables you to specifically configure various settings for the encoder. Configure the custom settings and click OK to use them. Depending on the encoder you choose, you can set various parameters, including the following: NOTE Custom configuration of the Apple Lossless Encoder is not allowed.
Stereo Bit Rate You can control the bit rate for stereo encoding. You can select rates between 8Kbps and 320Kbps. The higher the bit rate, the better the quality and the larger the file size will be. Sample Rate Music is encoded by taking a sample of the bits that make up specific instances in the music at various speeds. The rate at which these samples are captured, called the sample rate, affects the quality of the music. Higher sample rates result in higher-quality music (again, more data is collected per second of music). You can select a specific sample rate from the Sample Rate pop-up menu, or you can leave the default Auto setting (which enables iTunes to choose the sample rate). Channels You can choose to capture one channel of music (Mono) or both channels (Stereo), or let iTunes decide which to use (Auto). Variable Bit Rate Encoding With this option turned on, the encoder uses a guaranteed minimum bit rate. You can set the level of this encoding using a secondary Quality setting that ranges from Lowest to Highest. Stereo Mode Your choices here are Normal, which causes each track's information to be stored independently, and Joint Stereo, which causes information that is the same in both tracks to be stored in one track while the unique information is stored in another. According to Apple, this mode improves sound quality when encoding at 128Kbps or below. Smart Encoding Adjustments This setting enables iTunes to adjust the encoding rates as necessary to maintain the optimal ratio of music quality to file size. Unless you have a specific reason not to use this feature, you should leave it turned on. Filter Frequencies Below 10Hz Music frequencies below 10Hz are not audible, so there is really no reason to include them in the encoding process because it wastes disk space. This feature should be left on as well.
Copyright Conscious Musicians creating their own audio files and distributing them over the Net is certainly legitimate. However, it is not legitimate to create files of someone else's music and distribute them without the appropriate legal permission to do so. Some music sharing sites violate the letter and spirit of copyright laws because people other than those who own the rights to the music are distributing it. When you are dealing with music, you need to be very conscious of the copyright status of any music with which you work. Although copyright laws are complex, the basic idea behind them is not. Simply put, you cannot distribute material to which someone else holds a copyright without (written) permission to do so. Unless you create the music yourself (not simply encoding it yourself), you should not distribute it in any form. The exceptions are when you have received a license to use that music or when the music is in the public domain. |
Importing Audio CDs into Your Library To add music from an audio CD to your Library, use the following steps: 1. | Use the steps in the previous section to select and configure the encoder you want to use.
| 2. | Insert the CD containing the songs you want to encode. iTunes connects to the Internet and identifies the CD (again, assuming that you haven't disabled this feature or haven't listened to the CD before).
| 3. | Select the CD in the Source pane (if you just inserted it, it is selected by default).
| 4. | Uncheck the check box next to the title of each song you don't want to add to the Libraryby default, every track is selected and will be imported. You can use the boxes to deselect songs you don't want to import.
| 5. | Click the Import action button. iTunes begins to encode the songs you selected. Depending on how fast your Mac is and the number of songs you selected, this process can take from a minute or two to 15 minutes or so for a very slow Mac and a CD with a lot of songs. You can see the progress of the encoding process in the iTunes Information window (see Figure 18.10).
Figure 18.10. This iTunes window shows a CD being imported; information about the song currently being encoded is shown in the Information window. 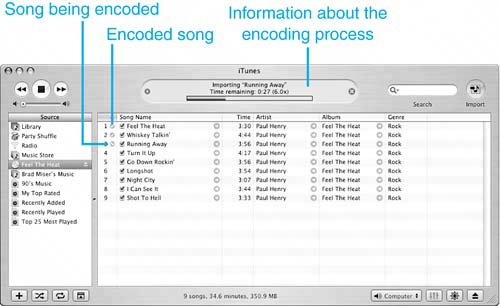
As the encoding process progresses, each song is marked with a green circle containing a check mark. The resulting files are added to your Library, and you can listen to them from there and add them to playlists. When all the songs on the CD have been imported, a tone will play to let you know the process is complete (of course, if music is playing, you might not hear the tone).
|
Following are some pointers to improve your importing experiences: When you first start building your Library, set iTunes to import songs and eject a CD when you insert it (use the On CD Insert pop-up menu on the General pane of the iTunes Preferences dialog box). When you insert an audio CD, iTunes imports it automatically. After iTunes finishes importing a CD, it ejects it. Then you can insert another CD and add it to the Library. After you have added all your CDs to your Library, select a different CD insert option; otherwise, you might end up with multiple versions of the same song in your Library when you insert a CD you have already imported. (iTunes enables you to create multiple versions of the same songs in case you want to have songs encoded with different quality levels or in different formats.) You can cancel the encoding process by clicking the small x at the right end of the encoding progress bar in the information window. You can listen to the music you are encoding while you are encoding it. Because the encoding process moves faster than real time, the import process is done before the selected songs stop playing. This can be confusing because it seems natural that both should stop at the same time. If you set CDs to eject after they are imported (using the On CD Insert pop-up menu), the end of the importing process is quite clear (because the CD is ejected). You can also listen to other songs in your Library or playlists at the same time you are importing songs from a CD. After the import process is complete, you can find the location of the encoded file for any song in your Library by selecting it and selecting File, Show Song File ( -R). A Finder window containing the file you imported opens, and the file is highlighted. -R). A Finder window containing the file you imported opens, and the file is highlighted.
Adding Other Audio Files to Your iTunes Music Library You can also add any audio file to your iTunes Library, such as those you create with other applications, those you download from the Internet, and so on. You can add files in any of the audio formats iTunes supports, including AAC, MP3, AIFF, WAV, and Apple Lossless. Configuring iTunes to Keep Your Music Organized Later in this chapter, you'll learn in detail how and where iTunes stores the music you add to your Library. For now, know that in most cases, you should have iTunes store files from any source in the same way as those you encode yourself. Here's how: 1. | Select iTunes, Preferences.
| 2. | Click the Advanced button.
| 3. | Check the "Keep iTunes Music folder organized" check box if it isn't checked already.
| 4. | Check the "Copy files to iTunes Music folder when adding to library" check box if it isn't already checked. This causes iTunes to place copies of songs you have downloaded in the appropriate iTunes Music folders.
| 5. | Click OK.
|
Adding Audio Files to Your iTunes Library After you have configured iTunes to store the music you add in an organized way, add the music to your library: 1. | Select File, Add to Library. The Add To Library dialog box will appear.
| 2. | Move to the files you want to add to your Library, select them, and click Choose. The files are added to your Library and you can work with them just like tracks you have imported from CD.
|
NOTE If you have unchecked the "Copy files to iTunes Music folder when adding to library" check box for some reason, you see a dialog box explaining that iTunes doesn't actually move the files but uses a reference to the files you choose. (If this check box is checked, iTunes does make a copy and places it in the appropriate location.) Just read the information in the dialog box and click OK.
TIP You can also add music to the iTunes Library by dragging song files onto the iTunes window or onto the iTunes icon on the Dock.
|