| iTunes is Mac OS X's amazing digital music application that enables you to truly master your music. For example, you can do the following: - Listen to audio CDs.
- Store and listen to all your music on your Mac so it is only a click away.
- Convert music into a variety of formats.
- Browse and purchase music (individual songs or albums) using the iTunes Music Store.
- Create and use playlists to totally customize the way you listen to your music.
- Create custom audio CDs and DVDs.
- Share your music on a network and listen to music being shared with you.
- Listen to audio streams from the Internet.
This list is just a start; if you can imagine something you want to do with your music, iTunes will probably enable you to do it! NOTE iTunes is a very powerful application and its capabilities seem almost endless. Although you will get a lot of good iTunes information in this chapter, it is by no mean comprehensive. You can get even more details in my book Absolute Beginner's Guide to iPod and iTunes.
Getting Started with iTunes By default, iTunes is installed when you install Mac OS X. If iTunes isn't installed on your Mac for some reason, you can download a copy at not cost to you from www.apple.com/itunes/. It is also included in Apple's iLife suite of applications. You can launch iTunes in a number of ways, including by clicking its Dock icon, opening the Applications folder and double-clicking its icon, inserting an audio CD into your Mac, or connecting an iPod to your Mac. The first time iTunes launches, you will move into the iTunes Setup Assistant. This assistant performs some basic configuration for you. Work through the assistant with the following steps: NOTE You can configure all the preferences set in the assistant using the iTunes Preferences command so nothing you set in the assistant is permanent.
1. | Read the license (if you have time and a law degree), agree to it, read the introductory text, and click Next or press Return.
| 2. | If you want to use iTunes for most audio content you will encounter on the Internet, click the "Yes, use iTunes for Internet audio content" radio button. I recommend you choose this option.
iTunes needs to connect to the Internet to perform specific tasks, such as looking up information about audio CDs you play, connecting to the iTunes Music Store, and so on.
NOTE I've assumed that you set the iTunes preferences as described in these steps. If you made other selections, your experience will vary slightly from this chapter. No worries, thoughthe differences won't be enough to derail your iTunes exploration. For example, if you don't allow iTunes to connect to the Internet automatically, you'll need to connect yourself when iTunes needs Internet access. | 3. | To allow iTunes to connect when it needs to, click the "Yes, automatically connect to the Internet" radio button.
| 4. | Click Next or press Return.
| 5. | If you have music files stored in your Home folder, enable iTunes to add those files to your Library automatically by clicking the "Yes, find MP3 and AAC files in my Home folder" radio button.
| 6. | Click Next or press Return.
| 7. | Start your iTunes experience in your iTunes Library by clicking the "No, take me to my iTunes Library" radio button; then click Done. You'll move to the iTunes window. Any music that iTunes could find in your Home folder will be added your Library. Don't be discouraged if iTunes looks kind of empty; you will easily and rapidly fix that.
|
iTunes uses a multipaned interface that you'll likely come to know and love like I do (see Figure 18.1). The iTunes window consists of three panesSource, Browser, and Contentand the control and information window that surrounds those panes. The Browser can be hidden or shown; the other panes are shown at all times (except when you use the iTunes mini-player, which you will see later in this chapter). Figure 18.1. iTunes provides complete control over your music. 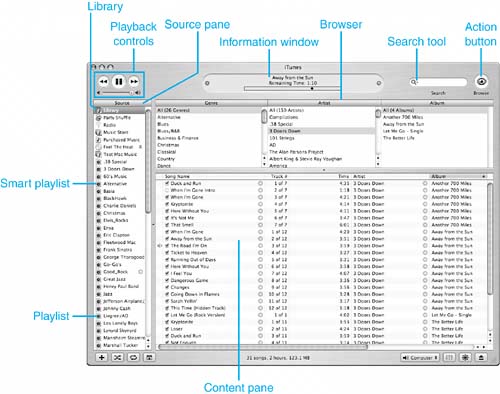
TIP If you don't see the Browser, click the Browse button to open it.
Choosing a Source on the Source Pane As you can probably guess from its name, the Source pane shows the music sources available to you. When you want to work with a sourcefor example, to listen to ityou select that source on the Source pane. The contents of the source you select will be shown in the Content pane, and you can work with the songs that source contains. As you work with iTunes, you will see the following sources: TIP You can change the relative size of any pane by dragging its resize handle, which is a small circle in the center of the border between the panes.
Library The Library contains all the music you have added to iTunes and enables you to access any of your music quickly and easily. Because you can import audio CDs to your Mac, you can add all your music to the Libraryno more fussing with individual CDs. You can also add music from the iTunes Music Store, along with any other audio files you have, to your Library. You can browse and search the contents of the Library and play any music it contains. Party Shuffle This is a special playlist you can use to randomize your music experience. You'll learn more about this later in this chapter. NOTE Some sources can be shown or hidden using the General pane of the iTunes preferences. For example, if you don't want the Radio Source to be shown, uncheck the Radio check box. This list describes the sources shown by default.
Radio The Radio Source enables you to listen to Internet radio broadcasts. Music Store Apple's iTunes Music Store enables you to find and purchase music online. You can preview music and then buy it. When you do so, that music is downloaded to your Mac and added to your Music Library. You can buy entire CDs or individual songs. Purchased Music This is a special playlist that contains all the music you have purchased from the iTunes Music Store. Audio CD When an audio CD is inserted in your Mac, you see its icon in the Source pane. You can listen to it and add it to your Library, which iTunes calls importing, so you never have to use the CD itself again. Shared Music With iTunes, you can share music with other people on your network and other people can share music in their Libraries with you. When you select a shared source, you can listen to music in other people's iTunes Libraries. Playlists Playlists are collections of songs you create and listen to. They enable you to create your own music collections that contain exactly the songs you want to listen to in the order in which you want to listen to them. You can add any music from your Library to playlists, and you can have as many playlists as you want. Smart Playlists Smart playlists use a set of expressions you create to automatically collect songs in a group (unlike playlists, which you create by manually adding music to them). You define the expressions used for each smart playlist you create. Smart playlists can be dynamic, meaning songs can be automatically added to them based on the expressions you create so their content changes over time. Music Player On of the best things you can do with iTunes is to manage the music stored on an iPod so you can take your music with you wherever you go. You can also use iTunes to work with other portable music players, but because the iPod is by far the best one, I don't know why you would want to use another kind.
 To learn how to use iTunes to manage the music on an iPod, p. 585. To learn how to use iTunes to manage the music on an iPod, p. 585.
Browsing Your Music with the Browser The Browser provides a way for you to browse your music by genre, artist, and album (refer to Figure 18.1). The Browser can be shown or hidden for each source on the Source list. As you select items in the Browser, the contents of what you select are shown in the Content pane (explained in the next section). The more specific you make the Browser, the more specific the selection of song results in the Content pane. For example, if you click a specific genre in the Genre column, only the artists associated with that genre are shown in the Artist column. Similarly, if you select an artist in the Artist pane, only that artist's albums are shown in the Album pane. When you select an album in the Album column, that album's songs are shown in the Content pane. To configure the Browser, do the following steps: 1. | Select iTunes, Preferences or press "-,.
| 2. | Click the General tab if it isn't selected already.
| 3. | Check the "Show genre when browsing" check box. This will cause iTunes to display the Genre column of the Browser.
| 4. | Check the "Group compilations when browsing" check box.
NOTE A compilation is a CD that contains songs from different artists, such as that Greatest TV Theme Songs of the 1970s CD you love to listen to. When you browse, it is usually a good idea to have iTunes group this type of CD as a compilation, rather than displaying the songs it contains by artist. | 5. | Click OK. The Preferences window will close and your settings will take effect.
|
TIP You can use the Source Text and Song Text pop-up menus on the General pane of the iTunes Preferences window to set the relative size of the text used in the Source pane and Content pane, respectively.
To show or hide the Browser for a source, select that source and select Edit, Show Browser or Edit, Hide Browser, respectively. You can also show or hide the Browser with the Browse action button (this appears only for certain sources, such as the Library). When the Browser is hidden, the Content pane expands to fill the right side of the iTunes window (see Figure 18.2). Figure 18.2. Press  -B to show or hide the Browser; compare this figure to Figure 18.1. -B to show or hide the Browser; compare this figure to Figure 18.1. 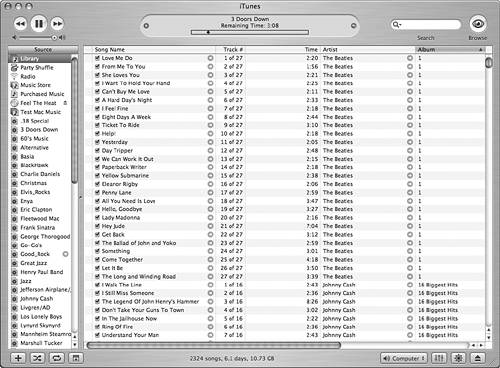
TIP The Browser is the most useful when you are working with a source that contains music from different artists and albums or from different genres, such as your Library, large playlists, and so on. It isn't so useful for sources from a single artist or that don't contain many songs. By default, the Browser will be displayed only for the Library source. You'll have to show it when you work with other sources.
Working with Music in the Content Pane The Content pane displays the contents (the songs) of the source selected in the Source pane or Browser. Along with song name, the Content pane can show a variety of other information for each song, including track number, time, artist, album, genre, and much more. You can choose to display different columns for each source. NOTE The first column in the Content pane does not have a column title and is always visible. Icons appear in this column to indicate what is happening with songs being shown in the Content pane. For example, when you are playing a song, a speaker icon appears in this column next to the name of the song.
The columns in the Content pane work similarly to those in a Finder window in the List view. You can sort the pane by a specific column (such as Track #) by clicking its column title (the column title by which the pane is sorted is highlighted in blue). You can drag columns to the left or right to change the order in which they appear, and you can resize a column by dragging its right border. To learn how to customize the information you see for sources, p. 564.
One of the most important things to realize about the Content pane is that songs will play in the order in which they appear in this pane starting from the top of the pane and moving toward the bottom. If the contents of the pane are too large to be shown at its current size, you can use the scrollbars to see all the information it contains. NOTE One of the nice features of iTunes is that it automatically connects to the Internet and downloads information about CDs you play, such as album, artist, genre, song title, and so on. Music you purchase from the iTunes Music Store includes this information, too. You can also add or edit a song's information manually. The information associated with your music is important because you use it to organize your music and to perform some actions, such as creating a smart playlist.
To learn how to associate information with your music, p. 552.
Using iTunes Controls and Displays At the top and bottom of the iTunes window, surrounding the panes, are the iTunes controls, information window, and search tool (see Figure 18.3). Figure 18.3. Surrounding the panes of the iTunes window are the controls and displays you use to work with your music. 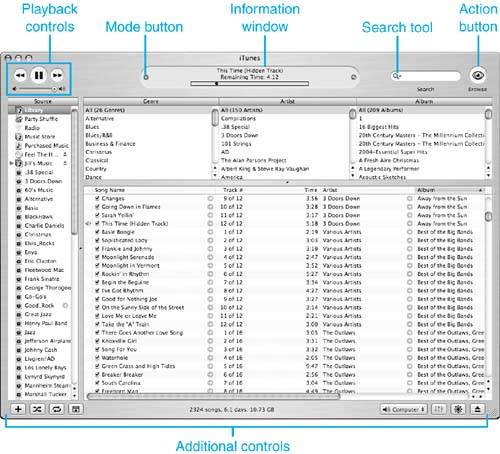
In the upper-left corner of the window are the playback controls, which include rewind/ jump to previous track; play, stop, or pause; fast forward/jump to the next track; and the volume slider. These are self-explanatory, and they change depending on the context (for example, when you are playing a CD, the Pause button appears, but when you stop the music, it becomes the Play button). In the top center part of the window is the information window. This display shows information about what you are doing at any moment in time. For example, when you are listening to music, it shows information about the song that is currently playing. When you are importing music into your Library, it shows information about the importing process. The information window also has several modes; you can change these using the Mode button. What this button does depends on the action you are performing at that particular time. For example, when you are listening to music, one mode displays a graphic equalizer representation of the music playing. In another mode, it shows the title of the track that is playing along with a progress bar. When you are importing a song, the information window shows a progress bar for the import process. In certain situations, this area also contains a Stop button you can use to stop what is happening (such as when you are importing audio files). You will see examples of these modes in the various figures in this chapter. TIP When you are playing music, the name of the track, artist, and album it comes from rotate above the time display; you can change from one to the other by clicking the text. You can also switch from the remaining time display to the total time display or elapsed time by clicking the time currently being displayed.
To the right of the information window is the search tool. You can use this to narrow the songs shown in the Content pane for any source you select, such as your Library or a CD: 1. | Select the source in which you want to search.
| 2. | Click the Magnifying Glass icon and select the attribute by which you want to search. Your options are All (the default), Artists, Albums, Composers, and Songs.
| 3. | Start typing in the Search tool. As you type, the songs displayed in the Content pane are limited to only those songs that contain the text you type (the text can be in any of the columns shown in the pane). The more letters you type, the more specific the search becomes.
|
For example, to find all the songs in your Library that have the word strange somehow connected with them, you would leave All selected on the pop-up menu and type strange in the Search box. The Content pane would then show only those items whose name, artist, or other data contain that text (see Figure 18.4). In this example, if you had selected a source containing the song "Strangers in the Night" and also had a song by Eddie Strange, both of these songs would appear in the Content pane. Figure 18.4. If you have strange music in your Library, it is easy to find using the iTunes search tool. 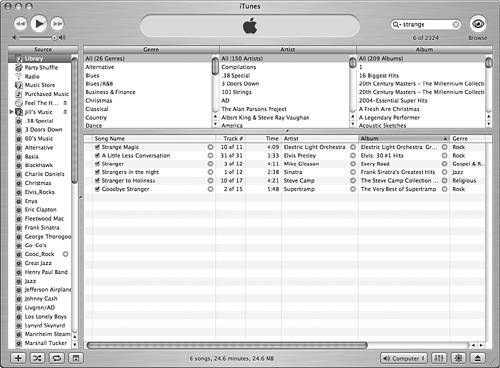
After you perform a search, the Clear button (which is a circle containing an x) appears at the right end of the search tool. Click this button to clear the search and cause the Content pane to display all the contents of the selected source again. In the upper-right corner of the iTunes window is the Action button, which changes depending on the source selected. When an audio CD is selected, the Action button becomes the Import button, which enables you to add songs from the CD to your Library. When a playlist is selected, it becomes the Burn CD button, which enables you to burn a CD from a selected playlist. When the Library, Music Store, or Shared Music is selected, it is the Browse button that shows or hides the Browser. Along the bottom of the iTunes window are more controls and information (see Figure 18.5). Figure 18.5. iTunes provides all the tools you need to get the most out of your music. 
At the bottom of the window, the following features are available (from left to right): New Playlist Click this to create a new playlist. If you hold down the Option key while you click it, you can create a new smart playlist. You will learn much more about playlists later in this chapter. Shuffle When you click this, the tracks of the selected source are played in a random order. This is reflected in the Content pane because the songs are reshuffled to reflect the random order in which they will be played. Click the button again to return the selected source back to its previous order. TIP To determine whether iTunes shuffles by song or album, use the Song or Album radio button on the Advanced pane of the iTunes Preferences dialog box. When you click Song, iTunes will shuffle among the songs in the current album. If you click Album, iTunes will shuffle among albums in the selected source (playing the entire album before it selects the next album to play).
Repeat The Repeat button enables you to repeat whatever you are playing. If you click this button once, the source repeats until you stop it. If you click this button twice, the source repeats one time. Show/Hide Song Artwork When you click this, the Song Artwork pane appears underneath the Source pane. The art associated with the currently playing or selected song is shown in this pane. Music you purchase from the iTunes Music Store has art associated with it. You can also add graphics to this field for any music in your Library. To learn about artwork, p. 567.
Source Information In the center of the bottom of the iTunes window information about the currently selected source is shown. You can see how many songs are included in the source, the total playing time, and the total file size of the source's tracks. This information is especially useful when you are burning CDs or managing a music player. Output Options Using AirTunes and an AirPort Express base station, you can broadcast your iTunes over a wireless network. The Output Options pop-up menu enables you to choose how you want to output your music. To learn more about AirTunes, p. 575.
Show Equalizer This opens the iTunes Equalizer that enables you to control how music sounds. To learn more about the Equalizer, p. 566.
Show/Hide Visualizer This opens a funky, 60s-style window that displays visuals to accompany your music. Eject As you can probably guess, this ejects the selected source, such as an audio CD or iPod.
TIP If you have an Apple Pro keyboard or are using a PowerBook or iBook, you can eject a selected source by pressing its Eject key.
When an iPod or other music player is connected to your Mac, you see additional buttons related to that player, such as the iPod Options button. The commands for many of iTunes' controlssuch as Shuffle, Repeat, and Ejectalso appear on the Controls menu along with additional controls, including Volume Up, Volume Down, and Mute. Also, keyboard shortcuts are available for most of iTunes controls. To see a list of keyboard shortcuts, p. 579.
The Most Useless Feature Ever? To the left of the Eject button is the Show Visualizer button. If you click this button, the center part of the iTunes window becomes a throwback to the 1960s and you see visual effects while the music plays. Although it looks cool for about 10 seconds, I have never used it for longer than that period of time. Perhaps if you like to stare at something while you listen to music, you might find this feature more useful than I do. Be aware that the effects you see really have nothing to do with the music that is playing. If you don't believe me, open it when you aren't playing any music. Because I think this feature is a waste, I won't waste any more of your time on it. |
|