Using an iPod shuffle As a Flash Drive


caution

When you have enabled an iPod to be used as a disk, you must manually eject it before disconnecting it from your computer. If you don't, you can damage the data stored on it. To let you know this, the Do not disconnect message will appear on the iPod's screen when it is mounted on your computer. Don't disconnect your iPod until you have ejected it and the OK to Disconnect message appears on its screen.


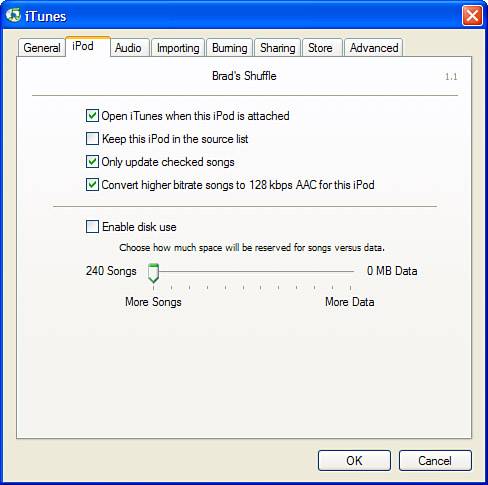
Even though it doesn't have a hard drive, you can use the shuffle to store files as a USB flash drive. This works similarly to the other iPod models. First, set up the shuffle to be used as a drive. Then, use it.

Configuring an iPod shuffle As a Flash Drive

To prepare an iPod shuffle to be a flash drive, perform the following steps:

1.

Plug the shuffle into your computer. iTunes will open and the shuffle will appear on the Source list.

2.

Select the shuffle and click the iPod Options button. The iPod pane of the iTunes Preferences dialog box will appear (see Figure 11.9).

Figure 11.9. When you select a shuffle and open its options, you can configure it as a flash drive.


3.

Check the Enable disk use check box and click OK in the resulting dialog box (which warns you that you must manually eject the shuffle before unplugging it when you use it as a drive). This enables your shuffle to become a USB flash drive.

4.

Use the slider to set the amount of memory that should be reserved for songs. A portion of its memory must be dedicated to the flash drive function to serve this purpose. Any memory you allocate for this won't be available for music. As you move the slider, the information at each end of the slider will show you how much memory you have allocated for each purpose.

5.

Click OK to close the Preferences dialog box.

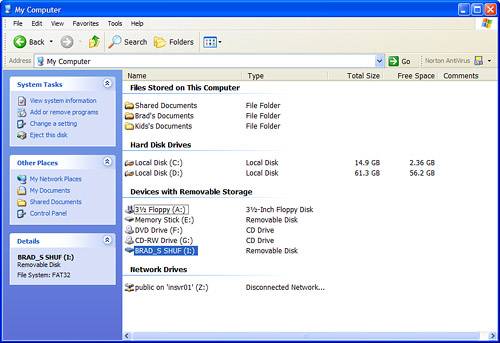
After you have configured it for disk use, using a shuffle as a disk is simple:

1.

Plug the shuffle into your computer. iTunes will open and the shuffle will appear on the Source list. The shuffle will also be mounted on your desktop just like hard drives and other storage devices you use.

2.

Move to your computer's desktop and locate the shuffle; it will have the name you gave it during the initial configuration process (or as close as your computer can come to it to create a valid disk name).

3.

Open the shuffle just as you would any other storage device (see Figure 11.10).

Figure 11.10. The shuffle appears on the list of removable storage devices and can be used just like one of them.


4.

To add files to the shuffle, drag them from your desktop onto its folder.

5.

When you are done using the shuffle as a disk, eject it from the desktop or by clicking one of the Eject buttons in iTunes (one is next to the shuffle on the Source list while the other is in the lower right corner of the iTunes window).


Absolute Beginner's Guide to iPod and iTunes
ISBN: 789731770
EAN: N/A
Year: 2003
Pages: 194

flylib.com © 2008-2017.
If you may any questions please contact us: flylib@qtcs.net