Controlling Your Music
| Okay, so now you have selected music and started to play it. What's next? Learn to control it, of course. Playing the Basic WayHere are the basic controls you can use:
Playing the iPod WayThe basics of listening to music are cool. Now let's take a look at some of the cool iPod playback features that aren't so obvious. You can move around menus while music is playing just like you can when it isn't. As you choose other menus, the music will continue to play until you pause it or choose different music and play that instead. tip
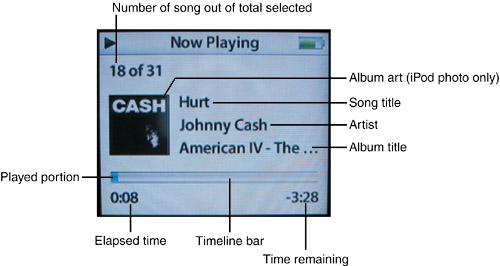
If music is playing and you move away from the Now Playing screen, such as to change a setting on a menu, you'll automatically move back to the Now Playing screen a couple of seconds after you release the Click Wheel. So, as long as music is playing, you'll always wind up back at this screen. The Now Playing screen provides lots of information about the music that is currently playing or paused (see Figure 4.10). Figure 4.10. The Now Playing screen is packed with features, some of which might not be obvious.
At the top of the screen, you'll see the number of the current song out of the total you selected. For example, if you are playing the first song in a playlist containing 50 songs, this will be 1 of 50. This information helps you know where you are in the selected source. In the center of the screen, you will see information about the song currently selected, including the song title, artist, and album. If any of this information is too long to be shown on one line, it will begin scrolling across the screen a second or two after a song starts playing. If you have artwork associated with music in iTunes and are using an iPod with a color screen, the album art will appear next to the song information. note
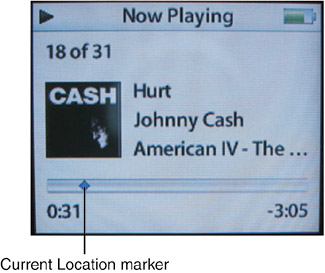
At the bottom of the screen, you will see the Timeline bar. In the normal mode, this gives you a visual indication of the song's length and how much of the song you have played so far (represented by the shaded part of the bar). Under the left edge of the bar, you will see the amount of time the current song has been playing. Under the right end of the bar, you will see the time remaining to play (this is a negative number and counts up to zero as the song plays). If you click the Select button one time, the Timeline bar changes to indicate that you can now rewind or fast-forward using the Click Wheel (see Figure 4.11). Figure 4.11. When the Timeline bar looks like this, you can rewind or fast-forward using the Click Wheel.
When the Timeline bar is in this mode, you can drag the Click Wheel clockwise to fast-forward or counterclockwise to rewind the music. As you drag, the Current Location marker moves to its new location and the time information is updated. When you release the Click Wheel, the Timeline bar will return to its normal mode in a second or so. If a song with artwork is playing on an iPod with a color screen and you click the Select button twice, the artwork will expand so it fills most of the screen. After a second or two, you'll return to the normal Now Playing screen. If you click the Select button three times rapidly on an iPod with a color screen or twice on an iPod mini, the Timeline bar will be replaced by the Rating display. If the song currently playing has been rated, you will see the number of stars for that song (see Figure 4.12). If the song hasn't been rated, you see five dots instead (see Figure 4.13). You can rate the current song by dragging the Click Wheel clockwise to give the song more stars or counterclockwise to reduce the number of stars. A second or so after you stop touching the Click Wheel, the Timeline bar will return to its normal mode. Figure 4.12. You can rate your music in iTunes and display the rating on your iPod.
Figure 4.13. You can rate your iPod music by choosing one of the dots shown here.
note
The neat thing about this is that the next time you connect your iPod to your computer, the rating information you set on the iPod is carried over to that music in your iTunes Library. So, you need to rate a song in only one place. |

EAN: N/A
Pages: 194