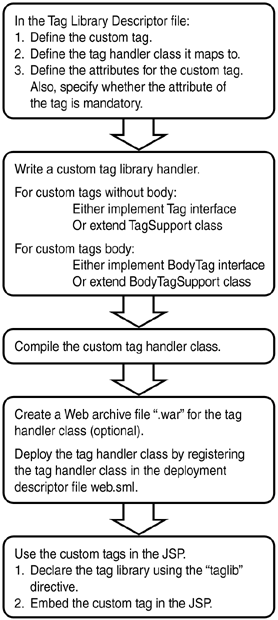
Flowchart for Developing a Custom Tag Library
| As can be seen from Figure 6.1, the first step in developing a custom tag library is to define the custom tag and the tag handler it maps to in the tag library descriptor file. Figure 6.1. Flowchart for developing a custom tag library.
The next step is to write a custom tag handler. If the custom tag does not have a body, the custom handler either implements the javax.servlet.jsp.tagext.Tag interface or extends from the javax.servlet.jsp.tagext.TagSupport class. For a custom tag with a body, the custom handler class needs to either implement the javax.servlet.jsp.tagext.BodyTag interface or extend the javax.servlet.jsp.tagext.BodyTagSupport class. This custom tag handler is your tag library. After developing the custom handler, you need to compile the tag handler to generate the classes that form part of your JSP custom tag library. The deployment of the custom tag library in the WebLogic Server environment is the next step. In this environment you can optionally create a .jar file of the tag handler classes or keep the tag handler classes in exploded format. The tag handler classes (in either the .jar or exploded format) must be registered in the WebLogic Server's deployment descriptor file web.xml. Now your custom tag library is all set to be used in your JSPs. Use the <taglib> directive in your JSP to reference the custom tag library. Embed the custom tags in your JSP as to what is defined in the tag library descriptor file. |
EAN: 2147483647
Pages: 339
