| The deployment tools provided by the WebLogic Server are primarily the WebLogic Builder visual tool and the command-line webLogic.Deployer tool. In this section you will be studying these tools apart from some allied support tools for deployment. WebLogic Builder One of the critical activities in application development using the WebLogic Server is deployment. The role of the deployer assumes significance since the WebLogic Server provides the execution environment and support for the application. Hence, it is very useful if there is a GUI tool available to perform deployment activities. The WebLogic Server provides such a tool for deploying different kinds of applications. Unlike some of the tools that have been used over the different days that were command-line driven, the WebLogic Builder provides a visual environment for creating and editing deployment descriptor files and deploying enterprise applications on the WebLogic Server. The WebLogic Builder is started using the command startWLBuilder.cmd From Figure 19.4 you can see that the screen of the WebLogic Builder tool is organized as follows: A menu bar and a toolbar are at the top. An area on the left side consists of a tree-view of the different deployment descriptor elements in the deployment descriptor file (depending on the kind of application). An area on the right side consists of tabs. Each tab represents a group of deployment settings that will be defined or are present in the deployment descriptor file. A message area on the bottom is used by the WebLogic Builder tool to display messages on every processing or action taken. Figure 19.4. Screen shot of the WebLogic Builder.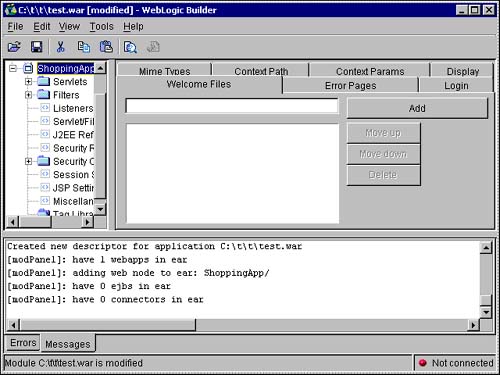
The WebLogic Builder tool is not limited to creating deployment descriptor files. The tool proves to be even more useful when maintaining and updating applications deployed in the WebLogic Server. Deployment settings are essentially declarative in nature. These are read and interpreted by the WebLogic Server, which then undertakes certain actions based on the deployment settings. Because of the declarative nature of the deployment descriptors, the WebLogic Builder tool can inspect and modify the deployment information offline, that is, without having the WebLogic Server up and running. This is different from using any online tools to configure deployment settings. The WebLogic Builder deployment tool can be used for the following primary tasks. Using the WebLogic Builder for Web Applications Web applications like Java servlets, JSPs, filters, and listeners require information like mapping information or aliases to be defined before the Web applications can be used. The WebLogic Builder provides a UI to generate the deployment descriptor files for Web applications. The WebLogic Builder can be used with either Web application archive files (.war) or a Web application in exploded format located in a directory. Figure 19.5 shows the contents of the deployment descriptors of the existing Web application archive that you developed on Day 9. This .war file contains Java servlets, filters, listeners, JavaServer Pages, and JDBC connection information. Figure 19.5. Screen shot of the WebLogic Builder opening a Web application archive file.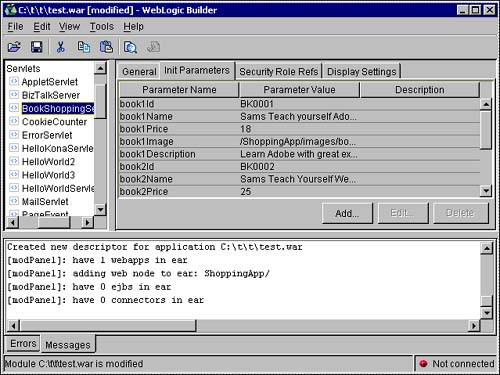
Using the WebLogic Builder for EJBs Now take a look at the other major activity that can be performed using WebLogic Server: creating the deployment descriptors for Enterprise JavaBeans. Figure 19.6 displays the contents of the deployment descriptor files used for the stateful session EJB that you prepared on Day 10. You can see the different classes of the EJB under the package structure com.sams.learnweblogic7.ejb.stateful. The deployment information of the EJB is categorized as it relates to tuning, methods, and resources used by the EJB. Clicking each of these categories pulls up the deployment information from the deployment descriptor files of the EJB. The WebLogic Builder tool can not only view these deployment descriptors but also modify them if required. For example, if you wanted to add transaction attributes for any methods in the EJB, you can do so here. Figure 19.6. Screen shot of the WebLogic Builder opening an EJB Java archive file containing a session bean.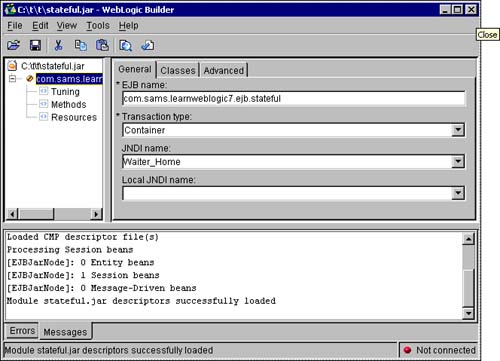
Another area that the tool can be used for is defining the mapping of the EJB fields to the database table and columns for container-managed persistence (CMP). In CMP the EJB container is responsible for the persistence activities of the entity bean through its life cycle. For this purpose, the EJB container is required to know which fields of the EJB will map to which tables and columns in the database. Figure 19.7 shows the contents of the deployment descriptor files for the CMPFinal.ear enterprise application archive file that was developed on Day 13. The CMP field mapping that was incorporated manually in the deployment descriptor file is displayed for the CMP fields node in the left side. Now you can really appreciate how easy it is to perform deployment activities using the WebLogic Builder tool. As you have seen above, the WebLogic Builder tool is a very powerful part of the toolset provided by the WebLogic Server. Figure 19.7. Screen shot of the WebLogic Builder opening an EJB Java archive file containing an entity bean.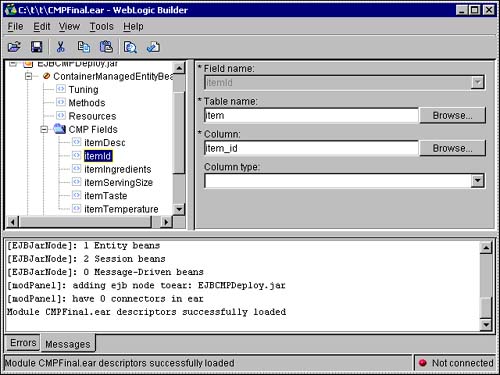
DDInit The DDInit set of ant utilities is useful for creating the deployment descriptors based on the contents of the staging directory where the servlet or EJB class files are located. The DDInit set of utilities can build the J2EE specification compatible deployment descriptor files as well as the WebLogic Server specific deployment descriptor files. The utilities of the DDInit set that are available are as follows: weblogic.marathon.ddinit.WebInit This tool accepts the directory where the servlet class files are located and generates the deployment descriptor files web.xml and weblogic.xml for the Web application files stored in the source directory. It accepts a source directory where the EJB class files are located and creates a WEB-INF directory containing the deployment descriptor files in the target directory. The following command should be used to execute the tool: java weblogic.marathon.ddinit.WebInit <base-directory> For example, for the BookShoppingServlet application developed on Day 3, you can use this utility to generate the deployment descriptor files web.xml and weblogic.xml for the compiled classes located in the deploy directory. The tool creates the WEB-INF directory and places these deployment descriptor files inside this directory: java weblogic.marathon.ddinit.EJBInit deploy weblogic.ant.taskdefs.war.DDInit In addition, WebLogic Server provides the weblogic.ant.taskdefs.war.DDInit tool. To use the utility, give the following command: java weblogic.ant.taskdefs.war.DDInit [-quiet|-verbose|-debug] <base-directory> [destination-directory] Since this tool may generate inaccurate deployment descriptor files, it is recommended that you use the weblogic.marathon.ddinit.WebInit utility. weblogic.ant.taskdefs.ear.DDInit This tool should be used to create the deployment descriptor files application.xml and the WebLogic Server specific weblogic-application.xml file. The following command should be used to execute the tool: java weblogic.ant.taskdefs.ear.DDInit [-quiet|-verbose|-debug] <base-directory> [destination-directory] weblogic.marathon.ddinit.EJBInit This tool should be used to create deployment descriptor files for EJBs compliant with the EJB 2.0 specification. It accepts a source directory where the EJB class files are located and creates a META-INF directory (under the directory where the EJB class files are located) containing the deployment descriptor files in the target directory. The following command should be used to execute the tool: java weblogic.marathon.ddinit.EJBInit <base-directory> For example, for the stateful session bean WaiterBean developed on Day 10, you can use this utility to generate the deployment descriptor files ejb-jar.xml and weblogic-ejb-jar.xml for the EJB-compiled classes located in the deploy directory. The tool creates the META-INF directory and places these deployment descriptor files inside this directory: java weblogic.marathon.ddinit.EJBInit deploy On executing the tool, the following output is displayed on the screen: [ModuleInit]: Searching for component class files [ModuleInit]: got 12 classes [ModuleInit]: ejbinit: setfound(true) [ModuleInit]: Found J2EE component classes. Initializing descriptors [ModuleInit]: Creating EJB descriptor(s) [ModuleInit]: found ejbhome: com.sams.learnweblogic7.ejb.stateful.WaiterHome [ModuleInit]: bean class: com.sams.learnweblogic7.ejb.stateful.WaiterBean [ModuleInit]: [ModuleInit]: Writing descriptors [ModuleInit]: Building module with newly created descriptors [ModuleInit]: Finished building module [EJBJarCMBean] writing descriptors [EJBJarCMBean] saving FS weblogic.ant.taskdefs.ejb20.DDInit Apart from the weblogic.marathon.ddinit.EJBInit tool, WebLogic Server also provides the weblogic.ant.taskdefs.ejb20.DDInit utility. This tool is very similar to the webblogic.marathon.ddinit.EJBInit tool. BEA does not recommend using the weblogic.ant.taskdefs.ejb20.DDInit tool, though, since it may generate deployment descriptor files with inaccurate values. The following command should be used to execute the tool: java weblogic.ant.taskdefs.ejb20.DDInit [-quiet|-verbose|-debug] <base-directory> [destination-directory] EJBGen To automate the process of creating Remote and Home interface classes, WebLogic Server now provides the EJBGen utility. In order to use this utility, you need to embed the source code of the bean with special javadoc tags and then process this file using EJBGen. Thus, you can avoid the extra effort of maintaining Remote and Home interface files. The following command should be used to execute the tool: javadoc -docletpath weblogic.jar -doclet weblogic.tools.ejbgen.EJBGen MyBeanSourceFile.java Examples of the tags that can be embedded are @ejbgen:remote-method, @ejbgen:jndi-name, and so on. A code snippet of a tag is given here: /*** * @ejbgen:remote-method * transaction-attribute = Required */ myRemoteMethod1() { // implementation code goes here ... } weblogic.Deployer This is the command-line tool provided by the WebLogic Server to deploy Web applications and EJB components. Through your work over the past three weeks, you have extensively used the weblogic.Deployer tool to deploy all the types of EJBs, such as stateful and stateless session beans, entity beans implemented using container-managed persistence, and bean-managed persistence and message-driven beans. To execute and use the tool, give the following command: java weblogic.Deployer [options] [-activate|-deactivate|-remove|-unprepare|-cancel|-list] [files] The options of the weblogic.Deployer tool are listed in Table 19.3. Table 19.3. weblogic.Deployer options | Option flag | Remark | | -help | Print this help message. | | -version | Print version information. | | -adminurl <https://<server>:<port>> | The URL of the administration server: default http://localhost:7001 | | -user <user> | A user other than the default of installadministrator | | -password <password> | Specifies the password on the command line. If this option is absent, the user is prompted. | | -verbose | Displays additional status during the deployment process, including notifications of when the application is prepared and activated on each target. | | -debug | Displays debug level messages to the standard output. | | -examples | Displays examples of usage of this tool. | | -upload | Causes the specified source file(s) to be transferred to the administration server. This is used when the Deployer tool is not being used on the same machine as the administration server and the user does not otherwise have access to place the targeted files on the administration server. | | -delete_files | Causes the server to remove the files that are specified in the file list and leave the application activated. This option is valid only for unarchived Web applications. | | -remote | Signals that the tools are not running on the same machine as the administration server. The source path should be made to pass through unchanged, as it represents the path on the remote server. | | -nostage | Sets the stagingMethod attribute on the application Mbean when it is created so that the application will not be staged and the original source is used. | | -external_stage | Sets the stagingMethod attribute on the application Mbean when it is created so that the application will not be staged but the value of the staging path will be used when preparing the application. | | -stage | Sets the stagingMethod staging attribute on the application when it is created so that the application will always be staged. This value will override the stagingMethod attribute on any targeted servers. | | -nowait | Once the action is initiated, the tool will print the task ID and exit. This is used to initiate multiple tasks and monitor them later using the -list action. | | -timeout <seconds> | The maximum time in seconds to wait for the completion of the deployment task. When the time expires, the current status is printed and the program exits. | | -source <archive file or directory> | Location of the file or directory that represents the enterprise component or application that is being (re)activated. If the source file is relative, it is relative to the current directory, unless the -remote option is used. To specify individual files within an application for redeployment or addition, list them at the end of the command line. | | -name <application name> | The name of the application being deployed. | | -targets <<server 1>, ...<component>@<server N>> | A comma-separated list of the server or cluster names. Each target may be qualified with a J2EE component name. This enables different components of the archive to be deployed on different servers. | | -id <task identifier> | Optional client-supplied unique identifier for the deployment task. The ID is first specified to -activate, -deactivate, -unprepare, or -remove. It is used later as an argument to -cancel or -list. | | -activate | (Re)activates the <source> application on the <targets> with the <name>. | | -deactivate | Deactivates the application <name> on the <targets>, leaving any staged application files in a state where they may be quickly reactivated. | | -unprepare | Deactivates and unloads classes for the application <name> on the <targets>, leaving any staged application files in a state where they may be quickly reloaded. | | -remove | Deactivates the application <name> on <target> and removes any files that were staged for this application. If there are no longer any targets for the application, the associated configuration is completely removed. | | -cancel | Attempts to cancel the task <id> if it is not yet completed. | | -list | Lists the target status of each task <id>. | | -deploy | A convenient alias for activate. | | -undeploy | A convenient alias for unprepare. | BEA XML editor The BEA XML Editor is entirely written in Java. The XML elements that are supported are listed here: Element Attribute Comment CDATA Processing instruction The editor supports files of the following formats: .xml XML files are the primary file formats supported by the editor. .xsd The editor can also be used to write the grammar of the file that is, XML Schema files files with the extension .xsd. .soap SOAP files can also be worked with using the editor. .wsdl The BEA XML Editor can also be used for writing the Web Services interface file written using the Web Services Description Language. From the screen shot in Figure 19.8, you can see that the screen is divided into the following parts: A top menu and toolbar. On the left-hand side, a tree-view of the open files and the elements contained in the files. On the right-hand side, an editing area that can be used to edit the opened file. The editing area displays color-coded elements for easy identification and editing. A bottom status message area that is used by the BEA XML Editor application to display messages. Figure 19.8. Screen shot of BEA XML Editor.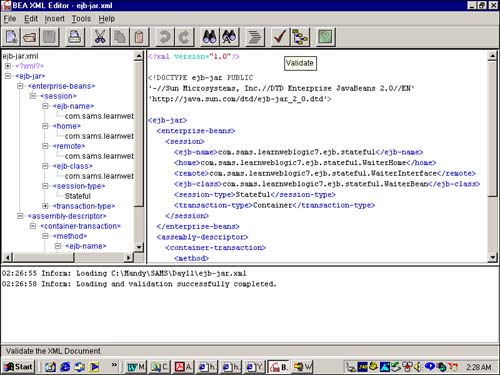
The XML documents in the BEA editor can be edited by inserting XML elements and their attributes. The XML editor also allows for parsing and validating the XML document by enabling the Parser Feature Validate on File Load option in the Options tab, which is displayed after clicking the Tools menu in the menu bar. |