Administering Your WebLogic Server
| The WebLogic Server's system administration tool allows you to configure and manage WebLogic Servers at one or more physical locations and to manage the applications running on these servers. You are already familiar with WebLogic Server's domains, managed servers and single servers. Also, you have a brief idea of how to start the WebLogic Server. The most common aspects of administering the WebLogic Server are listed here:
On Day 16, "Deploying Applications," you learned in detail how to deploy each of the components of a Web application. Also, while learning about each of the technologies in detail, you learned how to configure the required components. Now you'll take a look at the remaining administrative tasks. Starting Your WebLogic ServerA single JVM can contain only one WebLogic Server process because the WebLogic Server runs as a process within the JVM. Hence, if you wish to administer any server, you must first start the Administration Server. If yours is a single server, the WebLogic Server and Administration Server are one and the same. However, if you have a cluster of WebLogic Servers or you have managed servers, you will have a single Administration Server to control all these WebLogic Servers. Hence, to start any of the other WebLogic Servers, you need to first start your Administration Server. Now you will see in detail the different ways of starting the Administration Server. Later, you will see how to start your Managed Servers. Starting Your Administration ServerThe Administration Server can be started via the following methods:
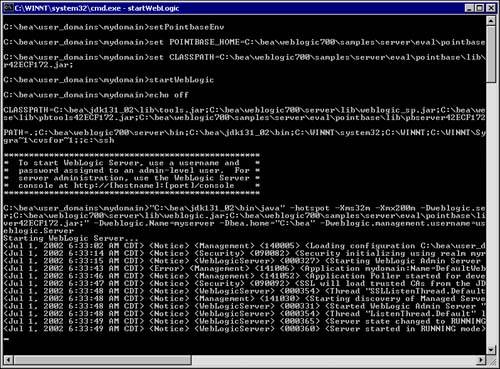
To start the WebLogic Server using any these methods, you need to have your WebLogic home path and Java home path set in the classpath variable. Also, you need to have the weblogic.jar, weblogic_sp.jar, weblogic_services.jar set in your classpath where the classloader can find it. All the required variables can be set by running either setEnv.cmd or setEnv.sh, present in your domain directory, or setWLSEnv.cmd or setWLSEnv.sh, present in your WL_HOME\server\bin directory. Besides this, if you are going to use a database, you need to have the JDBC driver in the classpath. If you are using PointBase, the following commands, executed as batch file setPointBaseEnv, will set the classpath for PointBase. You can then start the WebLogic Server using any of the modes discussed here: set POINTBASE_HOME=C:\bea\weblogic700\samples\server\eval\pointbase set CLASSPATH=%POINTBASE_HOME%\lib\pbclient42ECF172.jar;%POINTBASE_HOME%\lib\ pbtools42ECF172.jar;%POINTBASE_HOME%\lib\pbserver42ECF172.jar;%CLASSPATH% Command Prompt Using the weblogic.Server CommandAll the other methods of starting the WebLogic Server internally use the weblogic.Server command. The general syntax for this option is java [Mandatory Arguments] [Optional Arguments] weblogic.Server The mandatory arguments are
Using a ScriptBesides the parameters specified earlier, there are many more optional ones. Specifying all these parameters appropriately every time you wish to start the server is a tedious and also error-prone task. Hence, it is advisable to create your own script a .sh or .cmd file with these commands and use this script to start up the server. Using the Script Created by the Configuration WizardWhen you create a domain using the configuration wizard, it creates a script by default called startWebLogic.cmd / sh. This script uses a script called setEnv.cmd / sh, which sets the classpaths and the other concerned variables. Figure 18.1 shows the screen you would see when you run the setPointBaseEnv script first and then start up your WebLogic Server using the script created by the configuration wizard. Figure 18.1. Starting your WebLogic Server with PointBase settings configured.
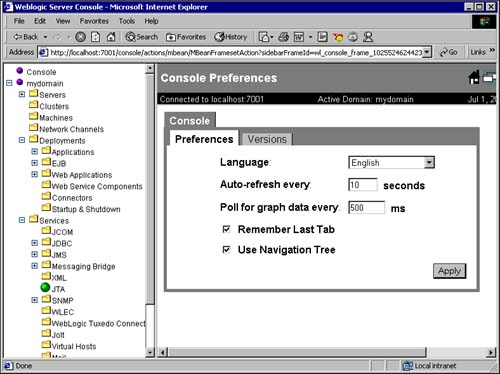
Using the Windows Start MenuWhen you install the WebLogic Server, a link to starting your WebLogic Server is made in the Windows Start menu. This happens when the domain is created using the configuration wizard. You will find this link in the Start Menu > Programs > BEA WebLogic Server Platform 7.0 > User Projects > Domain_name >Start Server. The system administration is developed using MBeans and the Java Management Extension (JMX) API. When you start the WebLogic Server, the server reads the config.xml file that exists in the domains directory and starts up the administration server with these values by overriding those default values set by the MBean. All of the current configuration values of the administration server are set in the MBean. When you make any change in the configuration of the administration server, the values are stored in the MBean and updated in the config.xml file. Now that you know the different ways to start your server, you will see how to start up the WebLogic Server's Administration Console and the services you can perform through it. The WebLogic Server Administration Console can be started up through a Web browser and a command prompt. Accessing the Administration Console Through the BrowserOnce the WebLogic Server has been started, you can open a Web browser to access the different resources in the WebLogic Server. The link to the Administration Console is http://<administration server hostname or IP address>:7001/console. The entry to the server console is protected by a user ID and password. Once you have opened the server console, you will be prompted for your user ID and password. Here, you have to put in the user ID and password of the administration server. You will then see a page with all the different resources available in WebLogic Server in the left frame of the Administration Console. The examples server has the user ID and password already entered in its startExamplesServer.cmd or startExamplesServer.sh file. The value is "weblogic" for both the user ID and password. Following are the different options and what you can configure using them. ConsoleFigure 18.2 shows the Console option with two tabs. Using the Preferences tab, you can select the language you wish your console to display. You can also configure the speed with which the graphics of this window will be refreshed. The Versions tab gives you a brief description about the server and is a noneditable screen. Figure 18.2. The Console window.
mydomainThis is the domain from which you have logged on. In this window you will see a number of options, which are all described later. However, when you click this option itself, you will see a screen with a number of tabs. Through this screen, you can choose the following properties:
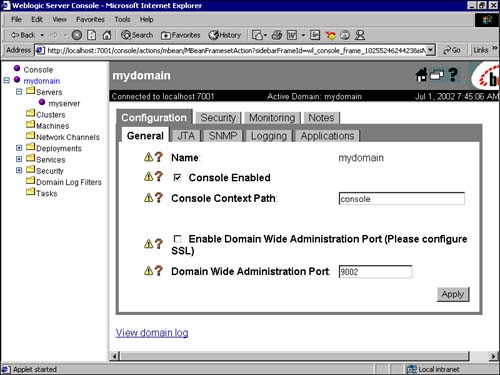
Through the General tab of this screen (shown in Figure 18.3), you can configure your domain-wide admininstration port, choose whether you wish to have your console enabled, select your console path text, and enable the domain-wide administration port. You also can see your domain log from this tab. Figure 18.3. mydomain link options.
ServersWhen you click the Servers link, you will see a list of the servers configured under this administration server. You can either configure a new server or see the properties of an existing server. In your case, the name of the existing server is myserver. If you click this, you will get a screen through which you can choose the following options:
In all these tabs, you will see the View Server Log and View JNDI Tree links at the bottom. If you click the JNDI tree link, you will see all the names of the deployed JNDI components. All the options mentioned are available separately again in the left frame, below the mydomain link. Note You can use the WebLogic Logging services to log any type of message, either related to your application or to the WebLogic Server itself. WebLogic Server uses embedded Java Management Extensions (JMX) to transfer messages from the WebLogic Servers to the WebLogic Administration server. Each domain has its own log file, and so does each server in each domain. You can log messages on the local file, for example, a local file on which the server is running. The importance of the messages is determined by the severity. Where it is logged according to the severity depends on the way you configure the logging service in the preceding option. ClustersThis link is used to configure a new cluster, or monitor existing ones. MachinesThis link is used to configure a machine that hosts another instance of the WebLogic Server. Network ChannelsThis link is used to configure additional ports with the WebLogic Server instances or clusters. DeploymentsThis link has the links to Applications, EJBs, Web Applications, Web Service components, Connectors, and Startup and Shutdown classes. Each of these options has links to either create a new service/component or monitor existing ones. You also have an option of uninstalling an existing one by clicking on the trash can sign next to the installed component. Figure 18.4 shows these options in the left frame. You have already dealt with how to perform most of these on previous days. Figure 18.4. Deployments link.
ServicesThis link gives you the ability to configure the following:
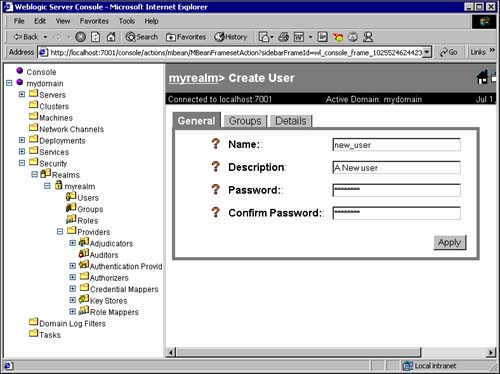
SecurityThrough this link you can configure many options, which you will learn more about later today. After reading the rest of the chapter, you may want to come back to this section to get a better understanding of the terms used. RealmsThrough this tab you can configure your users, groups, and roles. To create a new user, expand the Realms options and click the Users link. You will get the screen shown in Figure 18.5, which allows you to create a new user. Click the link, and you will get a screen prompting you to enter the new user ID and password. Click Apply. Figure 18.5. Creating a new user.
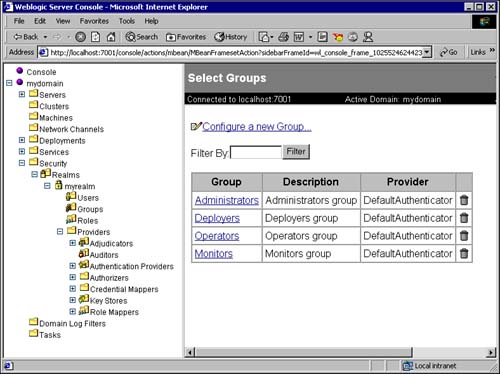
You can now choose the group that this user belongs to by clicking on the Groups tab and choosing the group from the list of possible groups on the left side. Transfer it to the current groups list on the right side. Creating a new group follows a similar procedure. You will, however, find four groups already existing when you click the Groups tab, as you can see in Figure 18.6. Figure 18.6. List of default groups.
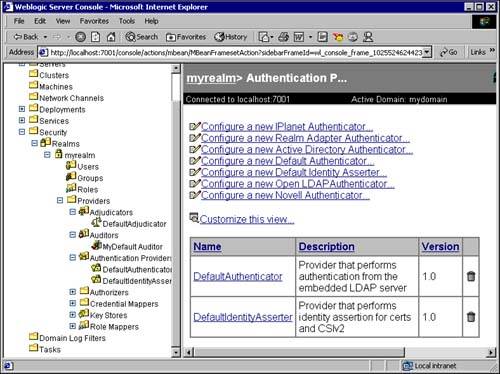
You can create new roles in a similar fashion. The existing roles are Deployer, Operator, Anonymous, Admin, and Monitor. Now you can create your own Providers (Adjudicators, Auditors, Authentication Providers, Authorizers, Credential Mappers, Key Stores, and Role Mappers). For Adjudicators and Auditors, click the respective link in the left frame, and you will see a screen on the right frame with a link to create a new default adjudicator and auditor. A default adjudicator already exists, and if you create a new one, it will replace the earlier one. Because authenticators are of different types, when you click the screen to create a new authenticator, you will see a list of authenticators, specifically for IPlanet, Active Directory, Realm Adapter Authenticator, Novell Authenticator, and so on. Also, a default authenticator and default identity asserter already exist. Figure 18.7 shows you a snapshot of the screen you will see for authenticators. Figure 18.7. Configuring a new Authentication Provider.
Domain Log FiltersThrough this option, you can group the messages sent by your WebLogic Server to a specific log file. TasksThrough this tab, you can get an overview of the tasks, such as deployment, starting and stopping managed servers, and so on. There is no way you can create a new task from here. This link gives an overview of the existing tasks. Command Line Mode of Administration ConsoleYou can also carry out administration operations through a command line interface. This command line interface is useful if
The syntax for running this is java weblogic.Admin [-url url] [-username username] [-password pswd] <Command> If you type this command on a DOS prompt, with your classpaths set as described earlier, you will get a complete listing of the command options. Stopping Your WebLogic ServerYou can shut down your WebLogic Server either through the command prompt or through the Administration Console browser window. Through the command prompt, first set the classpath variable by running the setEnv.cmd or setEnv.sh file. Then you need to run the weblogic.Admin command with the shutdown option. Through the Admin Console, expand the servers node in the left frame and select the server you wish to shut down. Then click the control tab on the right pane for your server. Now click the link that reads "shut down this server." |

EAN: 2147483647
Pages: 339
- An Emerging Strategy for E-Business IT Governance
- Assessing Business-IT Alignment Maturity
- A View on Knowledge Management: Utilizing a Balanced Scorecard Methodology for Analyzing Knowledge Metrics
- Technical Issues Related to IT Governance Tactics: Product Metrics, Measurements and Process Control
- Managing IT Functions