| Before using a connection pool in your program, you need to let WebLogic know the URL of the driver to connect to your database, which user ID and password you wish to use for the connection pool, and what you wish to name the connection pool. There are a few other parameters that you need to configure. You will look at them in detail a little later today. The configuration of the connection pool can be done in two ways: A static connection pool can be configured through the WebLogic Administration Console. As in the configuration of all other servlets and JSPs in your system, the values of your connection pool go in an XML file, config.xml. However, you cannot enter these values through an editor since the password, for security reasons, is saved in an encrypted format in this file. A dynamic connection pool can be created programmatically. This is dealt with later on today. The WebLogic Administration Console requires you to enter the URL, user ID, and password. Hence, you must first be familiar with your database and the user ID you want to use to make your connection pool. The following explanation will use the PointBase database as a reference. Configuration of a Static WebLogic Connection Pool The Administration Console is a tool provided with WebLogic Server 7.0 to carry out administrative tasks for the WebLogic Server. You will use the Administration Console to define the connection pool. The steps to be carried out are as follows: -
Start your WebLogic Administration Console. To get the WebLogic Administration Console, after starting your WebLogic Server, go to http://localhost:7001/console -
On the console you will see the link Connection Pools under the heading JDBC. -
Click Configure a New JDBC Connection Pool. You will see a screen like the one in Figure 7.12. Figure 7.12. Configuring a connection pool in WebLogic Server.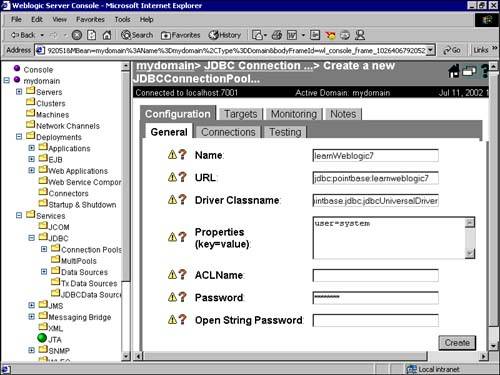
-
You will see a string of titles with a exclamation mark and question mark next to each of them. For a detailed description of each of them, click the question mark. The exclamation mark denotes that a change to this attribute may require you to restart the WebLogic Server for the changes to take effect. The parameters that can be configured on the General tab are as follows: Name (required) The first parameter is the name of the connection pool. Enter learnWeblogic7 in this text box. URL (required) The second parameter is the database URL of the JDBC two-tier driver, which is used by WebLogic to connect to the DBMS. Recall that this was the second text box that you entered while creating your PointBase database. Enter jdbc:pointbase:learnweblogic7 in this text box. Driver Classname (required) The third parameter is the driver class name. Here you should use the full package name of driver class that WebLogic should use to connect to the DBMS. The decision of what driver to use should be based on the kind of application system for which you are going to implement this connection pool, as discussed earlier. For this example, enter com.pointbase.jdbc.jdbcUniversalDriver. Table 7.1 lists the driver names, the class name of the drivers, and the JDBC URL to be used for the drivers. The details of how to configure a connection pool for Oracle, Sybase, and MSSQL Server 4 are discussed a little later. Table 7.1. JDBC Driver Table | Type of Driver | Tier Type | Name of Driver | DBMS | JDBC URL | Class Name of Driver | | Type 2 (native .dll) | Two-tier non-XA | WebLogic jDriver Third-party drivers | Oracle MSSQL | jdbc:weblogic:oracle jdbc:weblogic:mssqlserver | weblogic.jdbc.oci.driver weblogic:jdbc:dblib:driver | | Type2 (native .dll) | Two-tier XA | WebLogic jDriver | Oracle XA | No URL required | weblogic.jdbc.oci.xa.XADataSource | | Type 3 | Multitier | RMI driver Pool driver | Note: RMI deprecates t3 WebLogic drivers | jdbc:weblogic:pool:<pool> | weblogic:jdbc.pool.Driver | | Type 4 | Two-tier non-XA | WebLogic jDriver Third-party drivers: Oracle thin drivers Sybase jConnect for DB2 Informix JDBC | Informix, Microsoft SQL server Oracle Sybase Informix | jdbc:weblogic: informix4 jdbc:weblogic: mssqlserver4 | weblogic.jdbc. informix4.Driver weblogic.jdbc. mssqlserver4 driver oracle.jdbc.driver. OracleDriver | Properties (key = value) (optional) When you create a connection pool, the server logs on to the database using a few parameters. These parameters can be entered in this Properties text area. The values can include the user name, server, and so on. The password is one of the attributes required to log on to the server. However, it is advised that you not enter the password in this area, since the password will be visible in the config.xml file. Instead, using the Password attribute at the end of this screen will save the password in an encrypted format. ACL Name (optional) Do not enter anything here. All users and applications in WebLogic run in specific security realms. To categorize access to its internal resources, WebLogic defines a set of access lists, which are similar to roles. This parameter binds the connection pool to the access list. The access lists are defined in the realm.properties file in the server config directory. When you specify the access control list (ACL) for the connection pool, any user or group who falls into the category of this ACL type is allowed to create a connection pool. If you don't specify any value, any user has unrestricted access to this connection pool. More than one connection pool can use a single ACL. As the name denotes, an access control list is a list of entries that include the permissions that apply to a particular ACL name. To define an ACL, you need to create an ACL for the resource you wish to monitor, specify the permission for the resource, and then grant permissions to users and groups. You will be looking at ACLs and other techniques of security and access control on Day 18, "WebLogic Administration and Security." Password (optional) This password refers to the password for logging on to the WebLogic Server with the user ID given in the Properties field. As mentioned in the earlier discussion of the Properties (key = value) parameter, this value is stored in encrypted format only when it is stored here. Also, if the password has been entered in the Properties field, it is overridden by this password. Figure 7.13 shows the parameters that can be configured on the Connections tab. They are as follows: Initial Capacity (optional) This sets the initial number of connections to the database that WebLogic must open. The default value is equal to the value specified in the "Capacity Increment" parameter discussed a little later. Maximum Capacity (required) This value specifies the maximum capacity of the pool. The number you specify here depends on the license for your database; it defines the maximum number of active connections to your DBMS. In this way, WebLogic monitors the number of open connections. Capacity Increment (required) When a number of applications are carrying out database-related activities and all the connections in the pool have been allocated, there is a possibility that another application will request a connection handle but none will be free. A performance degradation can result if the requesting application has to wait for a connection to be freed before it can complete its transaction. To counter this problem, WebLogic creates another set of connections equal to the value set in this parameter and then allocates a connection from this new set of connections to the requesting application. This is continued until the total number of connections reaches the Maximum Capacity limit (the property mentioned above). The default incremental value is 1. Login Delay Secs (optional) This property is meant specifically for databases unable to handle multiple connections that open rapidly. For such databases, this parameter will tell WebLogic the time interval that it should maintain between creating consecutive connection creations. Refresh Period (optional) If a connection is idle for a long period or if any fatal errors occur during execution of database transactions, the DBMS closes down the connection. However, there is no way for the WebLogic Server to know about the state of this connection. To keep all the connections in the pool alive, WebLogic needs to check these connections from time to time. The WebLogic Server performs a dbping to check the validity of the connection at the time intervals set in this property. It performs the test on the test table that is entered in the Testing tab. Supports Local Transaction (optional) This value is ignored for a non-XA driver. In case of an XA driver, this value signifies whether the driver supports SQLs for local transactions. The default value is unchecked. Allow Shrinking (optional) In case the connections are not being used and the number of open connections is more than the initial capacity, WebLogic can close the extra connections and shrink the connection pool down to the initial quantity. Since open connections mean use of valuable resources at the database end and at the application server end, closing down unnecessary connections can help to improve the performance of the DBMS. This "shrinking" will be done only if this check box is checked. The default value is checked. Shrink Period (optional) This property is ignored if the Allow Shrinking property is enabled. The Shrink Period signifies the time that WebLogic should wait before it starts reducing the size of the connection pool. If WebLogic reduces the pool every 10 minutes and generally requests are made in large numbers every 15 minutes, then there is additional overhead on the database every time it has to reopen the connections, which will degrade the performance. Hence, this value should be calculated properly before it is configured. The default value is 15. Prepared Statement Cache Size Prepared statements in your application are cached by the WebLogic Server. This parameter determines the number of statements that have to be cached by the WebLogic Server. The default value is 20. Figure 7.13. The Connections tab of the WebLogic Administration Console.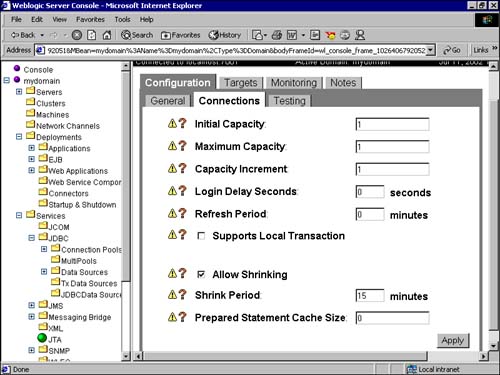
The parameters that can be configured on the Testing tab are as follows: Test Table Name The table specified here is used to test whether the database connection is open. This table should exist in the same database for which the connection pool has been made. Test Reserved Connections This property specifies whether WebLogic should check whether a connection is alive after the client request is made. The default value is unchecked, that is, false. Test Released Connections This property specifies whether WebLogic should check whether a connection is alive after the connection has been released and before it is returned to the connection pool. The default value is unchecked (false). Figure 7.14 shows the parameters that can be configured on the Servers tab. They are described as follows: Targets-Server (required) This multiple-selection box shows the existing servers on your WebLogic database. WebLogic creates the connection pool on this target server. Targets-Cluster (optional) This multiple-selection box displays the existing clusters on which the connection pool has to be displayed. Figure 7.14. The Server tab of the WebLogic Administration Console.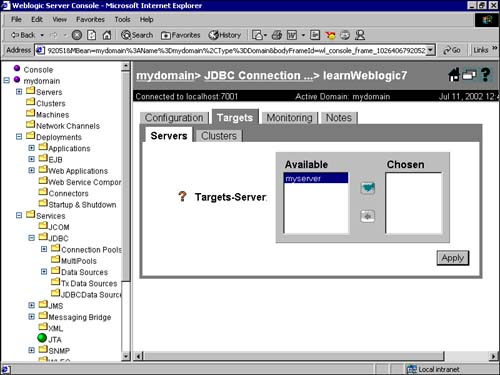
The parameters that can be configured on the Monitoring tab are as follows: You have now configured your connection pool on the Administration server. You now need to import the required packages. Here, the weblogic.db.jdbc package is imported to get the drivers for connecting to the DBMS. Following is a code snippet for using a connection pool in a Java application: //"driverName" is the jdbc driver and poolName specifies the name of the pool Driver myDriver = (Driver) Class.forName(driverName).newInstance(); conn = myDriver.connect("jdbc:weblogic:pool:" + poolName, null); Configuring Connection Pools for Different Databases Before you continue with the other settings, take a quick look at how to configure a connection pool for a few different databases. Configuring Connection Pools for Oracle From Table 7.1, you can see that the configuration of an Oracle database essentially involves using a different driver for each version of the Oracle database supported by WebLogic's JDBC driver jDriver (type 2) for Oracle. Alternatively, you can also use the standard type 4 JDBC driver available from Oracle. From Figure 7.15, you can see that WebLogic Server 7.0 supports Oracle database versions 8.1.5, 8.1.7, and 9.0.1. The JDBC drivers for these different versions are located in C:\bea\weblogic700\server\ext\jdbc\oracle\<oracleversion>\classes12.zip Figure 7.15. The location of the Oracle JDBC driver.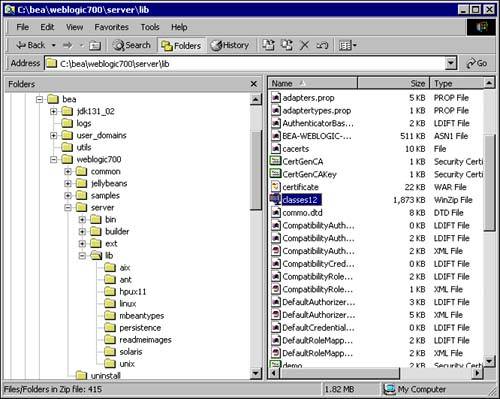
WebLogic Server can use the specific version of the JDBC driver for Oracle for configuring connection pools in two ways: Adding the location of the directory containing the JDBC driver archive ZIP file classes12.zip to the CLASSPATH. The easiest way to do this is by setting the CLASSPATH variable in the setEnv.cmd batch file or in the WebLogic Server startup batch file startWebLogic.cmd of your domain. Copying the classes12.zip file to the C:\bea\weblogic700\server\lib directory. Apart from adding the appropriate JDBC driver to the WebLogic Server's CLASSPATH and defining the appropriate database user ID and password, the rest of the configuration settings are the same for the Oracle database. Configuring Connection Pools for Sybase Similar to the configuration for Oracle database, WebLogic Server provides external support for JDBC drivers for Sybase database. As shown in Figure 7.16, the JDBC drivers for these different versions are located in C:\bea\weblogic700\server\ext\jdbc\sybase Figure 7.16. The location of the Sybase JDBC driver.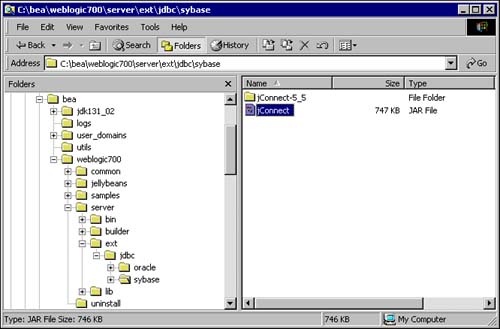
The Sybase JDBC driver is called jConnect.jar. WebLogic Server can use the specific version of the JDBC driver for Sybase for configuring connection pools in two ways: Adding the location of the directory containing the JDBC driver Java archive file jConnect.jar to the CLASSPATH. The easiest way to do this is by setting the CLASSPATH variable in the setEnv.cmd batch file or the WebLogic Server startup batch file startWebLogic.cmd of your domain. Copying the jConnect.jar file to the C:\bea\weblogic700\server\lib directory. Configuring Connection Pools for MSSQL Server The JDBC driver for MSSQL Server 7.0 is prepackaged in the weblogic.jar Java archive file located in the directory C:\bea\weblogic700\server\lib Hence, no special addition to the CLASSPATH is required. The JDBC driver is called jDriver for MSSQL Server. For MSSQL Server prior to version 7.0, a separate Java archive file, mssqlserver4v65.jar, is available. The CLASSPATH should contain the path to this Java archive file to enable WebLogic Server and its server-side applications to connect to a MSSQL Server database. Figure 7.17 shows the location of the mssqlserver4v65.jar driver. Figure 7.17. The location of the MSSQL Server (prior to version 7.0) JDBC driver.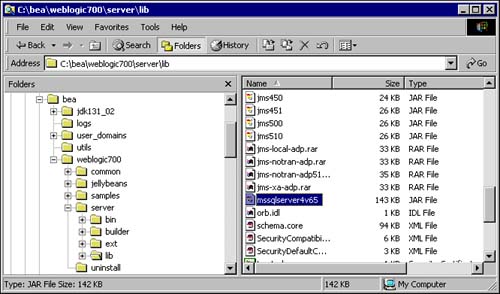
Creating a Connection Pool Dynamically The JDBC Mbean is used to dynamically create a connection pool. This can be done via the Java client or server application while the WebLogic Server is running. If for some reason the database server crashes, programmatic lookups for a connection are going to throw back an error. To avoid such fruitless lookups and expensive transactions, the server-side application can shut down the connection pool dynamically, hence suspending any communication with the database server. Dynamically created connection pools use dynamically created DataSources. However, a DataSource exists only in association with a connection pool. Hence, before you create a connection pool, you need to create a DataSource. The following steps provide a broad outline for dynamically creating a connection pool: -
Import the WebLogic-specific packages for management and the JNDI environment. -
Perform a JNDI lookup for the administration Mbean object. -
Obtain the server Mbean, create a WebLogic object name for the server bean and JDBCConnectionPoolRuntime Mbean. -
Create the Mbean for the connection pool and get the domain name. -
Set all the properties for the connection pool, as described earlier in the discussion about connection pools. -
Add the server Mbean as the target. -
Create a DataSource. |