Adding and Managing Comments Effectively
3 4
Comments allow people who collaborate on documents to ask questions, provide suggestions, insert notes, and generally annotate a document's contents without directly inserting any information into the body of the document. When you work with a document that contains comments, you can display the comments in the reviewing pane while viewing the document in any view or in a margin balloon if you're working in Web Layout or Print Layout view. When the reviewing pane is open, it is displayed below the document's editing window, along the bottom of the Word window. When you use balloons to display information, the balloons appear next to your document's contents in either the left or right margin. Figure 33-3, shows a sample document in Print Layout view, with a comment balloon and the reviewing pane visible.
In addition to comment balloons, Word 2002 implements a number of visual cues when displaying comments. For example, notice in both the balloon and the reviewing pane (in the shaded comment bar) that the word Comment identifies the information as a comment. (You can also show insertions, deletions, and formatting changes in balloons and the reviewing pane, as described in the section "Tracking Changes.") The balloons and comment bars in the reviewing pane can be color-coded to associate them with particular users, and each comment bar in the reviewing pane displays the user name of the person who inserted the comment. All these small modifications add up to create a new streamlined approach to using comments in Word.

Figure 33-3. In Word 2002, you can display color-coded comments in comment balloons or in the reviewing pane.
Configuring Reviewers' User Names
Before you start inserting comments, you need to tell Word how to identify the comments you create. In other words, you need to configure your user name in Word. In fact, each person collaborating on the document must properly configure his or her user name to maximize Word's reviewing features. To set your user name information, you simply configure the settings on the User Information tab in the Options dialog box, as follows:
- Choose, Tools, Options, and click the User Information tab.
- In the Name box, type the name you want to use to identify your comments, and enter your initials in the Initials box, as shown in Figure 33-4.
- Click OK to close the Options dialog box.
Keep in mind that the information you enter on the User Information tab is used by all Microsoft Office programs. Any changes you make to these settings will affect other Office programs in future documents as well. Fortunately, that's not as dire as it sounds. For example, if you're temporarily using someone else's machine to review a document, you can change the name on the User Information tab before you work without affecting existing documents. Then, when you've finished working with the document on that machine, reconfigure the User Information tab to contain the original information. That way, you can be sure that your comments will be marked with your name, even when you aren't working on your own computer.
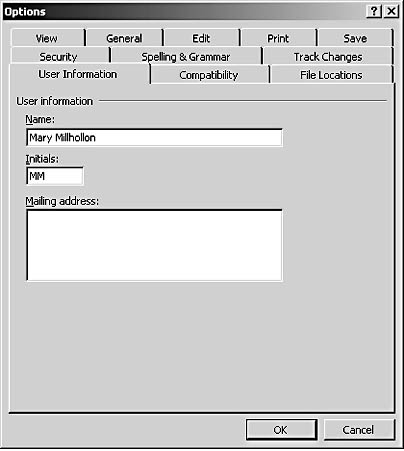
Figure 33-4. Word uses the User Information name to identify comments in documents.
Configuring Colors Associated with Reviewers
By default, Word automatically uses a different color for each reviewer's comments and tracked changes in a document. If you prefer all comments and tracked changes to be displayed in a single color, you can change the default setting by accessing the Track Changes options using one of the following techniques:
- On the Reviewing toolbar, click Show, and choose Options on the drop-down menu. The Track Changes dialog box opens, as shown in Figure 33-5.
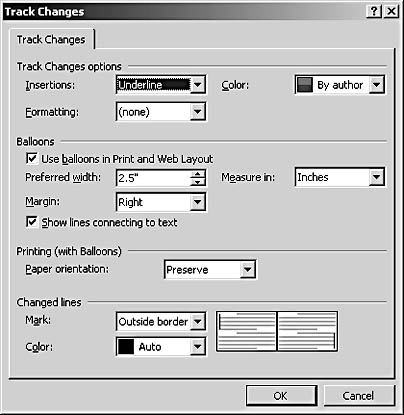
Figure 33-5. By default, comments and tracked changes are displayed in a different color for each reviewer.
- Choose Tools, Options, and click the Track Changes tab. The options on the Track Changes tab in the Options dialog box are the same options available in the Track Changes dialog box.
On the Track Changes tab, you can specify a color for all comments and tracked changes by selecting a color in the Color drop-down list. By default, By Author is selected in the Color box, which means that Word automatically assigns a different color to every person who inserts comments or tracked changes. Keep in mind that this setting doesn't always color-code each person's changes the same color every time. Instead, the By Author option simply guarantees that every person's marks will appear in a distinct color—each person's color will most likely change each time someone reopens the document.
For more information about configuring other Track Changes options, see "Adjusting the Appearance of Tracked Changes."
If you're viewing a document that's color-coded for a number of reviewers, you can quickly see which colors are currently assigned to which reviewers. To do so, click Show on the Reviewing toolbar, and choose the Reviewers submenu. You'll see a list of reviewer names accompanied by color-coded check boxes, as shown in Figure 33-6. (Of course, you can't see the color-coding here, but you can get an idea of how the color-coding system works.) In addition to seeing the reviewer color assignments, you can use the Reviewers submenu to specify whose comments and tracked changes are displayed in the current document by selecting and clearing the check boxes next to reviewers' names. When you clear a check box while you're in Print Layout or Web Layout view, that reviewer's comment and tracked change balloons are hidden, and text inserted by the reviewer appears as regular body text. To redisplay a reviewer's comments and changes, reselect the reviewer's check box on the Reviewers submenu.
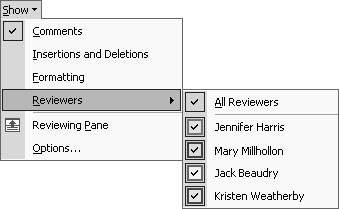
Figure 33-6. You can use the Reviewers submenu to quickly see the colors currently assigned to reviewers and to control whose comments and changes are displayed in the current document.
Marking Text You Insert in E-Mail Responses
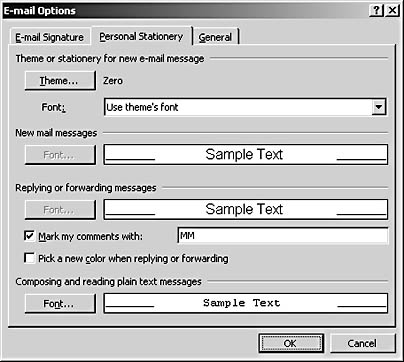
If Microsoft Outlook is your e-mail client and Word is set to serve as your e-mail message editor, you can add comments to e-mail messages in the same way you add comments to standard documents. You can also configure Word to display your name or initials next to text you insert in e-mail responses, as follows:
- Choose Tools, Options, and click the General tab.
- Click E-Mail Options, and then click the Personal Stationery tab in the E-Mail Options dialog box.
- Select the Mark My Comments With check box, and type the text (such as your name or initials) that you want to display in association with your comments, as shown here:
- Click OK to close the E-Mail Options dialog box, and then click OK to close the Options dialog box.
When you select the Mark My Comments With check box, only text you type next to previously written text in a message will display your name or initials next to it. To turn off this formatting in e-mail messages, clear the Mark My Comments With check box.
Inside Out
If you're working in Normal view and you turn off the display of a reviewer's tracked changes, the text deleted by the reviewer appears restored and text inserted by the reviewer appears as regular text. As you can imagine, this can result in some strange mixtures of restored and added text. To avoid confusion, if you choose to hide a particular reviewer's comments and changes, be sure you're working in Print Layout or Web Layout view.
Allowing Reviewers to Use Only the Comments Feature
In addition to color-coding reviewers' comments, you can use Word to help control who may or may not add comments to a document during the review phases. To do this, you use the Protect Document dialog box, shown in Figure 33-7. Using this dialog box, you can ensure that the only modifications reviewers can make to your document is to add comments.
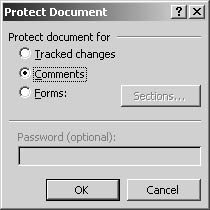
Figure 33-7. The Protect Document dialog box enables you to limit reviewers' actions and lets you assign a password that reviewers must enter before they can make changes to the document.
To arrange this setup, follow these steps:
- Choose Tools, Protect Document.
- In the Protect Document dialog box, click Comments.
- If desired, type a password in the Password box, click OK, retype the password in the Confirm Password dialog box, and click OK again. If you specify a password, reviewers will have to enter the password before they can enter comments.
Note
Password protection created by using the Protect Document dialog box doesn't work with HTML (Web page) documents.
If you choose not to assign a password in step 3, reviewers will be restricted to inserting only comments by default. But if reviewers choose Tools, Unprotect Document, they'll be able to unlock the document and edit your document freely. In other words, this document protection plan is really more of a deterrent than a fail-safe protection, but many times a deterrent is all you really need.
For more information about protecting documents, see Chapter 34, "Addressing Security Issues."
Troubleshooting
I Forgot the Password for a Protected Document
If you forget the password for a protected document, you can recover the document by circumventing the password protection. To do so, select the entire document (by pressing Ctrl+A), copy the document (by pressing Ctrl+C), and paste the document (by pressing Ctrl+V) into a new, blank document. This process creates a new document based on the existing document.
newfeature! Nicely enough, in Word 2002, when you copy and paste a document that contains tracked changes and comments, the newly created document retains all the reviewers' marks and color-coded settings. In earlier versions of Word, when you copy and paste text that contains tracked changes, the changes are accepted in the newly copied version of the text regardless of whether you're ready to accept the changes.
Inserting Standard Comments
After you configure your user name information, specify how to color comments, and set any reviewer limitations, you're ready to insert comments into documents. Inserting a comment is a straightforward process. You can insert your comment at the insertion point, or you can select text that you want to associate with your comment. If you insert a comment at the insertion point, Word indicates the existence of your comment in the text with a thin, color-coded insertion mark. (See Figure 33-3.) If you select text to be associated with a comment, Word marks the range of text by enclosing the text in thin, color-coded parentheses.
To insert a comment, follow these steps:
- Position the insertion point where you want to insert a comment, or select the text or item you want to associate with your comment.
- Perform anyof the following three actions:
- Choose Insert, Comment.
- Click the New Comment button on the Reviewing toolbar.
- Press Ctrl+Alt+M.
- If you're working in Web Layout or Print Layout view, an empty balloon opens by default when you insert a comment. If you're working in Normal view, the reviewing pane opens.
Note
By default, comment balloons are turned on in Print Layout and Web Layout views. If your balloons are hidden, you can type comments in the reviewing pane when you're working in Print Layout or Web Layout view. - Type the comment text in the comment balloon or the reviewing pane, and then click outside of the balloon or reviewing pane to complete the comment.
Tip
If you're entering a comment in a balloon, you can press Esc when you've finished typing to return the insertion point to the body text.
If you want to change a comment after you create it, you can do so by clicking inside the comment balloon or reviewing pane and then editing the text just as you edit standard text. If a comment is long and its contents aren't entirely displayed in a balloon, you can modify the comment in the reviewing pane. If the reviewing pane isn't open, click the reviewing pane button on the Reviewing toolbar to open it. To close the reviewing pane, click the Reviewing Pane button on the Reviewing toolbar, or press Alt+Shift+C.
Inserting Voice Comments
In addition to inserting standard comments, you can include voice comments with documents. Basically, voice comments are recordings you make and attach to a document. To create voice comments, your computer must have a sound card and a microphone. Likewise, others who review the document and listen to your voice comments must be using computers equipped with a sound card and speakers. Unlike text comments (which appear in balloons and in the reviewing pane), voice comments appear as an audio icon in line with text. To create a voice comment, display the Reviewing toolbar, and then follow these steps:
- Click the New Comment button down arrow.
- Choose Voice Comment on the drop-down menu. Sound Recorder opens, as shown in Figure 33-8.
- Click the Record button, and then speak into your microphone to record your comment.
- Click Stop when you've finished recording your comment, and close Sound Recorder or choose File, Exit & Return to complete the voice comment.

Figure 33-8. Sound Recorder is a simple application you can use to include voice comments in documents.
After you create a voice comment, you can manipulate it in the following ways:
- Listen to the voice comment. Double-click the audio icon in the document. The comment plays without opening Sound Recorder.
- Open Sound Recorder before listening to the voice comment. Right-click the audio icon, and choose Wave Sound Object, Edit on the shortcut menu.
- Modify the voice comment. Right-click the comment, and choose Wave Sound Object, Edit on the shortcut menu.
- Delete the voice comment. Select the audio icon and press Delete, or right-click the audio icon and choose Cut on the shortcut menu.
If you decide to use voice comments, you should keep your messages short. By default, voice comments are WAV audio files attached to the document, and as you know, audio files can grow in size fairly rapidly.
Configuring Comment Balloon and Reviewing Pane Options
When you work with comment balloons (and tracked change balloons, as discussed in the section "Tracking Changes,"), you can control a variety of balloon options. Specifically, you can format balloon and reviewing pane label text (which is the text that is displayed on reviewing pane bars above each comment or tracked change), specify whether balloons will be displayed, and adjust balloon width and placement.
Changing the Style of Balloon and Reviewing Pane Labels
You can modify the style of balloon and reviewing pane labels (including the word Comment and user names) in the same manner you modify other styles in Word documents—by using the Styles And Formatting task pane. To modify the Balloon Text style, follow these steps:
- Click the Styles And Formatting button on the Formatting toolbar to open the Styles And Formatting task pane.
- In the Styles And Formatting task pane, click the Show down arrow, and choose Custom in the drop-down list to open the Format Settings dialog box.
Inside Out
If the Format Settings dialog box doesn't open when you choose Custom in the Show drop-down list in the Styles And Formatting task pane, your insertion point might be positioned in the reviewing pane. The Format Settings dialog box won't open when you're working in the reviewing pane. To work around this little peculiarity, simply click in the document's body text, and then choose Custom in the Show drop-down list again. - In the Styles To Be Visible list, select the Balloon Text check box, and then click OK.
- In the list in the Pick A Formatting To Apply section, right-click the Balloon Text entry (this style also controls the reviewing pane label text), and choose Modify on the shortcut menu. The Modify Style dialog box appears.
- Select any options you want, and click Format to access additional style attributes.
- After you configure the options you want, select the Automatically Update check box if you want to update all instances of balloon and reviewing pane labels, and then click OK.
For more information about working with styles, see Chapter 10, "Using Styles to Increase Your Formatting Power."
Although most changes you make to balloon text affect only the balloon and the reviewing pane labels, changing the point size will affect the size of comment text. When you change the Balloon Text style point size, you'll also change the size of the comment text displayed in the balloons. To gain greater control over comment text within balloons and the reviewing pane, you should configure the Comment Text style, as discussed next.
Changing the Default Style for Text
Inserted in Balloons and the Reviewing Pane
You can modify how comment text appears in balloons and in the reviewing pane by modifying the Comment Text style. When you modify this style, you change the appearance of text only in comment balloons (not text displayed in tracked change balloons, as discussed in the section "Tracking Changes,"). To control how comment text appears, follow the steps in the preceding section, but in steps 3 and 4 choose Comment Text instead of Balloon Text.
Showing and Hiding Balloons
If you prefer to work with the reviewing pane and not balloons, you can turn off balloons. To control whether balloons are displayed in Web Layout and Print Layout views, you configure the Track Changes options, as follows:
- On the Reviewing toolbar, click Show, and choose Options on the drop-down menu, or choose Tools, Options, and click the Track Changes tab.
- In the Balloons section, select or clear the Use Balloons In Print And Web Layout check box, and click OK.
If you hide balloons, comments will be displayed as ScreenTips when you position your mouse pointer over the comment marker when the reviewing pane is closed, as shown in Figure 33-9. When the reviewing pane is open, comments will be displayed in the reviewing pane, and ScreenTips won't appear when you move your mouse pointer over a comment marker.
Note
When you hide balloons, insertions and deletions will be shown in the body of the document, and formatting changes will be visible when you view your document in Final or Final Showing Markup mode. Final and Final Showing Markup modes are discussed in the section "Tracking Changes."
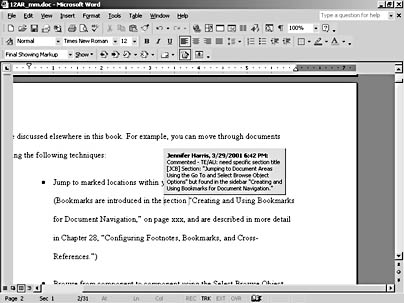
Figure 33-9. When balloons are hidden and the reviewing pane is closed, comments are displayed as ScreenTips.
Tip - Hide or display lines connecting text and balloons
You can also specify whether the lines used to connect balloons to text are displayed or hidden by selecting or clearing the Show Lines Connecting To Text check box on the Track Changes tab. When you clear the Show Lines Connect To Text check box, balloons are displayed with a thin dashed line when they aren't selected. Then, when you select a comment, the comment is displayed with a solid line that connects the balloon to the comment marker in the text.
Adjusting Balloon Size and Location for Online Viewing
Because balloons are a new feature in Word 2002, you might find that they take some getting used to, especially if you've frequently used comments and tracking tools in earlier versions of Word. To help you get more comfortable with this new feature, Microsoft provides a couple of options you can use to control the size and position of balloons when you choose to view them. In fact, you can control balloon width and location for online viewing as well as for printing purposes. In this section, we'll look at configuring the online presentation of balloons. For more information about configuring balloons for printing, see the section "Printing Comments."
To set balloon width and specify whether balloons are displayed in the right or left margin, you must configure the Track Changes dialog box (or the Track Changes tab in the Options dialog box), as follows:
- Open the Track Changes dialog box by clicking Show on the Reviewing toolbar and choosing Options on the drop-down menu, or display the Track Changes tab in the Options dialog box by choosing Tools, Options, and clicking the Track Changes tab.
- Make sure that the Use Balloons In Print And Web Layout check box is selected.
- Click the Measure In down arrow, and select an option in the drop-down list to specify whether you want the balloons to be measured in inches or percent. For more information about the Inches and Percent options, see the sidebar "Sizing Balloons—Inches vs. Percent."
- In the Preferred Width box, enter a percentage or measurement (in inches) for the width of the balloons.
- In the Margin box, choose the Left or Right option to specify on which side of the document text you want balloons to appear.
- Click OK to apply the balloon settings.
Unfortunately, you can't preview how your balloon settings will be displayed from within the Track Changes tab. Your best bet when configuring balloons is to try a few settings and see which setting works best for you on your monitor.
Sizing Balloons—Inches vs. Percent
When you size balloons, Word configures them without compromising the document's content area. This is accomplished by expanding the view of your document (not by reducing the document's content area). To clarify, let's look at the two sizing options: Inches and Percent.
When you use the Inches setting, you provide a set size in which your balloons will appear in your document's margin. For example, if you specify 2 inches, your page's view will expand so that balloons will be displayed within a 2-inch-wide area, starting from the document's margin.
Similarly, if you size balloons using the Percent option, the balloons will be displayed as a percentage of the page's size without compromising the document's content area. For example, if you specify balloons to be 100 percent, the balloons will be sized equal to 100 percent of the page, and the width of your page's view will be expanded accordingly (doubled, in this case).
You can easily see how balloons will be displayed relative to the current document by saving a setting (using Inches or Percent) and then viewing your document in Print Preview mode by clicking the Print Preview button on the Standard toolbar.
Reviewing Comments
Let's say your document has made its rounds, and now it's up to you to review the comments reviewers have inserted into the document. You can review comments only, or you can review comments while you review tracked changes. In this section, we'll look at the process of reviewing comments only. (For more information about reviewing tracked changes, see the section "Tracking Changes.") To review only comments, you must first hide tracked changes. To show comments without displaying tracked changes, display your document in Web Layout or Print Layout view, and then follow these steps:
- If necessary, choose View, Markup to show tracked changes and comments in your document. The Markup command on the View menu is a toggle command that you can use to show and hide markup in documents.
- On the Reviewing toolbar, make sure that either Final Showing Markup or Original Showing Markup is selected in the Display For Review box.
- Click Show on the Reviewing toolbar, and make sure that only the Comments option is selected on the drop-down menu. To accomplish this, you'll probably have to choose Insertions And Deletions and Formatting to clear the check marks next to them.
After you complete these steps, comments and comment markers should be the only markup features visible in the current document. At this point, you can review the comments manually by scrolling through your document or the reviewing pane, or you can jump from comment to comment by clicking the Next and Previous buttons on the Reviewing toolbar. Depending on the current view, clicking the Next or Previous button displays the next or previous comment as follows:
- In Normal view, the comment is displayed in the reviewing pane. If the reviewing pane isn't open, Word opens it automatically.
- In Print Layout or Web Layout view with balloons turned on, the comment balloon is displayed on screen and appears as the active comment, indicated by a dark outline and solid connector line.
- In Print Layout or Web Layout view with balloons turned off, the comment is displayed in the reviewing pane. If the reviewing pane isn't open, Word opens it automatically.
Note
You can also browse from comment to comment by using the Select Browse Object feature (press Ctrl+Alt+Home) or the Go To tab in the Find And Replace dialog box. On the Go To tab, you can select Comment in the Go To What list and then choose to view all reviewers comments or a selected reviewer's comments by selecting Any Reviewer or a specific name in the Enter Reviewer's Name drop-down list. For more information about using the Browse Object feature and the Go To tab, see Chapter 12, "Honing Document Navigation Skills."
When you view comments in balloons, you might notice that some comments have an ellipsis in the lower-right corner, as shown in Figure 33-10. This symbol indicates that the entire comment text doesn't fit in the balloon. To view the remainder of the comment, click the ellipsis to open the reviewing pane, which will contain the entire contents of the comment.
Naturally, as you read through comments, you might want to respond to them while you work. You can do so in a couple of ways, including the following:
- Type directly in a comment, in which case your response won't be color-coded according to your user name. (This is a departure from earlier versions of Word, in which all text you add to a document is color-coded when the Track Changes feature is turned on.)
- Click in the comment you want to respond to, and then click New Comment on the Reviewing toolbar, press Ctrl+Alt+M, or choose Insert, Comment. A new balloon opens directly below the balloon you're responding to, or a blank entry opens in the reviewing pane. Then simply enter your response.
In addition to responding to comments, you might want to delete comments as you address them to help prepare the document for final publication, as described in the next section.
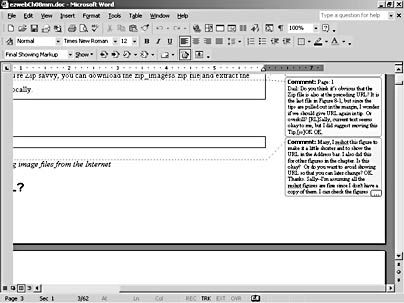
Figure 33-10. If a balloon contains more text than can be displayed in the balloon, you can click the ellipsis icon in the lower-right corner to open the reviewing pane, which will show the comment in its entirety.
Tip - See who created a comment and when
To quickly see when a comment was inserted and who created it, you can hover the mouse pointer over the comment balloon. When you do this, a ScreenTip appears that displays the comment's creation date and time as well as the user name of the person who created the comment. If you're working in the reviewing pane, each reviewing pane bar displays the user name and insertion date and time automatically.
Note
If you notice that a name associated with tracked changes or comments changes to Author every time you save your document, you might have to reconfigure your Security tab settings in the Options dialog box. This automatic change from user names to Author occurs if you've selected the Remove Personal Information From This File On Save check box on the Security tab. When you select this option, names associated with tracked changes and comments are replaced with the word Author. For more information about configuring your security settings, see Chapter 34, "Addressing Security Issues."
Deleting Comments
Generally, comments serve a temporary purpose—reviewers insert comments, someone addresses the comments, and then the comments are removed before the document's final publication (either on line or in print). If you work with comments, you'll need to know how to delete them so that you won't unintentionally include them in your final publication. As you might expect, you can delete comments in several ways. Namely, you can delete a single comment, delete comments from a specific reviewer (or reviewers), or delete all comments, using the following techniques:
- Delete a single comment. Right-click a comment balloon and then click Delete Comment on the shortcut menu, or select a comment balloon and then click the Reject Change/Delete Comment button on the Reviewing toolbar.
- Delete comments from a specific reviewer. First clear the check boxes for all reviewers by clicking Show on the Reviewing toolbar and choosing Reviewers, All Reviewers. Next display only the comments you want to delete by clicking Show, choosing Reviewers, and then selecting the check box next to the reviewer's name whose comments you want to delete. (You can repeat this process to select additional reviewers as well.) To delete the displayed comments, click the Reject/Delete Comment down arrow, and choose Delete All Comments Shown on the drop-down menu.
- Delete all comments in the document. Make sure that all reviewers comments are displayed. (This is the default setting, but if all reviewers' comments aren't displayed, click Show on the Reviewing toolbar, and choose Reviewers, All Reviewers.) Click the Reject Change/Delete Comment down arrow, and then choose Delete All Comments In Document on the drop-down menu.
Keep in mind that when you delete all comments at once by choosing the Delete All Comments In Document option on the Reject Change/Delete Comment drop-down menu, you delete all comments in the document, regardless of whether they are displayed on screen.
Tip - Delete a comment in the reviewing pane
You can also delete comments one at a time from within the reviewing pane. To do so, click in the comment in the reviewing pane and click the Reject Change/Delete Comment button on the Reviewing toolbar, or right-click a comment in the reviewing pane and choose Delete Comment on the shortcut menu.
Printing Comments
As mentioned, you can control how comments are displayed on screen as well as in print. The section "Configuring Comment Balloons and Reviewing Pane Options," addressed how to control the display of comments in balloons and in the reviewing pane. In this section, we'll look at the ways you can print comments. When you print a document containing comments (and tracked changes, for that matter), you can configure print settings in two areas: the Track Changes dialog box and the Print dialog box. Let's look first at the Track Changes dialog box.
In the Track Changes dialog box (accessed by clicking Show on the Reviewing toolbar and choosing Options), you can specify in the Printing (With Balloons) section how Word should adjust paper orientation to accommodate balloons. You can select any of the following settings in the Paper Orientation list:
- Auto specifies that Word can determine the best orientation layout for your document automatically, based on your margin settings and balloon width settings.
- Preserve prints the document with the orientation specified in the Page Setup dialog box.
- Force Landscape prints balloons and the document in landscape format to allow the most room for the display of balloons.
After you choose how you want Word to handle page orientation issues when you print documents with comment balloons, you're ready to configure the Print dialog box.
In the Print dialog box (choose File, Print), you can specify whether to print the document showing markup (the default setting when comments and tracked changes are displayed), or you can opt to print just a list of the markup changes made in a document. Most likely, if you want to print a document's changes, you'll want to print the document showing changes instead of printing a list of changes. When you print a list of changes, the list can become long and confusing.
The easiest way to print a document with its comments is to print the document with comment balloons in the margin and hide the other types of margin balloons (including balloons that show insertions, deletions, and formatting changes). To print comments in a document efficiently, follow these steps:
- Display your document in Print Layout view.
- On the Reviewing toolbar, click Show, and verify that only the Comments option is selected (and the Insertions And Deletions and Formatting options are cleared). By choosing just the Comments option, you'll be able to print the document and its comments, without cluttering up your view with balloons denoting inserted, deleted, and reformatted information.
- Choose File, Print to open the Print dialog box.
- In the Print dialog box, make sure that the Print What box shows Document Showing Markup, and click OK.
The document will be printed with comment balloons in the margin. Word will reduce the view of the page to accommodate printing balloons in the margins. This doesn't affect your document's layout parameters—it's just a temporary modification for printing purposes when you're printing balloons along with a document.
Saving a Document with Comments as a Web Page
You can save a document that contains comments and other marked up text as a Web page. When you do this, Word retains the comments and tracked changes in the text, although all reviewers' comments and changes are displayed in the same color. To save a reviewed document as a Web page, choose File, Save As, make sure in the Save As dialog box that the Save As Type box shows Web Page, and then click Save.
Keep in mind that the online display of comments and tracked changes in your document depends on your browser. In Microsoft Internet Explorer 4 and later, comments are shown as dynamic ScreenTips, as shown in Figure 33-11, and revised text appears in a color other than black with underlining and strikethrough formatting (but remember, color-coding based on reviewers' user names is lost), similar to how you see markup changes in Word when a single color is selected to show markup. In browsers earlier than Internet Explorer 4 and in Netscape Navigator 4 and later, comments appear as footnotes beneath the main Web page instead of as dynamic ScreenTips.
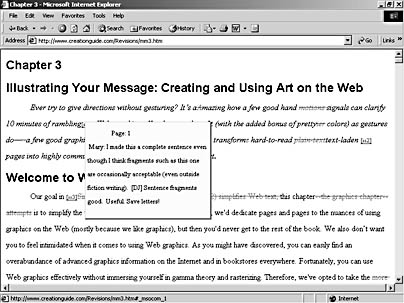
Figure 33-11. When you save a marked-up document as a Web page, users can view comments in the form of dynamic ScreenTips by positioning the mouse pointer over a comment link.
EAN: 2147483647
Pages: 337