Saving Your Web Pages
3 4
After you create a Web page document but before you get too far into Web page development, you need to save your Web pages. As with most document creation tasks, you should always (always, always, always) save your work frequently to avoid losing data due to unexpected system failures or power losses.
Saving Web pages involves a couple of key tasks that don't come into play when you save standard word processing documents. Specifically, you need to verify or add Web title bar text, and you need to determine whether you want to save your Web page so that you can continue to edit it in Word or save it in as streamlined a form as possible for publication on the Internet.
Inside Out
When you save a Web page, Word doesn't create a backup copy, even if you select the Always Create Backup Copy check box on the Save tab in the Options dialog box (choose Tools, Options, and click the Save tab). If you want to store a backup copy of a Web page, you'll need to use the Save As dialog box to manually save the document twice, using two different names or storing the files in two different locations.
Adding Title Bar Text
As you've probably noticed while surfing the Web, Web pages display text in your browser's title bar. The browser knows what text to display in the title bar by reading the HTML code in a Web page's header section. Using Word, you can add a title to a Web page without editing the document's source code. (If you've created a Web page using the Web Page Wizard, your page will already have title text assigned.) One of the most convenient ways to add title bar text to a Web page is to do so while saving the document, as described here:
- With your Web page document open, choose File, Save As. The Save As dialog box opens.
- In the Save As Type drop-down list, select Web Page or Web Page, Filtered. (The differences between these two file types are described in the next section, "Web Page vs. Web Page, Filtered.") As soon as you choose a Web page file type, the Save As dialog box changes to include the Change Title button, as shown in Figure 31-9.
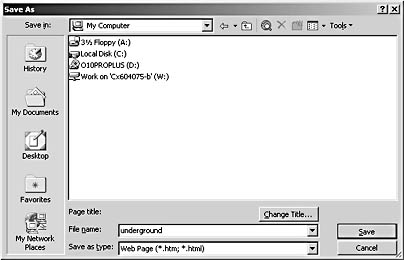
Figure 31-9. When you specify a Web page file type, the Save As dialog box changes to include the Change Title button.
- Click the Change Title button. The Set Page Title dialog box opens, as shown in Figure 31-10.
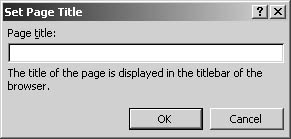
Figure 31-10. The Set Page Title dialog box enables you to add or modify a Web page's title bar text.
- Type the title bar text for the Web page, and click OK.
- Click Save to save your document.
When you display your Web page in a browser, the text you entered in the Set Page Title dialog box will be displayed in the browser's title bar. When you add title bar text, you should make the text as clear and descriptive as possible. The title text is also displayed on the Windows taskbar, so making the text concise and clear can help users find and return to your page if they're working with multiple windows open.
Tip
You can also change a document's title bar text by modifying the file's properties. To do so, open the file, choose File, Properties, click the Summary tab, and then type text in the Title box. Click OK to save your changes.
Web Page vs. Web Page, Filtered
As mentioned, you can save Web pages in two main formats: Web Page and Web Page, Filtered. Each file type serves a particular purpose. When you save a document using the Web Page file type, the document can be viewed on line. In addition, you can continue to edit the document in Word without a hitch. In contrast, when you save a document using the Web Page, Filtered format, tags specific to Microsoft Office are removed from the file's source code. This removal reduces the file size (and smaller file sizes mean faster download and display times when you're viewing files on the Web), but you lose some Office editing functionality. If you save a document using Web Page, Filtered and then reopen the file in an Office program, the text and general appearance of the page will be preserved, but some features might work differently or incorrectly.
You should follow these basic rules when saving Web pages in Word:
- If your Web page is a work in progress, save the document using the Web Page file type. That way, you'll retain full editing capabilities.
- If you've completed editing the Web page and you're ready to post it, save the document using the Web Page, Filtered file type to create the smallest possible document file with the cleanest HTML source code.
After you decide how you'd like to save your Web page document, you can do so as follows:
- While your Web page document is open, choose File, Save As.
- Type a name for the file in the File Name box, click the Save As Type down arrow, and choose Web Page (*.htm , *.html) or Web Page, Filtered (*.htm, *.html) in the drop-down list.
- With the Save In drop-down list, navigate to the desired location, and then click Save.
When you save a Word document as a Web page that contains pictures, drawing objects, and other graphics not saved as JPEG (or JPG), GIF, or PNG files, Word saves copies of the graphics with the HMTL document using the JPG, GIF, or PNG format, as appropriate. (Pictures are saved as JPG graphics, and drawings are usually saved as GIF graphics.) When Word automatically converts images, it names and numbers the images image001.gif, image002.jpg, image003.png, and so forth.
Tip - Maintain working versions of your Web pages
If you think you'll need to edit a Web page in Word later but you need to post it on line now, consider maintaining two files—one in Web Page format and one in Web Page, Filtered format. You can edit the content in the Web Page document, save it as a Web Page document for future editing, and then save another copy of the file as Web Page, Filtered, which you can post on line.
Creating Web Archives (MHTML)
In addition to saving Web page documents, you can create Web archives. A Web archive contains all the elements of a Web page, including the text (HTML source code) and graphics files (pictures, background graphics, bullet images, and so forth), in a single file. An archive file can be likened to HTML-formatted messages and complete Web pages that can be sent in many e-mail applications. The Web archive encapsulation allows you to publish your entire Web site as a single MHTML (MIME [Multipurpose Internet Mail Extensions] encapsulation of aggregate HTML documents) file or send an entire Web site as an e-mail message or attachment. This format is supported by Internet Explorer 4 and later.
To save a Web page as a Web archive, you simply specify the Web Archive file type in the Save As dialog box, as follows:
- Open the Web page, and choose File, Save As.
- In the Save As dialog box, choose Web Archive in the Save As Type drop-down list.
- Name the file, specify the location where you want to store the file, and click Save.
After you create a Web archive, you can move the file anywhere without losing the graphics. In addition, Web archives tend to be smaller overall than the original Web page and associated graphics stored as separate files. The major drawback to Web archives is that not all browsers support MHTML yet, so if you use this format to post Web pages, you risk losing viewers who use browsers that don't support the MHTML format.
EAN: 2147483647
Pages: 337