Training Your Office Assistant
3 4
Few people are lukewarm about the Office Assistant. They either really appreciate the help, waiting there patiently to suggest next steps, or they resent the interruptions and the time spent navigating to the answers they need. Whichever description fits you best, you can customize the way you work with the Office Assistant to get just the type (and amount) of help you want to receive.
Getting Help from the Assistant
The Assistant pops up whenever it observes you working with a common process or seeming to labor over a particular task. You can display the Assistant in a number of ways:
- Choose Help, Microsoft Word Help.
- Choose Help, Show Office Assistant (this option is available only if the Assistant is not currently enabled).
- Press F1.
- Click the Microsoft Word Help button on the Standard toolbar.
The Assistant appears, asking you what you'd like help with. Type your question, and click Search.
In other cases, the Assistant will appear with a balloon, asking you to explain what you want to know. You can simply type your question or phrase (the more complete the better the result) and click Search. After selecting a Help topic, the Assistant then displays the help in the task pane (see Figure 3-4).
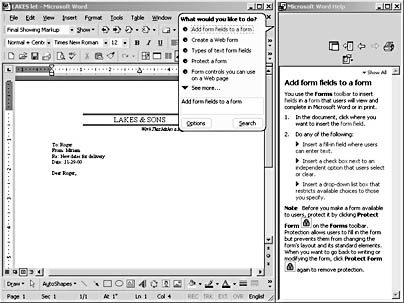
Figure 3-4. After you select the help you want, the Assistant displays the specific information in the task pane.
For more information on navigating through help in the task pane, see "Working with Microsoft Word Help," later in this chapter.
Hiding Your Assistant
When you first install and begin working with Word, the Assistant greets you. By default, your companion is Clippit, the personable paper clip. He watches over what you do and makes suggestions when you take on some of the tasks he's programmed to help with.
If you want to hide the Assistant while you work (which is a temporary fix—we'll tell you how to disable the fellow later in this section), simply right-click the Assistant and choose Hide from the shortcut menu that appears.
Tip - Ask the right question the right way
The Office Assistant is programmed to understand questions asked in general English, but you can save a few clicks by following a simple rule: Use an entire phrase or sentence as opposed to a single word. For example, entering the phrase Create a Web page will get you much more targeted help than entering the single word, Web.
Changing Assistant Behavior
Working with the Assistant isn't an all-or-nothing proposition. You can make a number of changes to the Assistant to control and customize the way it helps. You can choose a different assistant entirely, limit the way it behaves, or disable it entirely. Here's how to customize the Assistant:
- Display the Assistant, if necessary. If you need to review the steps, refer to the section, "Getting Help from the Assistant," earlier in this chapter.
- Right-click the Assistant and click Options. The Office Assistant dialog box appears.
- The set of options in the top half of the dialog box on the Options tab concern the use of the Office Assistant (see Figure 3-5). To further limit when and where the Office Assistant pops up to help you, clear some of these check boxes. Table 3-1 gives you an overview of the Office Assistant options.
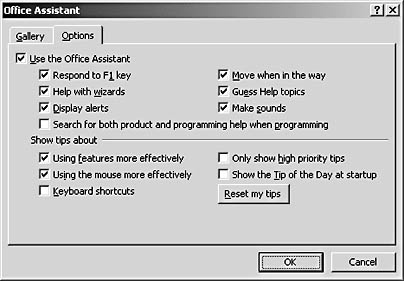
Figure 3-5. Change or limit the actions of the Office Assistant by clearing check boxes on the Options tab of the Office Assistant dialog box.
Table 3-1. Office Assistant Options
| Assistant Option | Description |
|---|---|
Respond To F1 Key | Displays context-sensitive help when you press F1 |
Help With Wizards | Displays the Office Assistant automatically when you elect to work with a wizard |
Display Alerts | Uses the Assistant to display Word alerts; clearing this check box displays the alert in a traditional message box |
Search For Both Product And Programming Help When Programming | Disabled by default; this option provides both programming and regular help when you're working in programming areas |
Move When In The Way | Moves the Office Assistant to a new location if it interferes with your work |
Guess Help Topics | Enables the Assistant to make "best guesses" about Help topics it's unsure of |
Make Sounds | Adds audio output to the actions of the Assistant motions |
Displaying Tips
One feature the Assistant offers is the ability to display tips that can make working with Word easier. Word includes a library of tips that the program cycles through, one at a time. To turn on the tips, right-click the Office Assistant, choose Options, and on the Options tab select the check boxes for the tips settings you want.
If you have Tip of the Day turned on, when you launch Word for the first time each day, a tip appears in the startup dialog box. Additionally, if you've turned on the tip feature and the Office Assistant is displayed as you work, a light bulb will appear above the Assistant's head when there's a tip to be shared (see Figure 3-6).

Figure 3-6. If you elect to get additional tips about ways to be most effective with Word, a light bulb above the Assistant's head alerts you to a tip.
If you hide the Assistant but leave the tips selected, a light bulb icon appears beside the Help button in the Standard toolbar when there's a tip Word thinks you might want to read.
Selecting a Different Assistant
One of the ways you can control the Office Assistant is to choose a different one. Word 2002 comes with eight different personalities you can try, each with a different movement, sound, and style (see Table 3-2). To change Assistants, follow these steps:
- Display the Assistant, if necessary. Turn to the section, "Getting Help from the Office Assistant," for more information.
- Right-click the Office Assistant.
- Click Choose Assistant.
- When the Office Assistant dialog box appears, on the Gallery tab, browse through the Assistants by clicking Next.
- To make your choice, click OK.
Tip
You can also get other Office Assistants on line by choosing Help, Office On The Web.
Table 3-2. Assistant Choices
| Assistant | Name | Comments |
|---|---|---|
| Clippit | The personable wire paper clip—the default Assistant |
| The Dot | A little bouncing dot that changes into various shapes as you work |
| F1 | A robot character with a metallic sound that's sure to wake the cat |
| Office Logo | The Office logo highlights and plays a chime sound when activated |
| Merlin | An automated wizard that speaks, twirls, and appears and disappears |
| Mother Nature | An earth logo that also changes to a flower or volcano and sounds a harmonic chime. |
| Links | A cat with a loud purr (this will really wake the cat up!) |
| Rocky | The cartoon dog that was the default Office Assistant in previous versions |


Note
If you haven't installed any additional Office Assistant yet, Word will prompt you to insert your Office CD.
Getting Rid of Your Assistant
If you want to turn off the Office Assistant until further notice, clear the Use The Office Assistant check box in the Options tab of the Office Assistant dialog box. The Assistant will disappear until you invoke him choosing Help, Show The Office Assistant.
Tip - Get help with programming
While you're programming with Word, you can get high-level help. Right-click the Office Assistant, and click Options. To make the programming help available, select the Search For Both Product And Programming Help When Programming check box. Then, when you're programming, both regular help and more specialized programming help will be available to you.
EAN: 2147483647
Pages: 337