Creating Enhanced Borders
3 4
When you want to create a border that has a more dramatic look than a simple line, you can take matters into your own hands using the Borders And Shading dialog box. By setting the options in this dialog box, you can choose a different look for your border (including 3-D and shadow effects) and change the style, color, and width of the line you use. You can also create partial borders by selecting only the line segments you want to appear.
To create a customized border, begin by placing the insertion point where you want the border to begin or by selecting the data around which you want to create the border. Then choose Format, Borders And Shading. The Borders And Shading dialog box appears, as Figure 24-2 shows.
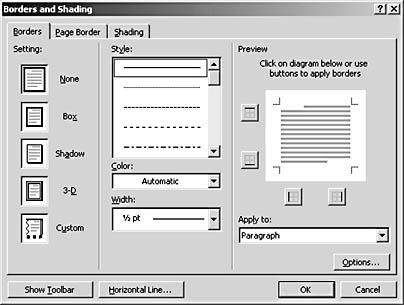
Figure 24-2. Use the options in the Borders And Shading dialog box to select the border type and line style, color, and width you want.
Word 2002 offers five different selections for the borders you create, although you have an almost unlimited number of combinations you can create, using the different styles, colors, widths, and line selections. The border type is the first major choice you'll make. It controls the overall look and feel of the border itself. You can choose from the following options:
- None is the default, of course, showing no border around selected text and objects.
- Box encloses the selection in a simple line box.
- Shadow outlines the selection with a box and adds a drop shadow below and to the right of the selection.
- 3-D creates a three-dimensional effect for the selected border, making it appear to "stand out" from the page.
- Custom enables you to create the look you want yourself by choosing only the line segments you want to display.
Tip - Mix and match borders
You can mix and match different border types to get the effect you want. For example, you might start with a 3-D border type and click Shadow to add a shadow behind it. You can further combine border options such as color and line width to make the border unique.
On the Borders tab of the Borders And Shading dialog box, click the border type you want to apply. If you don't want to make any additional changes, you can simply click OK to return to your document. The border will be added to the text or object you selected. If you didn't select anything before choosing Format, Borders And Shading, the border simply appears around the line at the insertion point; the border will expand as you type.
Tip - Undo or change a border
If you add a border and decide you really don't like it, you can do away with it altogether by pressing Ctrl+Z. Or, if you prefer, you can choose Format, Borders And Shading and select a different border type.
Selecting a Style
Word 2002 gives you 25 different line styles you can use to create the border effects you want. From simple, straight lines to dotted, double, and triple lines, you can create a variety of looks by changing the line style. Figure 24-3 shows a few examples of borders with different line styles.
To choose a different line style, open the Borders And Shading dialog box and select a line style in the Style list on the Borders tab. The Preview section shows the effect of your choices. Set any other border choices you want and click OK. The document is updated with your changes.
Troubleshooting
There's Not Enough Contrast in My Double Line
If you create a double line and can't see enough contrast between lines of different weights, you can play around with the line widths you've selected to get a better contrast. Start by selecting the area with the border and choosing Format, Borders And Shading to display the Borders And Shading dialog box. In the Preview section in the dialog box, click the line you want to modify. Then try selecting a heavier line width by clicking the Width down arrow and choosing a thicker line. This action magnifies the effect of the lines and, in a multi-line style with different weights, it increases the contrast.
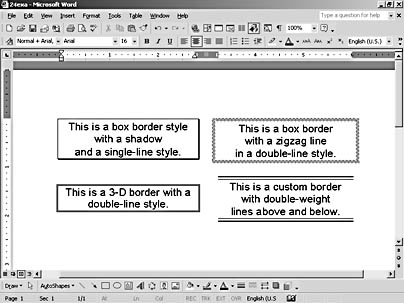
Figure 24-3. The line style you choose has a dramatic effect on the overall look of the border.
Choosing Color
When you first start adding lines and borders to your publication, Word selects black by default. But you have all the colors of Word at your disposal, so you can get as colorful as your needs allow. To choose a color for your border, follow these steps:
- Select the border you want to change or place the insertion point where you want to add the border.
- Choose Format, Borders And Shading. The Borders And Shading dialog box appears.
- Select the border type and line style you want.
- Click the Color down arrow. The color palette appears, as shown in Figure 24-4.
- Click the color you want to use from the color palette, or, if you don't see the color you were hoping for, click More Line Colors. The Colors dialog box appears so that you can find the color you're looking for. Click the color you want, and then click OK. The change you selected is displayed in the Preview section.
- When you're happy with the selection, click OK.
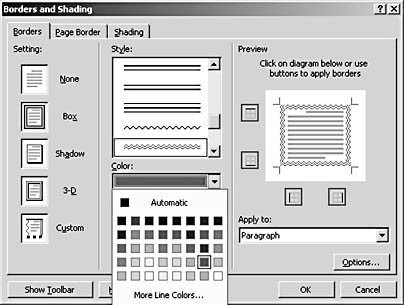
Figure 24-4. Use the color palette to select the color for lines and shading.
When You Need to Match Colors Exactly
Suppose that you're using Word to create a Web page that has the look and feel of your department's annual report, which was published on line last year. When you've been asked to match color schemes, choosing the right color for your borders can become an important issue. For these times, you can use the Custom tab in the Colors dialog box to find and then enter the exact Red, Green, and Blue percentages of the custom color you seek.
To determine the custom color of an item (such as the color you need to replicate from last year's annual report), right-click the item, choose Font on the shortcut menu, and in the Font dialog box, click the Font Color down arrow. The color palette appears. Choose More Colors, and click the Custom tab. At the bottom of the Custom tab, you see three percentages—Red, Green, and Blue if you've selected RGB as your color model, and Hue, Sat, and Lum if you've selected HSL. The numbers shown in the text boxes indicate the percentages of those colors used to create your custom color. Write the numbers down so that you'll have them when you return to the Borders And Shading dialog box to replicate the color. Close the Colors and Font dialog boxes.
Tip - Pick the best colors for borders
The trick to selecting good colors for your text, image, and table borders is to select a color that complements the rest of your design. If you've used a dark blue for headings, for example, you might want to use the same blue for borders and lines. Or if you have a variety of colors in your publication—some used for text, and others used for icons and other types of graphics—be consistent with the colors already used for similar design elements. What you don't want to do is create an effect that's interruptive or distracting—the point is to help readers find and understand your information more easily, not to leave them wondering about why you chose that loud color for your border.
Controlling Border Width
When you create a simple border, the default line width is ½ point, which is a simple, thin line. If you want to create a more dramatic effect—whether you leave the line black or add color—you can change the width of the line. To change the line width, display the Borders And Shading dialog box and click the Width down arrow. Then click the width you want, in increments, up to 6 points.
Tip - Add special effect separator lines
You can use line widths to create a special effect for partial borders. Select the area you want to enclose in a border, choose Format, Borders And Shading, and click the Custom border type. Select the line style and click the Width down arrow and choose 3 point. In the Preview section, click the top horizontal border. The line changes to show the 3 point thickness. Next, click the bottom horizontal border; then click OK. Word adds the thick line border above and below the selected area.
EAN: 2147483647
Pages: 337
- Challenging the Unpredictable: Changeable Order Management Systems
- Enterprise Application Integration: New Solutions for a Solved Problem or a Challenging Research Field?
- Distributed Data Warehouse for Geo-spatial Services
- A Hybrid Clustering Technique to Improve Patient Data Quality
- Relevance and Micro-Relevance for the Professional as Determinants of IT-Diffusion and IT-Use in Healthcare