Formatting Shadows and 3-D Effects
3 4
In addition to adding textures and colors, you can apply 3-D and shadow effects to lines, arrows, shapes, AutoShapes, backgrounds, and freeform shapes. Generally, you'll want to use 3-D and shadow effects when you want to create a sense of depth in your drawing. Both the shadow and the 3-D effects are accessible from the Drawing toolbar.
Note
You can apply either a shadow or a 3-D effect to an object—but you can't apply both. This means that if you apply a 3-D effect to a drawing object that has a shadow, the shadow will disappear. Likewise, if you add a shadow effect to a 3-D object, the 3-D formatting will be removed.
Adding and Controlling Shadows
You can instantly add depth to drawing objects in Word by adding a shadow to the edge of an object. The Shadow Style effects in Word enable you to add various shadow styles to objects, adjust shadow position, and change shadow color. Figure 16-21 shows a few flowchart objects formatted using the Shadow Style effects.
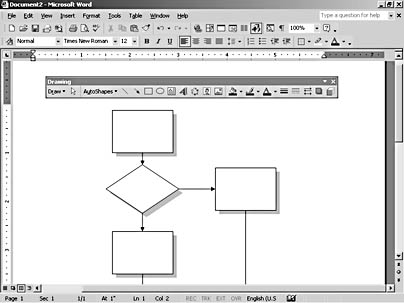
Figure 16-21. You can add shadows to basic objects, as shown in this flowchart structure.
Creating Shadows
You can add a 50-percent gray shadow to any selected object by using a preset shadow style in Word. To do so, you use the Shadow Style drop-down menu on the Drawing toolbar, shown in Figure 16-22.
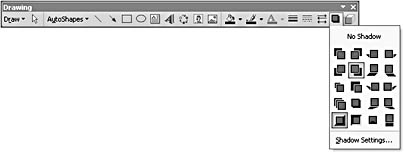
Figure 16-22. Word provides 20 preset styles on the Shadow Style drop-down menu.
To add a preset shadow style to an object, select the object you want to add a shadow to, click the Shadow Style button on the Drawing toolbar, and choose a shadow style on the Shadow Style drop-down menu. To remove a shadow, select the object, and click No Shadow on the Shadow Style drop-down menu.
Changing the Position of Shadows
After you apply a shadow, you can manually adjust the shadow's position relative to the object. To do so, follow these steps:
- Select the object whose shadow you want to adjust.
- Click the Shadow Style button on the Drawing toolbar, and choose Shadow Settings on the drop-down menu. The Shadow Settings toolbar opens.
The buttons on the Shadow Settings toolbar are described in Table 16-2.
- Click the appropriate buttons to reposition the shadow. Each time you click a nudge button, the shadow moves 1 point in the specified direction.
Table 16-2. Shadow Settings Toolbar Buttons
| Button | Name | Description |
|---|---|---|
| Shadow On/Off | Adds or removes an object's shadow |
| Nudge Shadow Up | Moves an object's shadow up by 1 point |
| Nudge Shadow Down | Moves an object's shadow down by 1 point |
| Nudge Shadow Left | Moves an object's shadow left by 1 point |
| Nudge Shadow Right | Moves an object's shadow right by 1 point |
| Shadow Color | Opens a color palette that you can use to color a shadow |


Tip
To nudge a shadow 6 points instead of 1 point, press Shift while you click the appropriate nudge button on the Shadow Settings toolbar.
Coloring Shadows
In addition to adjusting a shadow's position, you can also color a shadow. To do so, follow these steps:
- Select the drawing object that contains the shadow you want to change.
- Click the Shadow button on the Drawing toolbar, and choose Shadow Settings from the drop-down menu. The Shadow Settings toolbar opens.
- On the Shadow Settings toolbar, click the Shadow Color down arrow, and choose the color you want to apply to the shadow from the drop-down menu.
If you don't see the color you want on the Shadow Color drop-down menu, click More Shadow Colors to access the Standard and Custom tabs in the Colors dialog box (as discussed in the section "Specifying Line and Fill Colors," ). The Shadow Color drop-down menu also includes a Semitransparent option. This option is selected by default; it creates a lighter shadow that you can see text through. Clear the Semitransparent selection if you want to make your shadow darker and make sure that text is not visible through the shadow.
Inside Out
If you apply an embossed or engraved shadow to an object (Shadow Style 17 or Shadow Style 18 on the Shadow Style drop-down menu), Word hides the object's borders by default. If you later apply a different shadow effect to the object, you might have to redraw the object's borders (especially if the object is the same color as the background). To do so, select the object, and choose a line color on the Line Color drop-down menu on the Drawing toolbar.
Applying and Customizing 3-D Effects
By using 3-D effects, you can format and customize simple 3-D objects. To add a 3-D effect to an object, Word adjusts the two-dimensional object by expanding (or extruding) the object's edges and rotating the object to an angle. In Word, you can control the depth of a 3-D object's extrusion as well as the object's angle. In addition, you can specify how light and shadow reflect off the shape, and you can specify how the object's surface should be formatted by choosing the Wire Frame, Matte, Plastic, or Metal option.
Adding 3-D Effects
To create a 3-D effect, you use the 3-D Style drop-down menu, shown in Figure 16-23.
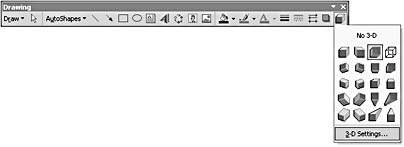
Figure 16-23. Word provides 20 preset styles on the 3-D Style menu.
To format a 3-D object, follow these steps:
- Select the object you want to modify.
- On the Drawing toolbar, click the 3-D Style button, and then click a 3-D setting on the 3-D Style drop-down menu.
After you create a 3-D object, you can remove a 3-D effect by choosing No 3-D on the 3-D Style drop-down menu. You can also change which 3-D setting is applied by selecting the 3-D object and choosing a different setting on the 3-D Style drop-down menu.
Tip
To add the same 3-D effect to several objects at one time (including applying the same lighting effects and other settings), select or group the objects before you apply the 3-D settings.
Controlling Light, Color, Angle, and Other Settings
After you apply a 3-D style to an object, you can change the 3-D style's appearance, including its color, rotation, depth, lighting, and surface texture. To modify an object's 3-D effects, you select the object, click the 3-D button on the Drawing toolbar, and then click 3-D Settings on the 3-D Style drop-down menu to open the 3-D Settings toolbar. Table 16-3 describes the buttons available on the 3-D Settings toolbar.
To use any of the 3-D Settings toolbar buttons, select the 3-D object and then click the appropriate toolbar button. Similar to the color settings available for other objects, the 3-D Color drop-down menu enables you to create custom colors for a 3-D object's extrusion by choosing the More 3-D Colors option to display the Colors dialog box. (The Colors dialog box is shown in Figures 16-13 and 16-14.)
Table 16-3. 3-D Settings Toolbar Buttons
| Button | Name | Description |
|---|---|---|
| 3-D On/Off | Adds or removes a 3-D effect. |
| Tilt Down | Tilts the object down by 5 degrees. Press Shift while clicking to move the object in 45-degree increments. Press Ctrl while clicking to move the object in 1- degree increments. |
| Tilt Up | Tilts the object down by 5 degrees. Press Shift while clicking to move the object in 45-degree increments. Press Ctrl while clicking to move the object in 1- degree increments. |
| Tilt Left | Tilts the object 5 degrees to the left. Press Shift while clicking to move the object in 45-degree increments. Press Ctrl while clicking to move the object in 1-degree increments. |
| Tilt Right | Tilts the object 5 degrees to the right. Press Shift while clicking to move the object in 45-degree increments. Press Ctrl while clicking to move the object in 1-degree increments. |
| Depth | Opens a drop-down menu that enables you to change the size of the object's extrusion. |
| Direction | Opens a drop-down menu that enables you to control the direction of the object's extrusion. You can choose from nine preset values as well as specify a diminishing perspective (Perspective) or a flat- plane perspective (Parallel). |
| Lighting | Opens a drop-down menu that enables you to choose a light direction. You can choose from nine preset values as well as Bright, Normal, or Dim. |
| Surface | Opens a drop-down menu containing four surface options you can assign to the selected object: Wire Frame, Matte, Plastic, and Metal. |
| 3-D Color | Opens a color palette that you can use to control the color of the 3-D object's extrusion. |


EAN: 2147483647
Pages: 337