Using Cross-References
|
| < Day Day Up > |
|
When you're working on a long document in which you want to refer to other parts of that document, you can use cross-references to help readers find the information they seek. Word lets you refer to a number of different elements in your document—including captions, headings, footnotes and endnotes, and bookmarks you've created.
| Tip | Expand subdocuments before referencing You can create cross-references only within the current document. You might create a reference at the beginning of a long report, for example, that points readers to a table in a later section that lists statistics related to a new study. You can't create a cross-reference to refer to a table in another document, however. If you're working with master and subdocuments, be sure to expand the master document by clicking the Expand Subdocuments button on the Outlining toolbar. This makes all text accessible before you enter cross-references. |
Creating a Cross-Reference
When you're ready to create a cross-reference, start by placing the insertion point where you want the cross-reference to appear in your document. Then follow these steps:
-
Add the text that refers to the cross-reference (for example, a phrase such as "To review the results of our survey, see").
-
Choose Insert, Reference, Cross-Reference. The Cross-Reference dialog box appears, as shown in Figure 23-6.
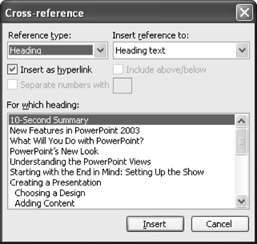
Figure 23-6: Cross-references enable you to point readers to different elements in your document. -
Click the Reference Type arrow, and then make your selection. You can choose from the following document elements:
-
Numbered Item—Lists all the text entries beginning with a number throughout the document.
-
Heading—Shows all headings based on Word's Heading 1, 2, 3 styles or outline levels
-
Bookmark—Displays all the bookmarks currently listed in the document
-
Footnote—Shows all footnotes inserted in the document
-
Endnote—Lists the endnotes you have created
-
Equation—Shows any equations you've inserted in the document
-
Figure—Lists all figure references
-
Table—Shows all available tables in the document
-
-
Click the Insert Reference To arrow, and then choose the element you want Word to insert in the document. This item will be inserted at the insertion point.
-
Select the item to which you want to refer by clicking it in the For Which Numbered Item list box.
-
Click Insert, and Word adds the cross-reference to your document as you directed.
-
Click Close to return to your document.
Tip Create links for a Web page If you plan to save your document as a Web page or make it available as an electronic file, you can have Word turn your cross-references into hyperlinks, so that readers can easily move from one page to another. To create links for cross-references, select the cross-reference you've created, and then display the Cross-Reference dialog box by choosing Insert, Reference, Cross-Reference. Select the Insert As Hyperlink check box, and then click Insert. The inserted cross-reference is created as a link to the other location in the document.
Modifying, Moving, and Updating Cross-References
You can edit and delete the text that introduces a cross-reference the same way you would modify any other text in your document. If you want to modify the item to which a reference refers, you need to make a different kind of change. Here are the steps:
-
Select the item inserted as the cross-reference (for example, you might select Table 1-1).
-
Display the Cross-Reference dialog box by choosing Insert, Reference, Cross-Reference.
-
In the For Which Numbered Item list in the Cross-Reference dialog box, click the new item to which you want the cross-reference to refer.
-
Click Insert, and then click Close to close the Cross-Reference dialog box.
Tip Make a reference relative You can have Word create a relative reference to a cross-reference you enter by selecting the Include Above/Below check box in the Cross-Reference dialog box. Create your cross-reference as usual, and then after selecting the item you want inserted in the Insert Reference To list box, select the Include Above/Below check box. If the insertion point is on the same page as the section or item referenced, Word will insert "above" or "below," based on the position of the reference.
If you want to move a cross-reference, simply select the reference in your document, and then cut and paste it as you would normally. Once you have the reference in the location you want, press F9. Word updates the reference and makes the connection to the new location. If you want to update all references in a document, select the entire document before pressing F9.
| Note | When you want to delete a cross-reference, simply select the reference, and then delete it as you would any other text. |
Troubleshooting: Cross-referencing in my document produces an error message
If you go through the steps to create a cross-reference and instead of the reference you expect, you get an error message saying, "Error! Reference source not found," check to make sure that the information you're referring to hasn't been removed from your document. If the item is still in your document but the reference still displays an error message, try fixing the problem by selecting the cross-reference and pressing F9 to update the reference. If the problem is caused by a broken link or a moved reference, the item should now be displayed properly.
|
| < Day Day Up > |
|
EAN: 2147483647
Pages: 373