Simplifying Existing Meshes
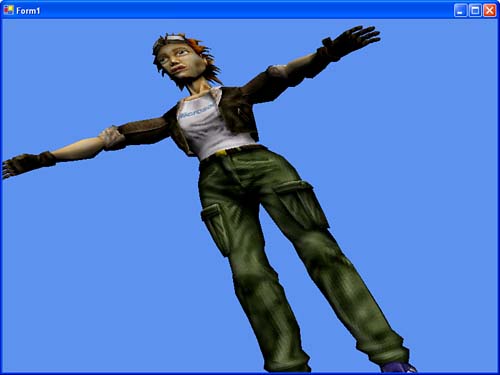
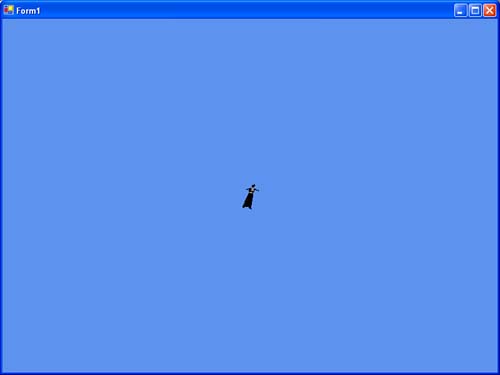
| Now let's say that your artist has just given you a mesh for "prop" that resides in differing locations in your scene, depending on which level you are on. It some levels, the mesh is way in the background, and doesn't need to be nearly as detailed as in other levels where it is right up close to the character. You could ask your artist to make you two different models, a high detailed one, and a low detailed one, but if the artist is already swamped with work, why not just use some of the built-in simplification our mesh class can provide. Simplifying a mesh is the act of taking an existing mesh, using a set of provided weights, and trying to remove as many faces or vertices as possible to achieve a lower-detail mesh. However, before a mesh can be simplified, it must first be cleaned. Cleaning a mesh is performed by adding another vertex where two fans of triangles share the same vertex. Let's look at the overloads for the clean method: public static Microsoft.DirectX.Direct3D.Mesh Clean ( Microsoft.DirectX.Direct3D.Mesh mesh , Microsoft.DirectX.Direct3D.GraphicsStream adjacency , Microsoft.DirectX.Direct3D.GraphicsStream adjacencyOut , out System.String errorsAndWarnings ) You'll notice that much like the earlier functions, this one takes as a parameter in the mesh we are going to clean, as well as the adjacency information. However, you'll also notice that the adjacencyOut parameter is always required as well. The most common technique is to use the adjacency in graphics stream you get from the mesh creation as both the adjacencyIn and adjacencyOut parameter for the cleaning. There is also a string that can be returned to notify you of any errors or warnings encountered when cleaning the mesh. You should also note that the adjacency parameters can be either the graphics streams as shown above, or arrays of integers. To show the dramatic simplification that can be achieved using these techniques, I took the MeshFile example that we wrote in Chapter 5, "Rendering with Meshes," and decided to use this as the starting point for our simplification. First, I turned on wire-frame mode so you could see the effect the simplification has on the vertices more easily. I added the following line in the SetupCamera function: device.RenderState.FillMode = FillMode.WireFrame; Next, as we've just discussed, the mesh needs to be cleaned. Since we need to know the mesh's adjacency information for the cleaning, we need to modify the mesh creation code in LoadMesh as follows: ExtendedMaterial[] mtrl; GraphicsStream adj; // Load our mesh mesh = Mesh.FromFile(file, MeshFlags.Managed, device, out adj, out mtrl); The only real change was the addition of the adj variable, which will hold our adjacency information. We then called the overload for FromFile that returned this data. Now we just need to make the actual call to Clean, so at the end of the LoadMesh function, we can add the following code to clean our mesh: // Clean our main mesh Mesh tempMesh = Mesh.Clean(mesh, adj, adj); // Replace our existing mesh with this one mesh.Dispose(); mesh = tempMesh; Before we update our code to do the actual simplification of this mesh, we should first look at the actual Simplify method, and its various overloads: public static Microsoft.DirectX.Direct3D.Mesh Simplify ( Microsoft.DirectX.Direct3D.Mesh mesh , int[] adjacency , Microsoft.DirectX.Direct3D.AttributeWeights vertexAttributeWeights , float[] vertexWeights , System.Int32 minValue , Microsoft.DirectX.Direct3D.MeshFlags options ) Once again, the structure of this method should seem similar. The mesh we are going to simplify is the first parameter, followed by the adjacency (which can be specified as either an integer array or a graphics stream). The AttributeWeights structure used for the next parameter is used to set the weights for the various values used when simplifying the mesh. Most applications should use the overloads that do not take this member, since the default structure will only consider geometric and normal adjustment. It is only in special cases that other members would need to be modified. The default values for this structure if you do not pass it in would be AttributeWeights weights = new AttributeWeights(); weights.Position = 1.0f; weights.Boundary = 1.0f; weights.Normal = 1.0f; weights.Diffuse = 0.0f; weights.Specular = 0.0f; weights.Binormal = 0.0f; weights.Tangent = 0.0f; weights.TextureCoordinate = new float[] {0.0f, 0.0f, 0.0f, 0.0f, 0.0f, 0.0f, 0.0f, 0.0f }; The next member is a list of weights for each vertex. If you pass in null for this member, it is assumed that each weight will be 1.0f. The minValue member is the minimum number of faces or vertices (depending on the flags you pass in) you want to try to simplify the mesh to. The lower this value, the lower the details of the resulting mesh; however, you should note that just because this call may succeed does not mean that the exact minimum value has been reached. This member is intended to be a desired minimum, not an absolute minimum. The final parameter to this function can only be one of two flags. If you want to simplify the number of vertices, you should pass in MeshFlags.SimplifyVertex. Otherwise, if you want to simplify the indices, use MeshFlags.SimplifyFace. Now we should add the code to simplify the mesh we used in our MeshFile example. We will want to keep both the original (cleaned) mesh, as well as the simplified mesh to toggle between them, so let's add a new member variable to store our simplified mesh: private Mesh simplifiedMesh = null; Next, you should actually create the simplified mesh. At the end of the LoadMesh function, add this small section of code: // Get our new simplified mesh simplifiedMesh = Mesh.Simplify(mesh, adj, null, 1, MeshFlags.SimplifyVertex); Console.WriteLine("Number of vertices in original mesh: {0}", mesh.NumberVertices); Console.WriteLine("Number of vertices in simplified mesh: {0}", simplifiedMesh.NumberVertices); Here you are trying to simplify the huge mesh down to a single vertex. Talk about low resolution meshes; you can't get much lower than that. Then you print out the number of vertices before and after the simplification to the output window. Running the application now won't actually show you the simplified mesh yet, but it will show you the number of vertices of the two meshes: Number of vertices in original mesh: 4445 Number of vertices in simplified mesh: 391 We may not have simplified our mesh down to one vertex like we asked for, but we did simplify it down to 8.8% of its original size. For objects off in the distance, you probably couldn't tell the difference between the high resolution and the low resolution models anyway; you may as well save the triangles for something more useful. Now let's update the code so that we can actually see the result of this simplification. We will want to toggle between the normal and simplified mesh, so first we should add a Boolean variable to maintain the current mesh we are rendering: private bool isSimplified = false; Next, we should update our rendering code to render the correct subset depending on the value of our Boolean. In the OnPaint overload, update the following code: device.Material = meshMaterials[i]; device.SetTexture(0, meshTextures[i]); if (!isSimplified) { mesh.DrawSubset(i); } else { simplifiedMesh.DrawSubset(i); } Notice that even though we may be rendering the full normal mesh, or the simplified one, the material and texture both stay the same. The only change we make is which mesh we call DrawSubset on. The only thing left to do is to have a way to actually toggle our Boolean value. You should make it toggle when the space bar is pressed; add the following method: protected override void OnKeyPress(KeyPressEventArgs e) { if (e.KeyChar == ' ') { isSimplified = !isSimplified; } } When you first run the example now, you see the full mesh rendered in wire-frame mode. There are quite a few vertices in this mesh; looking at the face alone, it almost looks solid, there are so many vertices. Now, hit the space bar and watch all of those vertices disappear. The effect is quite noticeable when the camera is close to the object, but what if the object was far away? Add another Boolean variable to control the camera distance: private bool isClose = true; Now update the SetupCamera function to have the camera up close or far away depending on this Boolean variable: if (isClose) { device.Transform.View = Matrix.LookAtLH(new Vector3(0,0, 580.0f), new Vector3(), new Vector3(0,1,0)); } else { device.Transform.View = Matrix.LookAtLH(new Vector3(0,0, 8580.0f), new Vector3(), new Vector3(0,1,0)); } //device.RenderState.FillMode = FillMode.WireFrame; As you can see, the camera is positioned 8,000 units further back if the camera isn't "close." You'll also notice that I turned off wire-frame mode here. Since most games aren't played in wire-frame mode, this will give you a more realistic view of what your players would see. The last thing we need to do is to have a way to toggle the camera. We will use the "m" key for this. Add the following to the end of the OnKeyPress override: if (e.KeyChar == 'm') { isClose = !isClose; } Run the example once more. While the camera is still close, hit the space bar a few times. Now, hit the "m" key to move the camera far away from the object. Hit the space bar a few more times; notice that the effect is much less dramatic? See if you can really tell if the meshes in Figure 7.1 and Figure 7.2 are that different. Figure 7.1. Up close and high resolution mesh.
Figure 7.2. Far away and low resolution mesh.
This technique can be used quite effectively to lower the resolution of your meshes when it's not feasible to have your artist create multiple copies of the same mesh.
|
EAN: N/A
Pages: 180