Adding a Camera to Your Scene
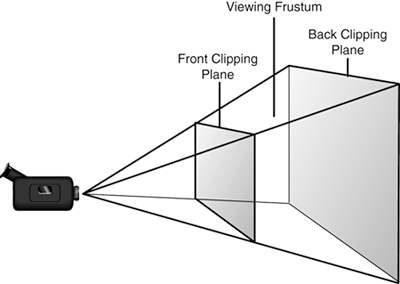
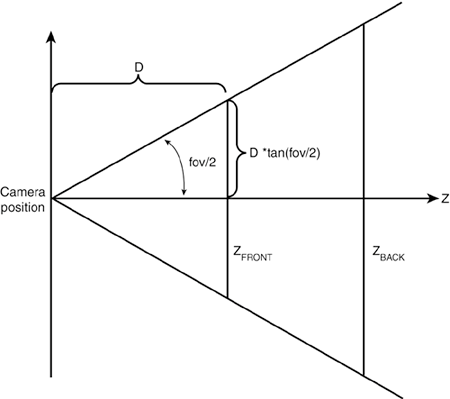
| If you run the application, you notice that nothing looks different. You still see a black screen and nothing else. You have all the code in to load and render your sky box mesh, so why isn't it rendering? Direct3D doesn't know exactly what it can render yet. In a 3D scene, you need to include a camera so Direct3D knows which areas of the world it should render. Add the code in Listing 4.9 to the OnDeviceReset method now. Listing 4.9. Setting Up a Camera// Set the transformation matrices localDevice.Transform.Projection = Matrix.PerspectiveFovLH( (float)Math.PI / 4, (float)this.Width / (float)this.Height, 1.0f, 1000000.0f); localDevice.Transform.View = Matrix.LookAtLH(new Vector3(0,0,-54), new Vector3(), new Vector3(0,1,0)); Here you set two transforms on the device that control the camera. The first is the projection matrix, which determines how the camera's lens behaves. You can use PespectiveFovLH method to create a projection matrix based on the field of view for a left-handed coordinate system (which is described later in Chapter 10, "A Quick 3D-Math Primer"). By default, Direct3D uses a left-handed coordinate system, so it is assumed from here on that you are as well. Direct3D can render in a right-handed coordinate system as well, but that topic isn't important for this book. Here is the prototype for the projection matrix function: public static Microsoft.DirectX.Matrix PerspectiveFovLH ( System.Single fieldOfViewY , System.Single aspectRatio , System.Single znearPlane , System.Single zfarPlane ) The projection transform is used to describe the viewing frustum of the scene. You can think of the viewing frustum as a pyramid with the top of it cut off; the inside of the pyramid is what you can actually see inside your scene. The two parameters in the preceding function, the near and far planes, describe the limits of this pyramid, with the far plane making up the "base" of the pyramid structure and the near plane where you would cut off the top. (See Figure 4.1.) The field-of-view parameter describes the angle between the point of the pyramid. (See Figure 4.2.) You can think of the aspect ratio as you do the aspect ratio of your television; for example, a wide-screen television has an aspect ratio of 1.85. You can normally figure out this parameter by dividing the width of your viewing area by the height. Only objects that are contained within this frustum are drawn by Direct3D. Figure 4.1. Viewing frustum.
Figure 4.2. Field of view.
The second transform is the view transform, which describes the actual camera's position in your scene. You'll notice that you can once again use the left-handed function off the Matrix object to construct this transform for you. The prototype for the method is public static Microsoft.DirectX.Matrix LookAtLH ( Microsoft.DirectX.Vector3 cameraPosition , Microsoft.DirectX.Vector3 cameraTarget , Microsoft.DirectX.Vector3 cameraUpVector ) You'll notice this method is simple. You have a position where you want the camera to be located, a position where you want the camera to be looking, and finally a vector describing which way "up" is to this camera. In most normal cases, up is simply the positive Y axis. With the camera transforms set up, you might be wondering why you add the code to the OnDeviceReset method. The reason is that any time the device is reset (for any reason, such as being lost), all device-specific state is lost. This state includes the camera transformations. As a result, the OnDeviceReset method (which is called after the device has been reset) is the perfect place for the code. You might also be wondering why you are using events, and why they would work, because earlier in this chapter you disabled the event handling. The event handling that you disabled was only the internal Direct3D event handling. The events are still fired and are available for you to consume if needed. Running the application shows you part of the sky box that will be used for your levels. (See Figure 4.3.) Figure 4.3. A rendered sky box.
Remember from earlier, you can't rely on the event handlers to automatically clean up your objects for you. You need to make sure you dispose of these new items you've created when the application shuts down. It's important to clean up these objects because failure to do so results in memory leaks, which can cause system instability and poor performance. Although the garbage collector can (and does) handle much of this memory management for you, doing this cleanup here will give you much finer control over the resources the system is using. Add the following code to your OnDestroyDevice method: // Clean up the textures used for the mesh level if ((levelTextures != null) && (levelTextures.Length > 0)) { for(int i = 0; i < levelTextures.Length; i++) { levelTextures[i].Dispose(); } // Clean up the mesh level itself levelMesh.Dispose(); } This code ensures each of the textures and the mesh are cleaned up. You must add any resource that you create to this method for cleanup. |

EAN: 2147483647
Pages: 191