Class Member Functions
|
| < Day Day Up > |
|
A class declaration introduces a new user-defined data type that can contain both attributes and functions. This section focuses on the declaration and definition of class member functions of which there are two general types: special member functions and all the rest. The special member functions include default and copy constructor, copy assignment operator, and destructor. All the rest include any additional functions required to give class objects their desired behavior. Before discussing special member functions I want to touch briefly on how member functions access class data members.
Class Member Function Access to Class Attributes
Class member functions behave as regular functions do, so all the material you learned in chapter 9 still applies. However, because class member functions belong to a particular class of object they will have direct access to all class attributes. In this regard it is helpful to think of a class attribute as being globally declared to be visible to all class member functions. And, just as with regular functions, any parameters or local function variables having the same names as class attributes will hide those class attributes.
Obtaining Access to Class Attributes From a Member Function
A class attribute is a static class variable of which only one copy exists to be shared by all instances of that class. To access a class attribute from within a member function simply use the class attribute name. If the attribute name is masked by a local function variable prefix the class name and the scope resolution operator to the attribute name like so:
ClassName::class_attribute_name
Obtaining Access to Instance Attributes from a Member Function
A non-static class attribute is an instance attribute and each class instance object will have its very own copy of the attribute. To access an instance variable in a member function simply use the variable’s name. If you have declared a local function variable with the same name as the instance attribute then you can prefix the keyword this and the indirection operator to the instance attribute’s name as shown here...
this->instance_attribute_name
...which is the shorthand method of doing the following:
(*this).instance_attribute_name
Special Member Functions
A class has four types of special member functions: default constructor, copy constructor, copy assignment operator, and destructor. Special member functions are used when objects are created, copied, and destroyed.
If you do not explicitly declare and define these special member functions in your classes they will be created by the compiler, but their default behavior may or may not be what you expect. As a rule, you should implement each of the four special member functions for all classes you write. Doing so will ensure your class objects are well-behaved. The idea of well-behaved objects is covered in great detail in chapter 17.
Constructor
A constructor is a special member function that is called automatically when an object of a particular class type is created. A constructor has exactly the same name as the class to which it belongs. There can be more than one constructor per class. A constructor has no return value type, not even void. A default constructor is a constructor with either no parameters or one whose parameters all have default values, meaning it can be called with no arguments. The default constructor is discussed in more detail below.
Purpose of a Constructor
The purpose of a constructor function is to initialize a class object to some known state when the object is created. By initialization I mean all of an object’s instance attributes should set to an acceptable value; there must be no surprises regarding the state of an object’s attributes.
Default Constructor
A default constructor is a constructor that requires no arguments. If you do not explicitly define a default constructor for a class, a compiler-defined default constructor will be used instead. Compiler-supplied default constructors perform basic class data member initialization. Relying on compiler-supplied constructors to properly initialize class objects is usually a big mistake.
Overloading Constructors
Constructors can be overloaded, just like ordinary functions, so that class objects can be initialized in different ways.
Constructor Initializer List
A constructor initializer list provides an expedited way to initialize class attributes. A constructor initializer list is a set of attribute initializers that appears between a colon and the opening brace of the constructor function body. The following code shows an example:
ClassName::ClassName():attribute_1(initializer_val), attribute_2(initializer_val), ..., attribute_n(initializer_val) { //constructor body } If the only purpose for a particular constructor is object attribute initialization then all initializations can be performed in an initializer list and the body of the constructor can remain empty.
There are three reasons for using an initializer list. First, when you simply want to initialize data members. Initializations performed in the initializer list are guaranteed to be performed before the body of the constructor executes. Second, when you need to call a base class constructor. This use of an initializer list in this regard will be discussed in greater detail in chapter 13. Last, when you need to initialize class or instance constants. Constants must be initialized in an initializer list since they must be initialized when they are created.
TestClass Example
Example 11.2 shows the contents of a header file named testclass.h that declares a class named TestClass. TestClass will be used to demonstrate constructors and will be modified later to demonstrate copy constructors, copy assignment operators, and destructors.
Listing 11.2: testclass.h
1 #ifndef TEST_CLASS_H 2 #define TEST_CLASS_H 3 4 class TestClass{ 5 public: 6 TestClass(int const_val = 25, int i_val = 0); 7 int getConstVal(); 8 void setI(int i_val); 9 int getI(); 10 11 private: 12 const int CONST_VAL; 13 int i; 14 }; 15 #endif Referring to example 11.2, TestClass is declared to have four public interface functions and two private data members. One data member is a constant, the other a variable.
The first public function is the constructor declared on line 6. This is an example of a default constructor in that its two parameters have default values assigned to them. This means that if no arguments are supplied to the constructor when it is called, it will use the default values to initialize the data members. Since the CONST_VAL data member is a constant, it must be initialized in an initializer list. Notice too that the constructor has no return type.
The other three functions set or retrieve the object attributes indicated by their names.
Example 11.3 gives the source code for the testclass.cpp file.
Example 11.3: testclass.cpp
Focus first on the TestClass constructor defined on line 5. The default values are not repeated in the function definition. The colon marks the beginning of the initializer list. Each data member is initialized with its corresponding parameter using constructor notation. Take for example the first initializer CONST_VAL(const_val). CONST_VAL is the name of the data member CONST_VAL, and const_val is the name of one of the constructor parameters. The value of const_val is used to initialize CONST_VAL. The data member i is initialized after CONST_VAL and the two initializers are separated by a comma. i_val appears below CONST_VAL in this example only because of space limitations, but this is a good example of how you should line wrap initializers to aid readability. The body of the constructor appears after i_val and contains two output statements. Example 11.4 shows a main() function using TestClass to create several different TestClass objects using different forms of the constructor.
Listing 11.4: main.cpp
1 #include "testclass.h" 2 using namespace std; 3 4 int main(){ 5 TestClass t1, t2(45, 5), t3(3); 6 return 0; 7 } In this example, three TestClass objects are created. The first, t1, is created with no arguments, therefore both instance attributes will be initialized to default values. The second object, t2, is created using two arguments. Notice how parenthesis are used to call the constructor. The value 45 will be used to initialize CONST_VAL, and the value 5 will be used to initialize i. The third object, t3, is created with one argument. Which instance attribute will be set? The answer is found by studying the output of the program shown in figure 11-3.
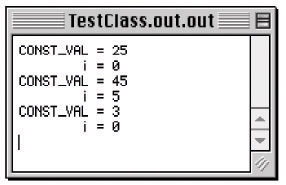
Figure 11-3: Results of Running Example 11.4
The argument value 3 used to create t3 is used to initialize the const_val parameter, which is used to initialize CONST_VAL as can be seen above.
Copy Constructor
The copy constructor is a constructor that is used to create a new instance object using an existing instance object as a guide. The first argument to a copy constructor must be a reference to an instance of the class for which it is defined.
Purpose of the Copy Constructor
The purpose of the copy constructor is similar to a regular constructor in that it is used to create a new object, using an existing object’s attribute values to initialize the new object’s attributes. The copy constructor is not intended for human use, rather, it is the constructor that will be used when objects are passed to functions by value. An example of its use is shown in example 11.7.
Overloading Copy Constructors
Copy constructors can be overloaded just like regular constructors but you rarely see this done in practice.
TestClass Example Extended
Example 11.5 shows the TestClass declaration extended to include a copy constructor.
Listing 11.5: testclass.h
1 #ifndef TEST_CLASS_H 2 #define TEST_CLASS_H 3 4 class TestClass{ 5 public: 6 TestClass(int const_val = 25, int i_val = 0); 7 TestClass(TestClass& tc_obj); 8 int getConstVal(); 9 void setI(int i_val); 10 int getI(); 11 12 private: 13 const int CONST_VAL; 14 int i; 15 }; 16 #endif The copy constructor declaration appears on line 7. The only parameter to the copy constructor in this example is a reference to a TestClass object named tc_obj.
Example 11.6 gives the code for the revised testclass.cpp file and example 11.7 gives the code for the revised main() function showing the copy constructor in use.
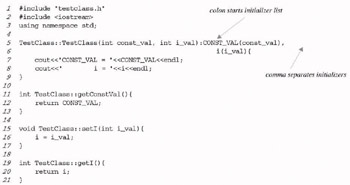
Listing 11.6: testclass.cpp
1 #include "testclass.h" 2 #include <iostream> 3 using namespace std; 4 5 6 TestClass::TestClass(int const_val, int i_val):CONST_VAL(const_val), i(i_val){ 7 cout<<"CONST_VAL = "<<CONST_VAL<<endl; 8 cout<<" i = "<<i<<endl; 9 } 10 11 TestClass::TestClass(TestClass& tc_obj):CONST_VAL(tc_obj.CONST_VAL), i(tc_obj.i){ 12 cout<<"CONST_VAL = "<<CONST_VAL<<endl; 13 cout<<" i = "<<i<<endl; 14 } 15 16 int TestClass::getConstVal(){ 17 return CONST_VAL; 18 } 19 20 void TestClass::setI(int i_val){ 21 i = i_val; 22 } 23 24 int TestClass::getI(){ 25 return i; 26 } Listing 11.7: main.cpp
1 #include <iostream> 2 #include "testclass.h" 3 using namespace std; 4 5 int main(){ 6 TestClass t1, t2(45, 5), t3(3); 7 TestClass t4(t2); 8 return 0; 9 } Referring to example 11.6, the copy constructor definition appears on line 11. Since TestClass functions have direct access to TestClass data members, the attributes of the copy constructor parameter tc_obj can be directly accessed via the dot operator and used to initialize the attributes of the new object being created.
Referring to example 11.7, the copy constructor is exercised on line 7 by creating a new TestClass object named t4 using t2 as an argument. The results of running this program are shown in figure 11-4.

Figure 11-4: Results of Running Example 11.7
Copy Assignment Operator
The copy assignment operator is an overloaded assignment “=” operator. The topic of overloading operators is formally presented in chapter 14 but because the copy assignment operator is considered a special member function I will discuss it here.
The copy assignment operator declaration takes the following form:
ClassName& operator=(ClassName& rhs);
It returns a reference to an object of type ClassName, where ClassName is the name of the class in which the function is declared. The copy assignment operator declares one parameter of type reference to ClassName. Here the parameter is named rhs which stands for “right hand side”. Now, you could name the parameter any name you want to but I like to name overloaded operator parameters rhs for the reasons you will see shortly.
Purpose of the Copy Assignment Operator
The purpose of the copy assignment operator is to change the values of an existing object’s attributes to those of another existing object’s attribute values.
Using the Copy Assignment Operator
The copy assignment operator is used like an ordinary assignment operator. For example, when the copy assignment is overloaded for TestClass objects, one object’s attributes can be set to equal another object’s attributes in the following manner:
t3 = t4;
Let’s see a complete example of the copy assignment operator declared and implemented for TestClass.
TestClass Example Extended
Example 11.8 shows the TestClass declaration with the copy assignment operator function added on line 8.
Listing 11.8: testclass.h
1 #ifndef TEST_CLASS_H 2 #define TEST_CLASS_H 3 4 class TestClass{ 5 public: 6 TestClass(int const_val = 25, int i_val = 0); 7 TestClass(TestClass& tc_obj); 8 TestClass& operator=(TestClass& rhs); 9 int getConstVal(); 10 void setI(int i_val); 11 int getI(); 12 13 private: 14 const int CONST_VAL; 15 int i; 16 }; 17 #endif Example 11.9 shows the testclass.cpp file with the copy assignment operator function definition added.
Listing 11.9: testclass.cpp
1 #include "testclass.h" 2 #include <iostream> 3 using namespace std; 4 5 6 TestClass::TestClass(int const_val, int i_val):CONST_VAL(const_val), i(i_val){ 7 cout<<"CONST_VAL = "<<CONST_VAL<<endl; 8 cout<<" i = "<<i<<endl; 9 } 10 11 TestClass::TestClass(TestClass& tc_obj):CONST_VAL(tc_obj.CONST_VAL), i(tc_obj.i){ 12 cout<<"CONST_VAL = "<<CONST_VAL<<endl; 13 cout<<" i = "<<i<<endl; 14 } 15 16 TestClass& TestClass::operator=(TestClass& rhs){ 17 i = rhs.i; 18 return *this; 19 } 20 21 int TestClass::getConstVal(){ 22 return CONST_VAL; 23 } 24 25 void TestClass::setI(int i_val){ 26 i = i_val; 27 } 28 29 int TestClass::getI(){ 30 return i; 31 } The function declaration begins on line 16. Notice that only the value of i is altered. That’s because CONST_VAL cannot be changed because it is a constant, and constants can only be set in a constructor initializer list.
Example 11.10 shows the code for the main() function where the copy assignment operator is used to assign the value of t1 to t2.
Listing 11.10: main.cpp
1 #include <iostream> 2 #include "testclass.h" 3 using namespace std; 4 5 int main(){ 6 TestClass t1, t2(45, 5), t3(3); 7 TestClass t4(t2); 8 t2 = t1; 9 cout<<"CONST_VAL = "<<t2.getConstVal()<<endl; 10 cout<<" i = "<<t2.getI()<<endl; 11 return 0; 12 } The assignment takes place on line 8 and two extra lines of code were added to print out the values of t2 after the assignment.
The results of running example 11.10 are shown in figure 11-5.
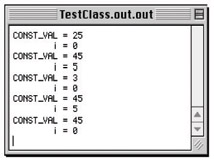
Figure 11-5: Results of Running Example 11.10
Destructor
The last type of special member function is the destructor. The destructor function has the same name as the class in which it is declared with the tilde “~” character prefixed to the name. Note the following example of a destructor declaration:
~ClassName()
The destructor takes no arguments and returns no value. A destructor is never called directly, although when a dynamically created object is released with the delete operator its destructor is called. Otherwise, destructors are automatically called when objects go out of scope like at the end of a block or when a program ends.
Purpose of Destructors
The purpose of a destructor is to release any resources allocated for an object’s use when it was created. An example of such a resource is dynamically allocated memory. If an object uses dynamically allocated memory during its lifetime then it should insure that all such memory is freed up when it is destroyed. This is the purpose of the destructor.
TestClass Example Extended
Example 11.11 gives the source code for the TestClass declaration with the destructor function declaration added.
Listing 11.11: testclass.h
1 #ifndef TEST_CLASS_H 2 #define TEST_CLASS_H 3 4 class TestClass{ 5 public: 6 TestClass(int const_val = 25, int i_val = 0); 7 TestClass(TestClass& tc_obj); 8 TestClass& operator=(TestClass& rhs); 9 ~TestClass(); 10 int getConstVal(); 11 void setI(int i_val); 12 int getI(); 13 14 private: 15 const int CONST_VAL; 16 int i; 17 }; 18 #endif The destructor function declaration appears on line 9. Since there is no dynamic memory or other resources to release the destructor will be utilized to print a short message to the screen indicating that the objects were destroyed. The modified testclass.cpp file is given in example 11.12.
Listing 11.12: testclass.cpp
1 #include "testclass.h" 2 #include <iostream> 3 using namespace std; 4 5 6 TestClass::TestClass(int const_val, int i_val):CONST_VAL(const_val), i(i_val){ 7 cout<<"CONST_VAL = "<<CONST_VAL<<endl; 8 cout<<" i = "<<i<<endl; 9 } 10 11 TestClass::TestClass(TestClass& tc_obj):CONST_VAL(tc_obj.CONST_VAL), i(tc_obj.i){ 12 cout<<"CONST_VAL = "<<CONST_VAL<<endl; 13 cout<<" i = "<<i<<endl; 14 } 15 16 TestClass& TestClass::operator=(TestClass& rhs){ 17 i = rhs.i; 18 return *this; 19 } 20 21 TestClass::~TestClass(){ 22 cout<<"Goodbye cruel world! TestClass object destroyed."<<endl; 23 } 24 25 int TestClass::getConstVal(){ 26 return CONST_VAL; 27 } 28 29 void TestClass::setI(int i_val){ 30 i = i_val; 31 } 32 33 int TestClass::getI(){ 34 return i; 35 } There is no reason to modify the previous version of the main() function; the one shown in example 10.10 is still good. Running the program now produces the results shown in figure 11-6.
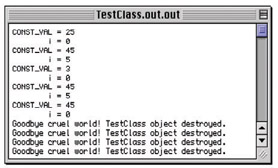
Figure 11-6: Results of Running Example 10.10 Again
Now that the destructor is declared and defined for TestClass you can see when each object is destroyed as the program terminates. You will see destructors used in ever-expanding roles as you progress through the text.
Behavior of Default Special Functions
Now that you know a little something about the four special function types I’d like to show you their default behaviors. As I said above, if you fail to implement the special functions in your classes the compiler will provide default versions for you. Their behavior may not be what you need or expect. I will demonstrate this by showing you a class called SimpleClass, whose declaration is given in example 11.13.
Listing 11.13: simpleclass.h
1 #ifndef SIMPLE_CLASS_H 2 #define SIMPLE_CLASS_H 3 4 class SimpleClass{ 5 public: 6 void setI(int i_val); 7 int getI(); 8 private: 9 int i; 10 }; 11 #endif The SimpleClass declaration leaves out the constructor, copy constructor, copy assignment operator, and destructor. The only two interface functions provided are a mutator function to set the value of i and an accessor function to get the value of i.
The implementation file simpleclass.cpp is shown in example 11.14.
Listing 11.14: simpleclass.cpp
1 #include "simpleclass.h" 2 3 void SimpleClass::setI(int i_val){ i = i_val;} 4 int SimpleClass::getI(){return i;} Example 11.15 gives a main() function showing each of the special functions being tested, and the results of running the program are shown in figure 11-7.
Listing 11.15: main.cpp
1 #include <iostream> 2 #include "simpleclass.h" 3 using namespace std; 4 5 int main(){ 6 SimpleClass s1; 7 cout<<"s1 = "<<s1.getI()<<endl; 8 s1.setI(5); 9 cout<<"s1 = "<<s1.getI()<<endl<<endl; 10 11 SimpleClass s2(s1); 12 cout<<"s2 = "<<s2.getI()<<endl<<endl; 13 14 SimpleClass s3; 15 cout<<"s3 = "<<s3.getI()<<endl; 16 s3 = s1; 17 cout<<"s3 = "<<s3.getI()<<endl; 18 return 0; 19 } 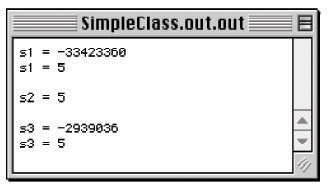
Figure 11-7: Results of Running Example 11.15
Referring to example 11.15, when the SimpleClass object s1 is created on line 6 the compiler-supplied constructor is utilized to initialize s1’s instance attribute i. But, what value will i be initialized to? The answer is found in figure 11-7. It is not initialized to anything; s1’s i attribute contains the garbage value found in memory when it was created. This is the default initialization behavior.
On line 8 the mutator function setI() is used to set the value of s1’s i attribute. The accessor function is used on line 9 to see if the change was successful, and it was.
Next, a new SimpleClass object named s2 is created on line 11 using the compiler-supplied copy constructor and the s1 object as a guide. On line 14 a new object named s3 is created and on line 16 the compiler-supplied copy assignment operator is used to assign the value of s1 to s3. This works because SimpleClass objects contain one simple object of a fundamental data type. The type of copying performed by the default copy constructor and copy assignment operator is referred to as a shallow copy. Shallow copy works for simple data types, but not for complex objects with pointers to other objects.
When the program ends the compiler-supplied destructor is called for each of the SimpleClass objects but this is not evidenced by the output shown in figure 11-7.
Quick Summary
There are four special functions: default constructor, copy constructor, copy assignment operator, and destructor. The default constructor is a constructor that has either no parameters, or all parameters have default values so it can be called with no arguments. The copy constructor is used to create new objects from existing objects. The copy assignment operator sets the attributes of an existing object to the attribute values of another existing object. The destructor is used to tear down or destroy an object when it is no longer needed by the program.
Default, compiler-supplied versions of these functions may not perform as you intend for your class objects so you should implement each special function to ensure proper special function behavior. The objective of implementing the special functions explicitly is to have well-behaved objects.
Accessor and Mutator Functions
Generally speaking, if a function is not one of the special member functions providing creation, copy, assignment, or destruction services, then it is an accessor or mutator function. TestClass has three such functions already implemented: getConstVal(), setI(), and getI(). These functions deal exclusively with either setting or getting the value of a particular instance attribute. In the case of TestClass, these three public functions, along with the special functions, constitute the range of behavior expected of a TestClass object.
Accessor Functions
Accessor functions provide behavior while preserving the state of the object. Accessor functions may simply return the value of an object or class attribute, or it may base its behavior on the state of one or more object or class attributes and return something different, like a status value, or return nothing at all. The key concept is that an accessor function can be called to perform some operation while not messing with things inside the object.
Accessor functions can be written in many ways to reflect the behavior they produce. If a function is to simply return an attribute’s value the function name can either begin with the word get followed by the name of the attribute whose value it is getting. Another way of writing the function is to leave off the word get and simply use the name of the attribute. This method actually produces easy-to-read code. Compare the following code samples:
if(obj.i() == some_value){//do something} if(obj.getI() == some_value){//do something}
Returning Boolean Values
If an accessor function returns a boolean value then by convention its name can start with the word is. For example:
if(obj.isTempHigh()){//do something}
Mutator Functions
Mutator functions provide behavior and change the state of the object in the process. A simple mutator function, like the one named setI() in TestClass, may only make a change to one class or object attribute and do nothing more. Complex mutator functions may make bold changes to an object’s state in order to provide complex behavior. Simple mutator functions can begin with the word set, followed by the name of the attribute’s value they are changing. Complex mutator functions should be named to reflect both the behavior they produce and the values they change. Here are a few examples:
void setFirstName(char* f_name); void changeLastName(char* l_name); float addFuelAndReturnLevel(float fuel_to_add);
Quick Summary
Accessor functions implement object behavior without changing the state of an object. Mutator functions implement object behavior while at the same time changing an object’s state.
|
| < Day Day Up > |
|
EAN: 2147483647
Pages: 340