Windows XP Professional provides many tools that you can use to maintain and troubleshoot disks and file systems. The tools described in this section are:
Chkdsk
Disk Defragmenter
Recovery Console
Automated System Recovery
DiskProbe
Dmdiag
For more information about troubleshooting problems with Windows XP Professional, see Tools for Troubleshooting and Troubleshooting Concepts and Strategies in this book.
Chkdsk
Chkdsk.exe is a command-line tool that verifies the logical integrity of a file system on a Windows XP Professional volume. If file system structures become damaged, Windows XP Professional automatically schedules Chkdsk to run the next time the computer is restarted. At any time, you can manually run Chkdsk at the command prompt or from Windows Explorer or My Computer. For more information about running the graphical version of Chkdsk, see Running Chkdsk from My Computer or Windows Explorer later in this chapter.
Volumes that have file system errors are known as dirty volumes. To indicate that a file system problem has occurred and that the volume is dirty, Windows XP Professional displays a message similar to the following when you attempt to open, delete, or rename a file or folder by using Microsoft Windows Explorer or the command prompt:
The file or directory filename is corrupt and unreadable. Please run the Chkdsk
utility.
You might also see messages in the system log in the Event Viewer snap-in. Figure 26-1 illustrates a Chkdsk entry in the system log.
Figure 26-1: Chkdsk message in the system log in Event Viewer
You can also determine whether a volume is dirty by using the fsutil dirty query command or the chkntfs command.
For example, to determine whether volume C is dirty, you can type:
fsutil dirty query c:
or
chkntfs c:
Running Chkdsk to Repair File Systems
You can run Chkdsk in two modes:
Chkdsk without parameters. When you run Chkdsk without parameters, it runs in read-only mode. In this mode, Chkdsk examines the disk and then reports whether it found any file system errors but does not repair the errors.
Chkdsk with parameters. When you run Chkdsk with parameters, such as /f or /r, Chkdsk repairs errors related to file system structures.
Before running Chkdsk to repair a volume
Before running Chkdsk to repair a volume, you must do the following:
Back up key data files or make sure that you have a known good backup.
Be prepared to let the Chkdsk process complete.
If you use the /f or /r parameter on a large volume (for example, 70 GB) or on a volume with a very large number of files (in the millions), Chkdsk can take a long time to complete. The volume is not available during this time because Chkdsk does not relinquish control until it is done. If a volume is being checked during the startup process, the computer is not available until the Chkdsk process is complete.
Chkdsk does not include parameters that let you cancel the Chkdsk process; however, when you run Chkdsk you can specify parameters that shorten the process. For more information about minimizing downtime during Chkdsk, see Reducing the Time Required to Run Chkdsk on NTFS Volumes later in this chapter.
Running Chkdsk on the boot volume
When you use the /f or /r parameters to run Chkdsk on the boot volume, Chkdsk displays the following message:
Chkdsk cannot run because the volume is in use by another process. Would you like to schedule this volume to be checked the next time the system restarts? (Y/N)
Chkdsk cannot gain exclusive use of the boot volume because it contains the Windows XP operating system files. Therefore, Chkdsk must always restart the computer to check the boot volume. If you press the Y key, a version of Chkdsk known as Autochk runs the next time the computer restarts. After Autochk checks the boot volume, the computer automatically restarts.
Running Chkdsk on a volume other than the boot volume
When you use the /f or /r parameters on a volume other than the boot volume, Chkdsk must lock the volume for exclusive use before it can repair errors. If the volume has open files or programs, Chkdsk displays the following message:
Chkdsk cannot run because the volume is in use by another process. Chkdsk may run if  this volume is dismounted first. ALL OPEN HANDLES TO THIS VOLUME WOULD THEN BE
 INVALID. Would you like to force a dismount on this volume? (Y/N)
If you press the Y key, Chkdsk attempts to close all handles and lock the volume. If Chkdsk is successful in locking the volume, the repair process begins. The duration of the repair process is determined by the number of files and folders on the volume and the level of damage, if any.
If Chkdsk cannot lock the volume, or if you press the N key, you can specify that you want to check the volume by running Autochk the next time the computer restarts. For more information about Autochk, see Running Autochk When the Computer Restarts later in this chapter.
Table 26-3 lists all Chkdsk command-line parameters.
Table 26-3: Chkdsk Parameters
Parameter
Description
volume
Specifies the volume that you want Chkdsk to check. You can specify the volume by using any of the formats in the following examples:
To run Chkdsk on the C volume, specify:
c:
To run Chkdsk on a mounted volume called data that is mounted on the C volume, specify:
c:\data
To run Chkdsk on a volume, you can specify the symbolic link name for a volume, such as:
\\?\Volume{2d9bd2a8-5df8-11d2-bdaa-000000000000}
You can determine a symbolic link name for a volume by using the mountvol command. For more information about mountvol, see Windows XP Professional Help.
path
FAT/FAT32 only. Specifies the location of a file or set of files within the folder structure of the volume.
filename
FAT/FAT32 only. Specifies the file or set of files to check for fragmentation. Wildcard characters (* and ?) are allowed.
/f
Fixes errors on the disk. The volume must be locked. If Chkdsk cannot lock the volume, Chkdsk offers to check it the next time the computer restarts.
/v
On FAT/FAT32: Displays the full path and name of every file on the disk. On NTFS: Displays additional information or cleanup messages, if any.
/r
Locates bad sectors and recovers readable information (implies /f). If Chkdsk cannot lock the volume, it offers to check it the next time the computer starts.
Because NTFS also identifies and remaps bad sectors during the course of normal operations, it is usually not necessary to use the /r parameter unless you suspect that a disk has bad sectors.
/x
Forces the volume to dismount first, if necessary. All opened handles to the volume are then invalid (implies /f). This parameter does not work on the boot volume. You must restart the computer to dismount the boot volume.
/i
NTFS only. Performs a less detailed check of index entries, reducing the amount of time needed to run Chkdsk.
/c
NTFS only. Skips the checking of cycles within the folder structure, reducing the amount of time needed to run Chkdsk.
/l:size
NTFS only. Changes the size of the log file to the specified number of kilobytes. Displays the current size if you do not enter a new size.
If the system loses power, stops responding, or is restarted unexpectedly, NTFS runs a recovery procedure when Windows XP Professional restarts that accesses information stored in this log file. The size of the log file depends on the size of the volume. In most conditions, you do not need to change the size of the log file. However, if the number of changes to the volume is so great that NTFS fills the log before all metadata is written to disk, then NTFS must force the metadata to disk and free the log space. When this condition occurs, you might notice that Windows XP Professional stops responding for 5 or more seconds. You can eliminate the performance impact of forcing the metadata to disk by increasing the size of the log file. For more information about NTFS recoverability, see File Systems in this book.
/?
Displays this list of Chkdsk parameters.
For more information about the Chkdsk parameters, see Windows XP Professional Help. For more information about running the graphical version of Chkdsk, see Running Chkdsk from My Computer or Windows Explorer later in this chapter.
Chkdsk Examples
To run Chkdsk to repair errors on the D volume, type:
chkdsk d: /f
If you need to run Chkdsk on a large D volume and you want Chkdsk to complete as quickly as possible, type:
chkdsk d: /f /c /i
You can script Chkdsk and Autochk by using the Windows Management Instrumentation (WMI) classes Win32_LogicalDisk, Win32_AutoChkSetting, and Win32_OperatingSystemAutochkSetting. For more information about WMI, see the Microsoft Windows Management Instrumentation (WMI) SDK link on the Web Resources Page at http://www.microsoft.com/windows/reskits/webresources
The Chkdsk Process on NTFS Volumes
When you run Chkdsk on NTFS volumes, the Chkdsk process consists of three major stages, and optional fourth and fifth stages. Chkdsk displays its progress for each stage with the following messages:
CHKDSK is verifying files (stage 1 of 3)...
File verification completed.
CHKDSK is verifying indexes (stage 2 of 3)...
Index verification completed.
CHKDSK is verifying security descriptors (stage 3 of 3)...
Security descriptor verification completed.
The following describes each of the Chkdsk stages.
Stage 1: Chkdsk verifies each file record segment in the master file table
During stage 1, Chkdsk examines each file record segment in the volume s master file table (MFT). A specific file record segment in the MFT uniquely identifies every file and directory on an NTFS volume. The percent complete that Chkdsk displays during this phase is the percent of the MFT that has been verified.
Stage 2: Chkdsk checks the directories in the volume
During stage 2, Chkdsk examines each of the indexes (directories) on the volume for internal consistency and verifies that every file and directory represented by a file record segment in the MFT is referenced by at least one directory. Chkdsk also confirms that every file or subdirectory referenced in each directory actually exists as a valid file record segment in the MFT and checks for circular directory references. Chkdsk then confirms that the time stamps and the file size information associated with files are up-to-date in the directory listings for those files.
The percent complete that Chkdsk displays during this phase is the percent of the total number of files on the volume that are checked. For volumes with many thousands of files and folders, the time required to complete this stage can be significant.
Stage 3: Chkdsk verifies the security descriptors for each volume
During stage 3, Chkdsk examines each of the security descriptors associated with each file and directory on the volume by verifying that each security descriptor structure is well formed and internally consistent. The percent complete that Chkdsk displays during this phase is the percent of the number of files and directories on the volume that are checked.
Stages 4 and 5 (optional stages): Chkdsk reads every sector on the volume to confirm stability
Chkdsk performs stages 4 and 5 if you specify the /r parameter when you run Chkdsk. The /r parameter confirms that the sectors in each cluster are usable. Specifying the /r parameter is usually not necessary because NTFS identifies and remaps bad sectors during the course of normal operations, but you can use the /r parameter if you suspect the disk has bad sectors.
During stage 4, Chkdsk verifies all clusters in use; during stage 5, Chkdsk verifies unused clusters.
The percent complete that Chkdsk displays during stage 4 is based on the percent of used clusters that are checked. The percent complete that Chkdsk displays during stage 5 is the percent of unused clusters that are checked. Used clusters typically take longer to check than unused clusters, so stage 4 lasts longer than stage 5 on a volume with equal amounts of used and unused clusters. For a volume with mostly unused clusters, stage 5 takes longer than stage 4.
During stages 1 and 3, the percent complete indicator advances relatively smoothly, although some unevenness might occur in the rate at which these phases progress. For example, file record segments that are not in use require less time to process than do those that are in use, and larger security descriptors take more time to process than do smaller ones. Overall the percent complete is a fairly accurate representation of the actual time required for that phase.
The duration of stage 2 varies because the amount of time required to process a directory is closely tied to the number of files or subdirectories listed in that directory. Because of this dependency, the percent complete indicator might not advance smoothly during stage 2, though the indicator continues to advance even for large directories. Therefore, do not use the percent complete as a reliable representation of the actual time remaining for this phase.
For more information, see Determining How Long Chkdsk Will Run later in this chapter.
Running Autochk When the Computer Restarts
Autochk.exe is a version of Chkdsk that runs only before Windows XP Professional starts. Autochk runs in the following situations:
Autochk runs if you try to run Chkdsk on the boot volume. Chkdsk cannot dismount the boot volume, so Chkdsk offers to run the repair process by using Autochk when the computer is restarted. If you press the Y key to schedule Autochk, you have 10 seconds after the computer restarts to press any key and cancel the repair process. If you cancel Autochk before the 10-second delay lapses, Autochk does not run the next time you restart the computer. If you want to run Chkdsk again, you can do so from the command line.
Autochk runs if Chkdsk cannot gain exclusive use of the volume. If Chkdsk cannot gain exclusive use of a volume when you run Chkdsk from the command line, Chkdsk offers to dismount the volume. If you press the Y key and Chkdsk still cannot dismount the volume, or if you press the N key, then Chkdsk offers to run the repair process by using Autochk when the computer is restarted. If you press the Y key to schedule Autochk, you have 10 seconds after the computer restarts to press any key and cancel the repair process. If you cancel Autochk before the 10-second delay lapses, Autochk does not run the next time you restart the computer. If you want to run Chkdsk again, you can do so from the command line.
Autochk runs if the volume is flagged as dirty. If the file system has flagged the volume as dirty, Autochk runs the repair process at startup. Volumes are flagged as dirty when the file system detects an error on the volume. If Autochk detects a dirty volume, it provides a 10-second delay and then begins the repair process. If you cancel Autochk when a volume is dirty, Autochk attempts to run again after a 10-second delay each time the computer is restarted.
You can use the Chkntfs.exe command-line tool to change the Autochk delay from 0 seconds to up to 3 days (259,200 seconds). However, a long delay means that the computer does not start until the time elapses or until you press a key to cancel Autochk.
If you choose to let Autochk run, you can review the Autochk report in the application log of the Event Viewer snap-in. Autochk information is logged by the Winlogon service, so look for entries with Winlogon listed as the source of the entry.
Note
You can use the fsutil dirty command to query and set the volume as dirty, but you must use the chkntfs command to exclude a dirty volume from being repaired by Autochk. For more information about using the fsutil dirty command, see Windows XP Professional Help.
Using Chkntfs to Prevent Autochk from Running
For heavily used computers that cannot be offline for the length of time required to complete the repair process, you can use the Chkntfs.exe command-line tool to exclude dirty volumes from being checked by Autochk. You can also use Chkntfs to cancel previously scheduled sessions of Autochk and to check the status of a volume.
For example, by typing chkntfs c: at the command prompt, you can find out:
Whether you manually scheduled Autochk to run on volume C the next time the computer is restarted.
Whether volume C is dirty, in which case Autochk runs automatically the next time the computer is restarted unless you manually run Chkdsk on volume C, cancel Autochk during the delay at startup, or exclude volume C by using the /x parameter.
Caution
If a volume is flagged as dirty, do not postpone running Chkdsk indefinitely. File system damage can become worse over time, so you must consider dirty volumes at risk until you run Chkdsk. Use Chkntfs only if you need to control when Chkdsk is run.
Chkntfs Syntax
The command-line syntax for Chkntfs is as follows:
Table 26-4 lists all Chkntfs command-line parameters. When using Chkntfs, you can specify only one parameter at a time.
For more information about the Chkntfs parameters, see Windows XP Professional Help. For more information about the registry changes that occur when you use Chkntfs, see article Q218461, Enhanced Chkdsk, Autochk, and Chkntfs Tools in Windows 2000. To find this article, see the Microsoft Knowledge Base link on the Web Resources page at http://www.microsoft.com/windows/reskits/webresources
Table 26-4: Chkntfs Parameters
Parameter
Description
volume [ ]
Specifies the volume that you want to check. You can specify the volume by using any of the formats in the following examples:
To run Chkntfs on the C volume, specify:
c:
To run Chkdsk on a mounted volume called data that is mounted on the C volume, specify:
c:\data
To run Chkntfs on a volume you can specify the symbolic link name for a volume, such as:
\\?\Volume{2d9bd2a8-5df8-11d2-bdaa-000000000000}
You can determine a symbolic link name for a volume by using the mountvol command. For more information about mountvol, see Windows XP Professional Help.
[/d]
Restores all Chkntfs default settings except the countdown time for Autochk. The /d parameter clears the list of volumes you excluded by using the /x parameter and also cancels any sessions of Autochk previously scheduled to take place when the computer restarts. After you use the /d parameter, Autochk runs on volumes that are flagged as dirty when the computer restarts.
[/t[:time]]
Changes the Autochk initiation countdown time to the specified amount of time entered in seconds. The default countdown time is 10 seconds. If you use the /t parameter without using :time, the countdown time that you last used is displayed.
[/x volume [ ]]
Excludes the specified volume from being checked when the computer starts. This parameter excludes only dirty volumes; Autochk still checks the volumes that you manually schedule.
[/c volume [ ]]
Schedules Autochk to run on the specified volumes if they are dirty when the computer starts, overriding any volumes excluded by the /x parameter.
Using the /x Parameter to Exclude Volumes
Use the /x parameter to prevent Autochk from running at startup on dirty volumes. Although it is not recommended that you use this parameter to postpone running Autochk indefinitely, you can use this parameter to prevent Autochk from running. For example, when you know the volume is dirty, you can use the /x parameter to postpone running Autochk until a period of low computer activity, such as overnight or during the weekend.
The /x parameter is not cumulative. Each time you use the /x parameter, you override the previous entry. For example, typing chkntfs e: /x, followed by chkntfs f: /x, excludes only the F volume from being checked.
To exclude multiple volumes, list them all in one command. For example, you can exclude both the E and F volumes by typing:
chkntfs e: f: /x
Note
You can configure physical disk resources in cluster disks so that Chkdsk is skipped when the system mounts the disk. You can also configure the system to mount the disk even if Chkdsk encounters errors. For more information about configuring Chkdsk to run on a cluster disk, see article Q223023, Enhanced Disk Resource Private Properties Using Cluster Server. To find this article, see the Microsoft Knowledge Base link on the Web Resource page at http://www.microsoft.com/windows/reskits/webresources
Using the /c Parameter to Run Autochk on Excluded Volumes
If you use Chkntfs to determine that an excluded volume is marked as dirty and if you want Autochk to run on the volume when the computer starts, use the /c parameter. The /c parameter overrides the /x parameter so that you can run Autochk on volumes that you previously excluded. After Autochk runs on the volume, the volume remains on the excluded list.
Note
You can also use the chkdsk /f or chkdsk /r command to check volumes that you previously excluded by using the chkntfs /x command. The chkntfs /c command runs Autochk only at startup and only if the volume is marked as dirty.
The /c parameter is cumulative. For example, you can specify multiple volumes by typing:
chkntfs c: /c
 chkntfs d: /c
 chkntfs e: /c
You can specify multiple volumes at the same time by typing:
chkntfs c: d: e: /c
Reducing the Time Required to Run Chkdsk on NTFS Volumes
NTFS is a journaling file system because it guarantees the consistency of the volume by using standard transaction logging and recovery techniques. If a disk becomes corrupted, NTFS runs a recovery procedure that accesses information stored in a transaction log file. The NTFS recovery procedure guarantees that the volume is restored to a consistent state. For this reason, it is unlikely that NTFS volumes might become corrupted.
Caution
NTFS does not guarantee the integrity of user data following an instance of disk corruption, even when a full Chkdsk is run immediately after corruption is detected. Chkdsk might not recover all files, and files that are recovered might be internally corrupted. Therefore, you must protect important data by performing periodic backups.
If file system errors do occur on an NTFS volume, you must run Chkdsk to repair the damage. The recommended procedure is to run chkdsk /f as soon as possible, but you can also run a shorter version of Chkdsk by using the /c and /i parameters. These parameters were designed for administrators who manage exceptionally large NTFS volumes and who require flexibility in managing the downtime that is incurred when Chkdsk is running.
Caution
Using the /c and /i parameters can result in a volume remaining corrupted after Chkdsk completes. Therefore, you must use these parameters only in situations where you need to keep system downtime to a minimum.
Table 26-5 provides a brief overview of each parameter and the potential reduction in Chkdsk duration. The actual reduction depends on a combination of factors, such as the ratio of files to directories and the relative speed of disk input/output (I/O) versus CPU speed, making the completion time difficult to predict.
Table 26-5: Overview of the /c and /i Chkdsk Parameters
Parameter
What It Does
Potential Reduction in Chkdsk Duration
/c
Skips the process that detects cycles in the directory structure.
1 to 2 percent
/i
Skips the process that compares directory entries to the file record segments that correspond to those entries.
50 to 70 percent
Using the /c Parameter
Use the /c parameter to skip the process that detects cycles in the directory structure. Cycles are a rare form of corruption in which a subdirectory has itself as a parent. Although you can speed up the Chkdsk process by using the /c parameter, using the /c parameter can also leave directory loops on an NTFS volume. Such loops might be inaccessible from the rest of the directory tree and could result in orphaned files. Files can become orphaned when file record segments remain but are not referenced by any directory entry. The file represented by the file record segment might be intact in all ways except that the file is invisible to all programs, including backup programs.
Using the /i Parameter
Use the /i parameter to skip the process that compares directory entries to the file record segments that correspond to those entries. A file record segment in the master file table (MFT) uniquely identifies every file and directory in an NTFS volume. When you use the /i parameter, the directory entries are checked to verify that they are self-consistent, but the directory entries are not necessarily consistent with the data stored in their corresponding file record segments.
When you use the /i parameter, files can become orphaned if directory entries remain, but the directory entries refer to incorrect file record segments. In this case, the files exist, but programs encounter errors when attempting to access them.
For more information about using the /i and /c parameters, see article Q187941, An Explanation of CHKDSK and the New /C and /I Switches. To find this article, see the Microsoft Knowledge Base link on the Web Resource page at http://www.microsoft.com/windows/reskits/webresources
Running Chkdsk on Mission-Critical Computers
If you use the Chkntfs or Fsutil command-line tool and discover that a volume in a mission-critical computer is flagged as dirty, you must choose among the following three choices:
Do nothing.
For a mission-critical computer that is expected to be online 24 hours a day, doing nothing might be a necessary choice. The drawback to this option is that relatively minor corruption can become major corruption if you do not repair the volume as soon as possible after you detect the corruption. Therefore, consider this option only if keeping a system online is more important than the integrity of the data stored on the corrupted volume. You must consider all data on the corrupted volume at risk until you run Chkdsk.
Run a full Chkdsk.
This option repairs all file system data, restoring all user data that can be recovered by means of an automated process. The drawback is that a full Chkdsk might require several hours of downtime for a mission-critical computer at an inopportune time.
Run an abbreviated Chkdsk by using a combination of the /c and /i parameters.
This option repairs minor corruption that can become major corruption in much less time than a full Chkdsk requires, but might not repair all corruption. A full Chkdsk is required to guarantee that all the data that can be recovered has been recovered.
Determining How Long Chkdsk Will Run
The best way to predict how long Chkdsk will take to run on a given volume is to perform a trial run in read-only mode during a period of low system usage. However, you must use caution when using read-only mode to estimate run time because of the following reasons:
Chkdsk might fail in read-only mode or might report false errors.
The read-only Chkdsk process involves three phases. If Chkdsk encounters errors in the early phases, Chkdsk might abort before it completes all three phases. In addition, Chkdsk is prone to falsely reporting errors when in read-only mode and might report that a volume is corrupted even when no corruption is present. For example, Chkdsk might report corruption if NTFS modifies an area of the disk on behalf of a program at the same time Chkdsk is examining the same area. To verify a volume correctly, the volume must be in a static state, and the only way to guarantee that state is to lock the volume. Chkdsk locks the volume only when you specify the /f, /r, or /x parameters. Thus, you might need to run Chkdsk more than once for Chkdsk to complete all stages in read-only mode.
System load can influence the time required to run Chkdsk.
Chkdsk is both CPU intensive and disk intensive. If heavy disk I/O or high CPU usage is occurring when you run Chkdsk in read-only mode, the time required to complete the process increases.
Chkdsk and Autochk do not take the same time to complete.
Chkdsk runs while Windows XP Professional is running, and Autochk runs before Windows XP Professional loads. Although running Autochk at startup gives exclusive use of CPU and disk I/O resources to Chkdsk, it also deprives Autochk of the benefit of virtual memory. Thus, while Autochk usually runs faster than Chkdsk, systems with relatively low amounts of RAM might see longer times for Autochk than for Chkdsk.
Repairing corruption lengthens the Chkdsk process.
The read-only Chkdsk process can complete only if no significant corruption is found. If a disk suffers only minor corruption, the time to fix the problems is only slightly longer than the time required for read-only Chkdsk. However, if the volume has major corruption, the time required to run Chkdsk can increase in proportion to the number of files damaged.
Recovering Lost Clusters on FAT Volumes
Because some repairs on FAT volumes, such as correcting lost clusters (also known as allocation units) or cross-linked files, change the volume s file allocation table and can cause data loss, Chkdsk first prompts you with a confirmation message similar to the following:
10 lost allocation units found in 3 chains.
Convert lost chains to files? (Y/N)
If you press the N key, Windows XP Professional fixes the errors on the volume but does not save the contents of the lost clusters.
If you press the Y key, Windows XP Professional attempts to identify the folder to which they belong. If the folder is identified, the lost cluster chains are saved as files.
If Windows XP Professional cannot identify the folder or if the folder does not exist, it saves each chain of lost clusters in a folder called Found.xxx, where xxx is a sequential number starting with 000. If no folder Found.000 exists, one is created at the root. If one or more sequential folders called Found.xxx (starting at 000) exist, a folder that uses the next number in the sequence is created.
Windows XP Professional creates Found.xxx folders as hidden system folders. To see a list of Found.xxx folders, at the root folder in the command prompt, type dir /a. For information about viewing hidden system folders in My Computer or Windows Explorer, see Windows XP Professional Help.
After the storage folder has been identified or created, one or more files with a name in the format Filennnn.chk are saved. (The first saved file is named File0000.chk, the second is named File0001.chk, and so on in sequence.) When Chkdsk finishes, you can examine the contents of these files with a text editor such as Notepad to see whether they contain any needed data (if the converted chains came from corrupted binary files, they are of no value). You can delete the .chk files after you save any useful data.
Caution
Because other programs might create and use files with the .chk extension, you must be careful to delete only the .chk files that are in the Found.xxx folders.
Running Chkdsk from My Computer or Windows Explorer
In addition to using the command-line version of Chkdsk, you can run Chkdsk from My Computer or Windows Explorer. The graphical version of Chkdsk offers the equivalent of read-only mode, the /f parameter, and the /r parameter.
If Chkdsk cannot lock the volume, you can schedule Autochk to run the next time you restart the computer. You cannot choose to dismount the volume like you can when you use the command-line version of Chkdsk, nor can you use other Chkdsk parameters, such as /c or /i. To take advantage of all the Chkdsk parameters, use the command-line version of Chkdsk.
To run Chkdsk from My Computer or Windows Explorer
In My Computer or Windows Explorer, right-click the volume you want to check, and then click Properties.
On the Tools tab, click Check Now.
Do one of the following:
To run Chkdsk in read-only mode, click Start.
To run Chkdsk by using the /f parameter, select the Automatically fix file system errors check box, and then click Start.
To run Chkdsk by using the /r parameter, select the Scan for and attempt recovery of bad sectors check box, and then click Start.
Disk Defragmenter
Fragmentation causes your disk subsystem to perform more seeks, which slows the transfer rate and results in sluggish disk performance. Defragmenting is occasionally necessary because of the way files are stored on disk. Fragmentation can occur when:
You create a file, but the volume does not have a group of contiguous, free clusters that is large enough to contain the entire file. Therefore, the file is broken into fragments rather than residing in contiguous clusters on the disk.
You edit a file so that it outgrows its existing space on the disk. When a file uses all the clusters in a group of contiguous, free clusters, the file is then broken into fragments that are stored in free clusters elsewhere on the disk.
Although FAT and NTFS are designed to make storage faster and more efficient when you save files, these file systems take longer to read and write fragmented files than unfragmented files. When the files on a disk become badly fragmented, performance noticeably suffers because the disk heads must move to different tracks on the disk to locate all the clusters of the file.
Defragmentation tools fix this problem by moving the files into contiguous clusters on the disk. Reducing fragmentation reduces the amount of mechanical movement required to locate all clusters of a file, which improves hard disk performance.
Windows XP Professional provides two methods for defragmenting FAT and NTFS volumes:
The Disk Defragmenter snap-in (Dfrg.msc).
The new Disk Defragmenter command-line tool (Defrag.exe).
Both tools rearrange files, folders, programs, and unused space on your computer s hard disk to optimize disk performance. In addition, the defragmentation tools are improved in Windows XP Professional so that you can:
Defragment volumes that use any cluster size.
Defragment files that are smaller than 16 clusters.
Defragment the master file table (MFT).
The amount of time that the defragmentation process takes depends on several factors, including the size of the volume, the number and size of files on the volume, the amount of fragmentation, and how busy the system is during defragmentation.
Before Using the Disk Defragmentation Tools
When you use the disk defragmentation tools, keep the following restrictions in mind:
You can defragment only local volumes, and you can defragment only one volume at a time.
You must be logged on as an administrator or as a member of the Administrators group to defragment volumes.
You cannot use the Disk Defragmenter command-line tool (Defrag.exe) while the Disk Defragmenter snap-in is open.
You cannot defragment volumes that are marked as dirty by the file system. You must run Chkdsk on the dirty volume before you can defragment it. To determine if a volume is dirty, use the fsutil dirty query command. For more information about running Chkdsk, see Chkdsk earlier in this chapter.
In addition, to obtain best results when you use the disk defragmentation tools, follow these guidelines:
Ensure you have at least 15 percent free disk space when you defragment a volume. Windows XP Professional uses the free disk space as a sorting area for file fragments.
Although the defragmentation tools can partially defragment volumes that have less than 15 percent free space, for best results delete unneeded files or move them to another volume to increase the free space to at least 15 percent. You can also use the Disk Cleanup tool to delete unnecessary files. For more information about Disk Cleanup, see Windows XP Professional Help.
Do not run Backup (either a manual or a scheduled start) at the same time that you run the defragmentation tools because using Backup causes the defragmentation process to pause.
The Backup program included with Windows XP Professional uses volume snapshots to allow users or applications to continue working while a backup occurs. The defragmentation process resumes after Backup removes the volume snapshot. For more information about volume snapshots, see Backup and Restore in this book.
Running the Disk Defragmenter Snap-in
By using the Disk Defragmenter snap-in, you can analyze the volume before you defragment to see how many fragmented files and folders exist. If 10 percent or more of the files and folders are fragmented, Disk Defragmenter recommends that you defragment the volume. If the volume is less than 10 percent fragmented, you can still defragment the volume or you can simply view the fragmentation report.
To open the Disk Defragmenter snap-in
Click Start, click Run, type dfrg.msc, and then click OK.
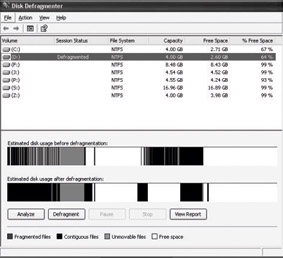
Figure 26-2 shows that the Disk Defragmenter snap-in is divided into two main areas. The upper part lists the volumes on the local computer and allows you to select a volume to analyze and defragment. The lower part displays a graphical representation of how fragmented the volume is. The colors indicate the condition of the volume:
Red areas show fragmented files.
Blue areas show contiguous (unfragmented) files.
White areas show free space on the volume. White areas on an NTFS volume might also represent the MFT zone. For more information about the MFT zone, see File Systems in this book.
Green areas show files that cannot be moved. The green areas usually represent the paging file, but on NTFS volumes, green areas might also represent space used by the NTFS change journal and the NTFS log file.
Figure 26-2: The Disk Defragmenter snap-in
By comparing the Estimated disk usage before defragmentation band to the Estimated disk usage after defragmentation band, you can see the improvement in your volume after defragmenting. The defragmentation report provides further details on the fragmentation state of the volume. Analyze volumes regularly and defragment them when Disk Defragmenter recommends it.
Defragmenting Volumes by Using the Defrag Command
The Disk Defragmenter command-line tool and the Disk Defragmenter snap-in both defragment volumes by using the same method. However, the command-line tool differs from the snap-in in the following ways:
The command does not provide a graphical analysis of a volume s fragmentation status, but it does provide a summary.
The command does not provide a status indicator.
To see a list of parameters for Defrag.exe, at the command prompt, type:
defrag /?
To defragment a volume, specify the drive letter. For example, to defragment the C volume, type:
defrag c:
To defragment the C volume and view a detailed report that is similar to the report shown in the Disk Management snap-in, type:
defrag c -v
To analyze the C volume and view a detailed analysis report, type:
defrag c: -a -v
While the command-line Disk Defragmenter is analyzing and defragmenting a volume, it displays a blinking cursor. When Disk Defragmenter finishes analyzing a volume, it displays the analysis report. When Disk Defragmenter finishes defragmenting a volume, it displays the defragmentation report. After the process completes, Disk Defragmenter exits to the command prompt.
To interrupt the defragmentation process, at the command line, press CTRL+C.
For more information about using Defrag.exe, see Windows XP Professional Help.
Tips for Using the Disk Defragmentation Tools
For best results when defragmenting volumes, follow these tips:
Before defragmenting a volume, delete any unnecessary files, such as temporary files. You can delete unnecessary files by using Disk Cleanup. For more information about Disk Cleanup, see Windows XP Professional Help.
Defragment a volume before you add a large number of files to the volume, such as before you install programs. This ensures that the files occupy contiguous space and do not become fragmented after you add them.
Defragment a volume after you delete a large number of files from the volume.
Defragment a volume after you install programs on it.
Defragment the system and boot volumes after installing Windows XP Professional.
Defragment volumes during periods of low system activity.
Optimizing Startup Times by Using Defragmentation Tools
Windows XP Professional monitors the files that are used when the computer starts and when you start applications. By monitoring these files, Windows XP Professional can prefetch them. Prefetching data is the process whereby data that is expected to be requested is read ahead into the cache. Prefetching boot files and applications decreases the time needed to start Windows XP Professional and start applications.
Prefetching is further improved if the files are located next to each other on the outer edge of the disk. Windows XP Professional optimizes the location of boot files and applications when the computer is idle. The optimization occurs in the background and lasts only a minute or two; you might hear the hard disk being accessed when optimization occurs. After the initial optimization takes place, subsequent optimization occurs, at most, every three days.
When you run the Disk Defragmenter tools that are included with Windows XP Professional, they can perform any optimization updates that are scheduled to take place during the next idle period. The Disk Defragmenter tools do not disturb the existing layout of optimized boot files and applications.
Note
Computers running Windows XP Home Edition also prefetch and optimize boot files and applications.
Files That You Cannot Defragment
After you defragment a volume, you can view the defragmentation report to see the results. The report includes a list of files that remain fragmented (having two or more fragments). Some reasons that a file might remain fragmented include:
The volume lacks adequate contiguous free space to defragment all files. Disk Defragmenter requires at least 15 percent free disk space to completely defragment a volume.
During defragmentation, a new file is created on the volume in disk space that was previously free space. In this case, if Disk Defragmenter tries to move a file to that space to defragment the file, the move fails and the file remains fragmented.
The file is the master file table (MFT) on an NTFS volume. Because the first fragment of the MFT cannot be moved, the MFT is typically contained within two fragments when sufficient space is available on the volume. If the MFT is contained within three or more fragments, Disk Defragmenter looks for free space where the MFT might fit. If sufficient free space exists, the MFT is moved as a whole (minus the first fragment). If space is not available, the MFT is not defragmented.
The file is permanently excluded, in which case it might appear in the defragmentation report as still being fragmented no matter how many times you defragment the volume. The following files are permanently excluded from being defragmented.
Bootsect.dos
Safeboot.fs
Safeboot.csv
Safeboot.rsv
Hiberfil.sys
Memory.dmp
Paging file
The paging file is a hidden file on the hard disk that Windows XP Professional uses to hold parts of programs and data files that do not fit in memory. (The paging file and physical memory make up virtual memory.) In Windows 2000, the size of the paging file was conservative and often needed to be increased, which caused the paging file to become fragmented. Because Windows XP Professional creates a larger paging file than the default size used in Windows 2000, it is unlikely that your paging file will become fragmented.
You can determine whether the paging file is fragmented by analyzing the volume that contains the paging file and then viewing the analysis report. The report shows the size of the paging file and the number of fragments. You cannot use Disk Defragmenter to defragment the paging file because Windows XP Professional holds the paging file open for exclusive use. However, you can reduce the degree of fragmentation by deleting and then re-creating the paging file. You must have at least two volumes to perform this procedure.
To defragment the paging file
From the Start menu, click Control Panel, click Performance and Maintenance, and then click System.
On the Advanced tab, under Performance, click Settings.
On the Advanced tab, click Change to open the Virtual Memory dialog box.
In the list of drives, select a volume to store a temporary paging file.
Click Custom size, type an initial and maximum size to match the current paging file, and then click Set.
Select the original paging file in the drive list, reduce the minimum and maximum size of the original paging file to 0 MB, and then click Set.
Restart your computer to have the system use the new paging file.
Run Disk Defragmenter on the original volume to consolidate the free space segments created by moving the paging file.
Re-create the paging file on the original volume.
Reduce the minimum and maximum size of the temporary paging file to 0 MB.
Restart your computer.
Recovery Console
The Recovery Console is a text-mode command-line interpreter that you can use for basic troubleshooting and system maintenance. You can run the Recovery Console directly from the Windows XP operating system CD, or for x86-based systems install it as a startup option. The Recovery Console is separate from the Windows XP Professional command prompt and grants limited local hard disk access for both NTFS and FAT volumes.
Because starting the Windows XP Professional graphical user interface (GUI) is not a prerequisite for using the Recovery Console, it can help you recover a Windows XP Professional-based computer that cannot start in safe mode or normal mode. For example, if the computer does not start because the master boot record (MBR) or boot sector is corrupted, you can use the Recovery Console to repair the MBR or boot sector.
Note
Certain Recovery Console commands are not fully functional on dynamic disks or GPT disks.
For more information about using the Recovery Console to repair MBR and boot sector errors, see Repairing Damaged MBRs and Boot Sectors in x86-based Computers later in this chapter.
For more information about installing and using Recovery Console, see Tools for Troubleshooting in this book.
Automated System Recovery
If changes to the operating system cause instability or startup problems, you can use the Automated System Recovery (ASR) tool to restore the system state and all files stored on the system volume. The term system state refers to all the components that determine the current state of the operating system, including:
User account information, hard disk configuration, and registry information that includes application, hardware, network, video, and software settings.
Operating system files that are required to start the system, including those in the systemroot directory and boot files such as Ntldr or IA64ldr.efi.
ASR is a last resort option to use after you have unsuccessfully tried other recovery methods, such as rolling back drivers, restoring from backups, performing parallel installations, and using System Restore. ASR restores system state files and settings, and restores your ability to start your system. For example, hard disk corruption might prevent you from starting Windows XP Professional, and the damage might be serious enough to prevent you from using safe mode, Recovery Console, or the Last Known Good Configuration. ASR automates the process of backing up and restoring system state information and files that are needed on the system volume to start Windows XP Professional.
ASR is accessible through the Windows XP Professional Backup application NTBackup.exe and through other programs created by independent software vendors (ISVs). ASR replaces the Emergency Repair Disk option found in Windows 2000 and Windows NT 4.0. For more information about using ASR and other recovery tools, see Backup and Restore in this book.
DiskProbe
DiskProbe is a sector editor tool for Windows XP Professional that allows users who are members of the Administrators group to directly edit, save, and copy data on a physical hard disk. With careful use of DiskProbe, you can replace the master boot record (MBR), repair damaged partition table information, and repair or replace damaged boot sectors or other file system data. You can also use DiskProbe to save MBRs and boot sectors as backup binary files in case the original sectors become damaged by viruses, human error, hardware problems, power outages, or similar events. Unless you are familiar with using DiskProbe, try other troubleshooting tools, such as Recovery Console, before using DiskProbe.
Caution
Be cautious when making any changes to the structures of your hard disk. Because DiskProbe does not validate the proposed changes to records, incorrect values in key data structures can render the hard disk inaccessible or prevent the operating system from starting. If you cannot correct the changes you entered, you must re-create and reformat all volumes on the disk.
DiskProbe can change the values of individual bytes in any sector on a dynamic disk, but it cannot navigate the structure of a dynamic disk. Therefore, it is recommended that you use DiskProbe only on basic disks. You can, however, use DiskProbe to back up and restore the boot sector and MBR of dynamic disks.
DiskProbe is part of Windows Support Tools. For more information about DiskProbe, click Tools in Help and Support Center, and then click Windows Support Tools.
Caution
Do not use DiskProbe on GPT disks in Itanium-based computers. Structures on GPT disks are self-repairing. Making direct changes to GPT structures could cause the partition table checksums to become invalid, rendering the disk inaccessible. For more information about GPT disks, see Disk Sectors on GPT Disks later in this chapter.
Dmdiag
Dmdiag.exe is a command-line tool that displays the location and layout of dynamic disks (MBR and GPT) and dynamic volumes. This information is primarily useful if you are working with Microsoft Product Support Services to troubleshoot problems with dynamic disks and volumes.
Dmdiag.exe is part of Windows Support Tools and can be run from the command line by using the following syntax:
dmdiag [-f filename] [-v] [/?]
When used without parameters, Dmdiag.exe displays information about the dynamic disks and volumes installed on the computer. Table 26-6 describes the Dmdiag.exe parameters.
Table 26-6: Dmdiag.exe Parameters
Parameter
Description
-f filename
Specifies the name of the file that stores the output. If you do not specify an output file, the file is saved as Dmdiag.txt in the same folder where you run Dmdiag.exe. If you do not specify the -f parameter, the output is displayed at the command prompt.
-v
Runs Dmdiag in verbose mode, which contains additional information about dynamic disks and volumes. Use this mode to obtain a report that product support can use to help you troubleshoot dynamic disks and volumes.
/?
Displays a Help screen with usage syntax.
For more information about Dmdiag.exe, click Tools in Help and Support Center, and then click Windows Support Tools.