Adding Signatures to Messages
|
| < Day Day Up > |
|
Microsoft Office Specialist By using a signature, you can personalize your messages and save time. A signature is a predefined block of text that can be inserted, manually or automatically, at the end of your messages. Signatures can include any text you like, but they typically include your name, title, and company name. Signatures can be formatted in the same ways that message text can be formatted.
New in Office 2003—Unique signature per account In Outlook 2003, you can create a variety of signatures and assign a different signature to each of your Outlook accounts. If you like, you can create multiple signatures for different uses, such as formal business e-mail, casual business e-mail, and personal e-mail.
In this exercise, you will create a signature, and then instruct Outlook to insert the signature in all the new messages you create.
OPEN the practice file Inbox folder or your own Inbox.
-
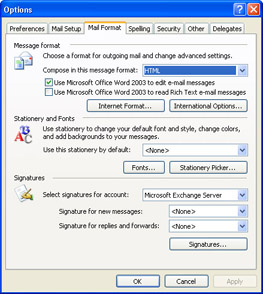
On the Tools menu, click Options.
The Options dialog box appears.
-
Click the Mail Format tab, and then click the Signatures button.
The Create Signature dialog box appears.
-
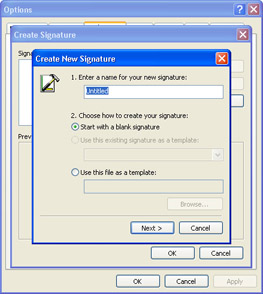
Click the New button.
The Create New Signature dialog box appears.
-
Type Professional as the name of your signature, and then click the Next button.
The Edit Signature dialog box appears.
-
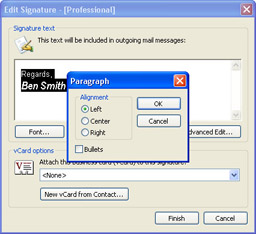
In the Signature text box, type Regards and a comma, press the [ENTER] key, and then type your name.
-
Select your name, and then click the Font button.
The Font dialog box appears.

-
Change the font to Arial Narrow, the style to Bold Italic, and the size to 14.
The text shown in the Sample area reflects your changes.
-
Click OK.
-
Select both lines of text, and click the Paragraph button.
The Paragraph dialog box appears.
-
Click Center, and then click OK.
-
Make any other changes you want, and then click Finish.
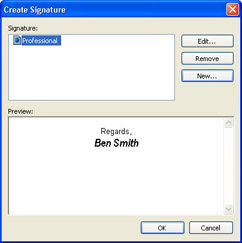
Your newly created signature is now available in the Create Signature dialog box.
-
Click OK.
The Options dialog box appears. Note that the signature you just created is selected in the “Signature for new messages” list, and your default account is selected in the “Select signatures for account” list. Outlook will insert your signature into all new e-mail messages you send from this account.
Tip If you have more than one e-mail account set up in Outlook, you can use a different signature with each account. Follow the steps to create a new signature; then on the Mail Format tab of the Options dialog box, select the alternate account in the “Select signatures for account” list, select the signature you want to use with that account in the “Signature for new messages” list, and click Apply.
-
Click OK.
The Options dialog box closes.
-
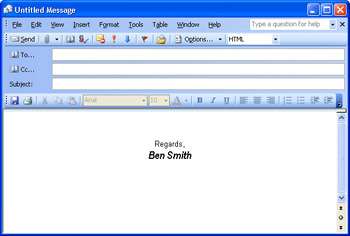
On the toolbar, click the New Mail Message button.
A new message, containing your new signature, appears in the Message form.
-
Close the message.
Tip To automatically insert your signature into forwarded messages and replies, on the Tools menu, click Options, and then click the Mail Format tab. Select the account in the “Select signatures for account” list, click the signature you want in the “Signature for replies and forwards” list, and click OK.
-
On the Tools menu, click Options, and then click the Mail Format tab.
-
In the Signature for new messages list, click <None>, and then click OK.
New messages will now appear without a signature.
BE SURE TO delete the Professional signature file if you don’t want to keep it.
|
| < Day Day Up > |
|
EAN: 2147483647
Pages: 116
- Enterprise Application Integration: New Solutions for a Solved Problem or a Challenging Research Field?
- The Effects of an Enterprise Resource Planning System (ERP) Implementation on Job Characteristics – A Study using the Hackman and Oldham Job Characteristics Model
- Intrinsic and Contextual Data Quality: The Effect of Media and Personal Involvement
- A Hybrid Clustering Technique to Improve Patient Data Quality
- Development of Interactive Web Sites to Enhance Police/Community Relations