Lesson 2: Inserting Objects
Lesson 2: Inserting Objects
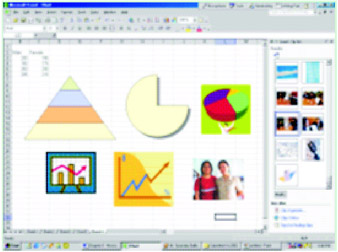
Aside from charts, you can also insert pictures, word art, organizational charts, and other items on your worksheet or chart sheets.
To insert pictures or clipart on your worksheet, do the following:
-
Do any of the following:
-
On the Insert menu, point to Pictures, then click Clipart. The Insert Clipart task pane appears.
-
From the Drawing toolbar, click the
 Insert Clipart button.
-
-
In the Search text text box, type the clipart you want to search, then click Search.
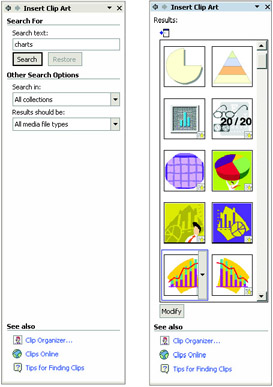
After clicking Search, the task pane will display all clipart that refers to the one you have searched.
-
Click any clipart on the list and it will automatically appear on the worksheet.
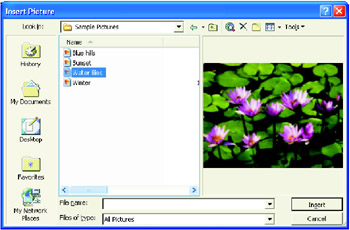
You can also insert pictures from the file.
-
Do any of the following:
-
Click Insert, point to Pictures, then click From File.
-
Click Insert Picture
 button from the Drawing toolbar. The Insert Picture dialog box appears.
-
-
Look for the picture you want to insert and then click Insert.
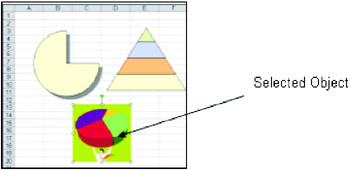
Move an Object
You can move the inserted clipart or picture by doing any of the following:
-
Click on the object and drag it to the desired location.
-
Cut the object, select a new location, and then click paste.
Delete an Object
To remove an object from your worksheet, do the following:
-
Select the object you want to delete.
-
From the Edit menu, click Delete or press Delete on the keyboard.
If you want to delete all objects in your worksheet, do the following:
-
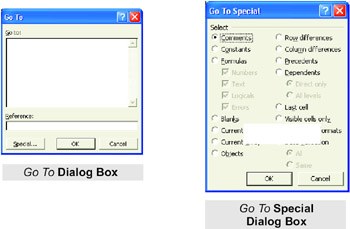
On the Edit menu, click Go To or press Ctrl+G or F5. The Go To dialog box appears.
-
Click the Special button. The Go To Special dialog box appears.
-
Click Objects from the selection, and then choose OK.
-
Notice that all objects on your worksheet are selected.
Note You can also use the Select Object
 button under the drawing toolbar to select all the objects.
-
From the Edit menu, click Delete or press Delete on the keyboard
Resizing Objects
There are times that you want to change the size of the objects on your worksheet. To do this, follow the steps below:
-
Select the object you want to resize.
-
Position the mouse pointer to the border of the object until it changes its shape.
-
Drag the pointer until the object reaches the desired size. Notice that a broken-dashed line surrounds the objects. While you drag the pointer it changes its size.
Create and Modify Lines and Objects
In addition to clipart and pictures, you can also draw lines and shapes on your worksheet or chart.
To draw lines or shapes, do the following:
-
If the Drawing toolbar is not displayed, click the Drawing
 button in the Standard toolbar. Remember, this button can be toggled on or off.
 -
Choose the following tools in the Drawing toolbar:
![]()
![]()
Line - draws a line
![]()
Arrow - drag the arrow from tail to head
![]()
Rectangle - used to draw a rectangle. To create a square, hold down shift key as you drag a square.
![]()
Ellipse - used to create ellipse. To create a circle, hold down Shift key as you drag a circle.
![]()
Text Box - used to insert text in a movable box.
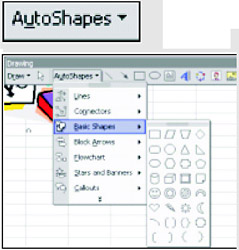
AutoShapes - click the drop-down arrow to choose a category you want. Drag to draw the shape.
You can change the style of the selected shape by applying any of the following options below. But before that, you have to make sure that the objects are selected.
![]()
Fill with Color - used to add color to your shape.

Clicking on the drop-down arrow beside the Fill with Color button allows you to choose any color from the Fill Color box.
![]()
Line Color - used to change the color of your line.
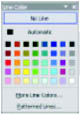
Clicking on the drop-down arrow beside the Line Color button allows you to choose any color from the Line Color box.
![]() Font Color - allows you to change the color of your font.
Font Color - allows you to change the color of your font.
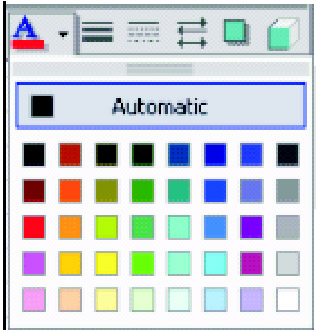
Clicking on the drop-down arrow beside the Font Color button allows you to choose any color from the Font Color box.
![]()
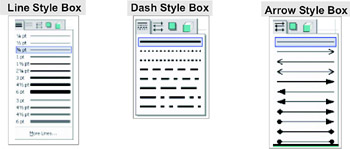
Line Style - Click to select a thickness for a line or border.
![]()
Dash Style - Click to select a pattern for a line or border.
![]()
Arrow Style - Click to select different arrow style, one or two arrows for lines and arrows.
![]()
Shadow - Click to add a shadow to an object and direction for the shadows.
![]()
3-D - Click to turn the object into 3-D and choose direction of the third dimension.

Modifying Lines and Objects
After creating lines and objects, you can make changes by doing any of the following:
-
Drag the four-headed arrow to move the shape to the desired location.
-
Drag the handle pointing to the shape to change its size.
-
Press Delete to remove the objects.
-
Use the buttons on the drawing toolbar that allows you to change the styles of the lines and objects.
Whiz Words
| Object | Clipart | Picture | Task Pane |
| Shadow | 3-D | Arrow | AutoShapes |
Lesson Summary
You can insert objects on your worksheet using the clipart or pictures from file. To move, delete, or resize an object you have to select it first.
You can also insert lines and shapes using the Drawing toolbar. If the Drawing toolbar is not visible, click on the Drawing button in the Standard toolbar. You can toggle this button on and off.
You can make changes to your drawing by applying different styles using the Drawing toolbar.
Study Help
Directions: Identify the following:
-
___1. This bar allows you to create lines and shapes and make changes to it.
-
___2. It is used to change the color of your line.
-
___3. It is used to add color to your shapes.
-
___4. A button that allows you to select the thickness for lines and borders.
-
___5. You can click this button to add shadow to your drawing.
-
___6. This button allows you to change the color of your font.
-
___7. This button allows you to put arrow head to your line.
-
___8. This button allows you to create a circle with the help of the Shift key.
-
___9. This button allows you to create a square with the help of the Shift key.
-
___10. Click this button to add a shadow to an object and direction for the shadows.
-
Open a new workbook.
-
Insert the clipart named computer.
-
Change the size of the object to 300 X 300. See the scale on the Name Box.
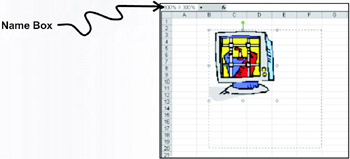
-
Insert the following lines and shapes.
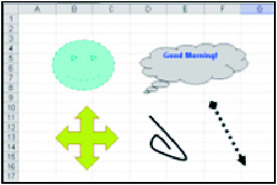
-
Modify these objects, to come with the illustration above.
-
Save your work as Objects.xls at Excel-Activities folder.