Deploying a Site-to-Site Connection
After you make all the necessary design decisions, you can deploy a remote site connection for your organization. The flowchart in Figure 10.9 shows the tasks that can help you to successfully deploy a site-to-site connection.
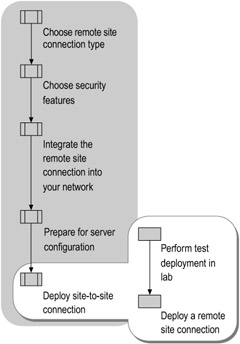
Figure 10.9: Deploying a Site-to-Site Connection
If you want to try a test deployment to prepare for your production deployment, see "Perform a Test Deployment in Your Lab" later in this chapter. If you are ready to connect two sites in your production environment now, see "Deploy a Remote Site Connection" later in this chapter.
Perform a Test Deployment in Your Lab
By reading the design sections earlier in this chapter, you can develop a good idea about which remote site connectivity features are appropriate for your organization. However, before you deploy any technology in your production network, it is a good practice to perform a test deployment in a lab first. Testing in a lab familiarizes you with how the technology works and gives you the opportunity to experiment with different features when alternatives are available.
When testing how to deploy a remote site connection, evaluate the following key issues in a lab setting before deciding how to deploy the technology in your production environment:
-
Whether to deploy a dial-up connection, a PPTP VPN, or an L2TP/IPSec VPN.
-
Whether to deploy an on-demand connection or a persistent connection.
-
Whether to deploy a one-way initiated connection or a two-way initiated connection.
-
If you plan to deploy a VPN connection, what type of perimeter network you want to use.
-
Whether to use certificate-based EAP-TLS or password-based MS-CHAP v2 for user-level authentication.
-
If you plan to deploy an L2TP/IPSec VPN connection (the only connection type that offers computer-level authentication), whether to use computer certificates or preshared keys.
-
Whether the encryption method, such as a dial-up or PPTP VPN connection using MPPE encryption or an L2TP/IPSec VPN using IPSec for encryption, influences your decision about which connection type to use.
-
Whether to use an Active Directory account (and join your routers to the Active Directory domain) or use a local account for your router user accounts.
-
Which dial-up options to set in the router user account.
-
Whether to use a default remote access policy, a common policy, or a custom policy.
-
Which static IP addresses and which static routes are needed.
-
Which routing protocol or protocols are needed.
-
Whether your demand-dial routers will support Internet traffic.
-
Whether to enable multicast connectivity between your sites.
-
Whether to deploy a DHCP server in each site.
-
Whether to deploy a domain controller in each site.
For a tool to assist you in evaluating some of the remote connectivity features presented in this list, see "Example: Contoso Connects Remote Sites" (DNSREM_1.doc) on the Windows Server 2003 Deployment Kit companion CD (or see "Example: Contoso Connects Remote Sites" on the Web at http://www.microsoft.com/reskit). This job aid shows you how to deploy a PPTP VPN and a dial-up connection in a lab environment.
For additional test lab deployment examples, including information about deployments that include certificates and L2TP/VPN connections, see "Routing scenarios" and "Virtual private network implementation examples" in Help and Support Center for Windows Server 2003.
Deploy a Remote Site Connection
To connect remote sites using a site-to-site link, you must decide which of the design options described earlier in this chapter you want to deploy. Use the "Choose Optional Tasks You Need" column in Figure 10.10 to mark which optional tasks you will perform for your deployment.
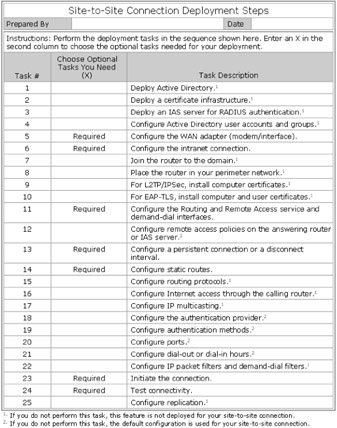
Figure 10.10: Deployment Tasks for a Site-to-Site Connection Worksheet
For a copy of Figure 10.10 that you can use to record which deployment options you need for your site-to-site deployment, see "Site-to-Site Connection Deployment Steps" (DNSREM_2.doc) on the Windows Server 2003 Deployment Kit companion CD (or see "Site-to-Site Connection Deployment Steps" at http://www.microsoft.com/reskit). You can also use this worksheet as a guide for the sequence in which you must perform the tasks.
Deploy Active Directory
How you manage Active Directory and domain controllers in a branch office varies depending on the size, complexity, and structure of your overall network. If you do not plan to deploy a domain controller in the branch office location, Microsoft recommends that you establish a persistent connection between the two sites. If you do plan to locate a domain controller in the remote site with which you want to establish a site-to-site connection, you must place it in a subnet separate from the computers at the main site and create a separate Active Directory site for the branch office subnet.
-
To deploy a domain controller for a new branch office site
Note This procedure assumes that both sites belong to the same Active Directory domain.
-
Install the Windows Server 2003 operating system on a computer at the main office, promote it to a domain controller, and then confirm that it successfully replicates with the existing domain controllers.
-
Log on as a member of either the Domain Administrators or Enterprise Administrators security group of the forest root domain, open Active Directory Sites and Services, right-click Sites, select New Site, type a name for the new branch office site, and then, under Link Name, select the appropriate site link (such as DEFAULTIPSITELTNK).
-
Right-click the server object of the new branch office domain controller from its current location (which might be under Default-First-Site-Name), click Move, and then, in the Move Server dialog box, click the new site that you just created.
-
Right-click Subnets, click New, and then click Subnet to create a new child for the new remote site, providing the appropriate network ID and subnet mask.
Note If, until now, your domain has had only one site, you must create two child objects under Subnets — one for the main office site and one for the branch office site, each with its own network ID and subnet mask.
-
If necessary to optimize network performance, make the domain controller a global catalog.
-
Ship the new domain controller to the remote site.
-
Install a LAN adapter connected to the branch office intranet, and then, on the LAN adapter's Internet Protocol (TCP/IP) Properties page, configure an IP address, subnet mask, and gateway appropriate for the branch office subnet.
-
The domain controllers in the main and branch offices cannot replicate yet, because the demand-dial connection does not exist yet. For information about how to configure replication after a connection exists, see "Configure Replication" later in this chapter.
Deploy a Certificate Infrastructure
If you plan to use EAP-TLS as your authentication protocol for user-level authentication on a dial-up, PPTP VPN, or L2TP/IPSec VPN connection, or if you plan to use L2TP/IPSec with computer certificates for your VPN connection, or if you plan to do both, you must have a certificate infrastructure in place in your network.
For information about creating a certificate infrastructure, see "Certificate Services" in Help and Support Center for Windows Server 2003, and see "Designing a Public Key Infrastructure" in Designing and Deploying Directory and Security Services of this kit.
Deploy an IAS Server for RADIUS Authentication
For a site-to-site only connection, you use Windows authentication and do not need to deploy an IAS server. However, if you use the same answering router for both a site-to-site connection and a remote access connection that supports mobile or home users, you might decide to use RADIUS authentication instead. If you plan to use RADIUS authentication and Windows Server 2003 IAS, you must have an IAS server available in your network. Deploying an IAS server is the same for both dial-up and VPN site-to-site connections.
-
To enable RADIUS authentication
-
Install an IAS server. To ensure that RADIUS authentication and accounting services remain available, configure both a primary IAS server and one or more backup (secondary) IAS servers to provide redundancy and fault tolerance.
-
Register the IAS servers in the appropriate Active Directory domain.
-
Configure the primary IAS server with RADIUS clients corresponding to your answering routers.
-
Configure each answering router with the RADIUS servers of your primary and secondary RADIUS servers.
-
After you enable the Routing and Remote Access service, configure remote access policies that reflect your dial-up or VPN connection requirements on the primary IAS server. For more information, see "Configure the Routing and Remote Access Service and Demand-Dial Interfaces" and "Configure a Remote Access Policy" later in this chapter.
-
Configure logging methods for user authentication and accounting requests.
-
Copy the IAS configuration (including the remote access policies) from the primary IAS server to the secondary IAS server.
-
For more information about installing an IAS server and using it for RADIUS authentication, see "Deploying IAS" in this book, and see "Checklist: Configuring IAS for dial-up and VPN access" in Help and Support Center for Windows Server 2003.
Configure Active Directory User Accounts and Groups
| Note | If you plan to use local accounts, do not perform these steps. Instead, use the Demand-Dial Interface Wizard to create a user account for the calling router locally on the answering router. |
Each calling router must have a user account, which the answering router uses to authenticate the calling router. If you have more than one calling router and if you joined your routers to the Active Directory domain, you can add each router user account to an Active Directory group to simplify administration.
Use the following procedures to accomplish these tasks:
-
Create Active Directory user accounts for routers.
-
Add router user accounts to an Active Directory group.
Create Active Directory User Accounts for Routers
If you plan to use Active Directory user accounts for demand-dial routers, you manually create an Active Directory user account for each calling router (you can use the Demand-Dial Interface Wizard to create the user account only if you use a local user account).
-
To create an Active Directory user account for a router
-
Open the Active Directory Users and Computers snap-in, and create a user account for the calling router (for a two-way connection, create a user account for the calling router in both sites). The name of the account must match the name of a corresponding demand-dial interface on the remote router.
-
To ensure that connectivity occurs, clear the User must change password at next logon check box and select the Password never expires check box on the Account tab on the property sheet for the user account object.
-
On the user account Dial-in tab, select one of the following options:
-
Allow access. This option overrides the grant or deny remote access permission setting specified on the Properties page of any associated remote access policy.
-
Control access through Remote Access Policy. This option ensures that the grant or deny remote access permission setting specified on the Properties page of any associated remote access policy is used.
-
-
Add Router User Accounts to an Active Directory Group
If you use Active Directory user accounts for demand-dial routers, you can add the router user accounts to a group to simplify administering them and to simplify configuring remote access policies.
-
To add router user accounts to a group
-
Open the Active Directory Users and Computers snap-in, create an Active Directory group to contain the user accounts of the calling routers. Use an appropriate name, such as BranchOfficeRouters.
-
Add the user accounts of the calling routers to the group.
-
Configure the WAN Adapter
On the demand-dial router at each site, use the following procedures, as appropriate, to configure the WAN adapter for a dial-up connection, the WAN adapter for a dedicated link to an ISP, or (if needed) to configure the DNS server IP address.
-
To configure the WAN adapter for a dial-up connection
-
On the demand-dial router at each site, install the WAN adapter. This WAN adapter is a modem, an ISDN adapter, or other physical device connected to one of the following:
-
For a non-VPN dial-up connection, the line that links the two sites.
-
For a VPN with a dial-up connection to the local ISP, the line that links the branch office router to its local ISP.
-
-
Provide the phone number and the authorized user name and password. Leave the Domain field blank. The phone number is one of the following:
-
For a non-VPN dial-up connection, the phone number of the answering router.
-
For a VPN that uses a modem, ISDN, or PPPoE dial-up connection to its local ISP, the phone number of the local ISP.
-
-
-
To configure the WAN adapter for a dedicated link from a VPN router to an ISP
-
On the demand-dial router at each site, install the Internet-connected WAN adapter. This WAN adapter is a DDS, T1, Fractional T1, or Frame Relay adapter.
-
On the WAN adapter's Internet Protocol (TCP/IP) Properties page, configure the following:
-
The public IP address and subnet mask allocated to you by your ISP (or by the InterNIC).
-
The default gateway of the firewall (if you plan to have the router connect to a perimeter network) or of the ISP router (if you plan to have the router connect directly to the Internet).
-
-
-
To configure the DNS server IP address (if needed)
-
If you have a VPN connection, configure the DNS server IP address on the Internet-connected interface of the calling router if either of the following is true:
-
If you use the DNS name of the answering router (instead of its IP address), you must specify the DNS server IP address in the Internet-connected interface of the calling router. Because the Routing and Remote Access Wizard clears the Register this connection's addresses in DNS check box (on the DNS tab) and selects Disable NetBIOS over TCP/IP (on the WINS tab), you must configure the DNS server IP address on the VPN Internet-connected interface after you run the wizard.
-
If the branch office calling router will provide users access to the Internet (in addition to supporting site-to-site traffic to the main office), you must specify the DNS server IP address in the Internet-connected interface of the calling router. For more information about configuring access to the Internet, see "Configure Internet Access Through the Calling Router" later in this chapter.
-
Configure the Intranet Connection
Configure the intranet interface on the demand-dial router at each site.
-
To configure the connection to the local intranet
-
Install a LAN adapter connected to the intranet.
-
On the LAN adapter's Internet Protocol (TCP/IP) Properties page, configure the following:
-
The public or private IP address and subnet mask that your network administrator assigned.
-
The IP addresses of the DNS and WINS name servers for your organization's intranet.
-
-
Typically, leave the default gateway value on the LAN adapter blank to avoid default route conflicts with the default route pointing to the Internet.
Note If a router is positioned between the demand-dial router that you are configuring and the intranet, the Routing and Remote Access Wizard might not be able to add the demand-dial router to the list of valid remote access servers in the Active Directory. One workaround to this problem is to temporarily configure the default gateway on the LAN adapter. To do this, enter a value for the default gateway, run the Routing and Remote Access and Demand-Dial Interface wizards (as described later), and then remove the default gateway from the LAN adapter.
-
Do not configure the intranet interface of the router to be a DHCP client. However, an answering router can still use DHCP to obtain IP addresses for calling routers, and vice versa.
Join the Router to the Domain
After you install the Windows Server 2003 operating system on the computers that you want to use as the calling and answering routers, you can join the routers to the Active Directory domain.
If you have a calling router that is located in the branch office, and you already have a domain controller in the branch office, join the router computer to the domain there.
If you do not have a domain controller at the branch office yet, you can install the Windows Server 2003 operating system on the computer that you want to use as the calling router while that computer is located in the main office, join the computer to the domain, and then ship it to the branch office.
| Note | Alternatively, you can set up the routers to dial in once, install Active Directory on the computer in the branch office that you want to use as the domain controller, replicate, and then join the routers to the domain. |
Place the Router in Your Perimeter Network
For optimal security, place both the answering router and the calling router in a perimeter network at their respective sites. For more information about VPN routers and perimeter networks, see "VPN servers and firewall configuration" in Help and Support Center for Windows Server 2003.
Install Computer Certificates for L2TP/IPSec
If you use an L2TP/IPSec site-to-site connection, you must install a computer certificate on both the answering router and on the calling router. You must have a certification authority (CA) in your network to issue these certificates.
You can install a computer certificate for L2TP/IPSec by using one of three methods:
-
Configure the automatic enrollment of computer certificates in a Windows Server 2003 domain system container by using Group Policy.
-
Use the Certificates snap-in to request a computer certificate.
-
Use your Web browser to connect to the CA Web enrollments pages to request a certificate.
| Note | It is also possible to use a preshared key to provide authentication for IPSec security associations for an L2TP/IPSec connection. However, using computer certificates is the recommended method. |
For information about how to create a certificate infrastructure and install computer certificates, see "Certificate Services" in Help and Support Center for Windows Server 2003, and see "Designing a Public Key Infrastructure" in Designing and Deploying Directory and Security Services of this kit. For more information about configuring a preshared key, see "Configure a pre-shared key for a demand-dial routing interface" in Help and Support Center for Windows Server 2003.
Install Computer and User Certificates for EAP-TLS
When you use EAP-TLS as the user authentication method for your site-to-site connection, you must install a computer certificate on the authentication server of the answering router and a user certificate on the calling router. These steps are the same for a dial-up router and for a VPN router.
For information about how to deploy certificates required by EAP-TLS see "Deploying certificate-based authentication for demand-dial routing" in Help and Support Center for Windows Server 2003.
Configure the Routing and Remote Access Service and Demand-Dial Interfaces
Use the following procedures to enable the Routing and Remote Access service and to establish a site-to-site connection:
-
Enable Routing and Remote Access.
-
Configure the demand-dial interface for the remote site connection.
-
Configure an additional demand-dial interface for a temporary ISP link.
Enable Routing and Remote Access
When you run the Routing and Remote Access Wizard to enable the Routing and Remote Access service, the choices you make are the same for dial-up routing and for VPN routing.
-
To enable the Routing and Remote Access service
Note You can skip step 1 if either of the following is true:
-
If this server uses local authentication or authenticates against a RADIUS server.
-
If you have administrative rights to add the computer account of the Routing and Remote Access server to the RAS and IAS Servers security group. The wizard automatically adds the computer to RAS and IAS Servers.
-
Enable the router as follows:
-
Ask your domain administrator to add the router's computer account to the RAS and IAS Servers security group for this domain by using the Active Directory Users and Computers snap-in or the netsh ras add registeredserver command.
-
If this router must access other domains, ask your domain administrator to add the router's computer account to the RAS and IAS Servers security group of the other domains.
-
Restart the router for the change to take effect immediately.
-
-
Open Routing and Remote Access, select the computer on which you want to enable the Routing and Remote Access service (probably the computer you are currently working on), and then, on the Action menu, select Configure and Enable Routing and Remote Access to start the Routing and Remote Access Wizard. Complete the wizard pages as shown in Table 10.13.
Table 10.13: Enabling the Routing and Remote Access Service Wizard Page
Action
Configuration
Select Secure connection between two private networks.
Demand-Dial Connections
Select Yes (to use demand-dial routing to access remote networks).
IP Address
Choose one of the following alternative options:
Assignment
Select Automatically to use DHCP if you want to assign addresses automatically without using a specified range of addresses.
-or-
Select From a specified range of addresses if you want to specify an address range (recommended):
-
On the Address Range Assignment screen, select New, and then type values for the following:
-
Starting address
-
Ending address
You can use public or private address ranges.
Based on what you specify for the starting and ending addresses, the Number of addresses for the IP address pool field is prepopulated for you.
Note For example, for a two-way connection, you might specify the range 192.168.10.1-192.168.10.2 on the calling router and the range 192.168.0.220-192.168.0.221 on the answering router. In this case, if the calling router initiates the connection, the calling router assigns 192.168.10.1 to itself, and it assigns 192.168.10.2 to the answering router.
-
-
If the static IP address pool address range is an off-subnet address range, ensure that the routes to the address range exist in the routers of your intranet.
-
-
When the Routing and Remote Access Wizard completes, you might see the message "Windows was unable to add this computer to the list of valid remote access servers in the Active Directory. Before you can use this computer as a remote access server, the domain administrator must complete this task." If you see this message, click OK. Later, after you complete the Demand-Dial Interface Wizard (described next), you will add the computer account to the RAS and IAS Servers security group.
Configure the Demand-Dial Interface for the Remote Site Connection
The Demand-Dial Interface Wizard appears automatically after the Routing and Remote Access Wizard completes.
-
To configure the demand-dial interface for a remote site connection
-
Complete the wizard pages for the Demand-Dial Interface Wizard as shown in Table 10.14.
Table 10.14: Configuring the Demand-Dial Interface for a Remote Site Connection Wizard Page
Action
Interface Name
Type a name for the remote router that matches the user account name that you created earlier for the remote router.
Connection Type
Choose one of the following alternative options:
Connect using a modem, ISDN adapter, or other physical device. Select this option to establish a device-to-device dial-up connection.
-
On the Select a device screen, select the modem or adapter this interface will use from the prepopulated list.
-
On the Phone Number screen, if this is a calling router, type the phone number of the router this interface will call. (If this is an answering router that is not also a calling router, you can leave this blank.)
-or-
Connect using virtual private networking (VPN). Select this option to establish a VPN connection over the Internet.
-
On the VPN Type screen, select one of the following:
-
Automatic (accepts either PPTP or L2TP connections)
-
Point to Point Tunneling Protocol (PPTP)
-
Layer Two Tunneling Protocol (L2TP)
-
-
On the Destination Address screen, if this is a calling router, type the IP address of the remote router this interface will connect to. (If this is an answering router, you can leave this field blank.)
Do not select the third option, Connect using PPP over Ethernet (PPPoE), because PPPoE is used to link to the local ISP, not to create a device-to-device dial-up link or a VPN tunnel.
Protocols and Security
-
Select Route IP packets on this interface (the default).
-
If this is an answering router that is not joined to an Active Directory domain, add a local account by selecting Add a user account so a remote router can dial in. This creates a local user account on the demand-dial router. (Do not select this option if you earlier created an Active Directory user account for the answering router to use to authenticate the calling router.)
Static Routes for Remote Networks
To add one or more static routes to define the permanent route between this network and the remote network, click Add, and then, in the Static Route dialog box, do the following:
-
Destination — Type the network ID of the remote site.
-
Network Mask — Type the subnet mask for the network ID of the remote site.
-
Metric — Select an appropriate number for the metric.
Dial In Credentials (for an answering router)
Type and confirm a password for the local user account.
Note This page appears only if this is an answering router and if you chose Add a user account so a remote router can dial in on the Protocols and Security page earlier in the wizard (to use a local account rather than an Active Directory account for router authentication). Notice that the prepopulated User name provided is the same name as that used for the demand-dial interface.
Dial Out Credentials (for a calling router)
Specify the dial-out credentials that this interface will use to connect to the remote router:
-
User name — Type the name of the user account for the calling router that matches the name of the corresponding demand-dial interface on the answering router.
-
Domain — Type the domain name; typically, both sites belong to the same domain.
-
Password and Confirm Password — Type the password.
Note If this is an answering router that is not also a calling router, you do not need to provide this information; however, the wizard requires that you fill in this page, so type any name, domain, and password.
-
-
If the Routing and Remote Access Wizard (which ran before the Demand-Dial Interface Wizard) was unable to add the computer to the list of valid remote access servers in Active Directory, you saw the error message "Windows was unable to add this computer to the list of valid remote access servers in the Active Directory. Before you can use this computer as a remote access server, the domain administrator must complete this task." To enable the computer to function as a remote access server, add the computer account for the router to the RAS and IAS Servers security group. For information about how to add a computer account to a group, see "Add a computer account to a group" in Help and Support Center for Windows Server 2003. If you did not see the error message indicating that the computer had not been added to the valid remote access servers in Active Directory, you do not need to perform this step.
After at least one demand-dial interface exists, you can run the Demand-Dial Interface Wizard at any time to add additional demand-dial interfaces by right-clicking Network Interfaces in console tree, and then clicking New Demand-dial Interface. You run the wizard again for the following reasons:
-
To add other branch office sites, repeat the steps in this procedure for each additional demand-dial interface you want to create.
-
To establish a temporary link to the local ISP at the branch office in order to create a demand-dial interface for that link, perform the steps as described in the next section.
Configure an Additional Demand-Dial Interface for a Temporary ISP Link
If this is a VPN connection, and you connect your branch office to its local ISP through a temporary link, you must run the Demand-Dial Interface Wizard a second time to create a demand-dial interface for this physical link to the ISP. This link to the ISP can be a dial-up link or a PPPoE link.
| Note | If you are deploying a non-VPN dial-up link, or a VPN connection between two sites, each of which connects to its local ISP through a dedicated link, do not perform these steps. Instead, perform the steps in "Configure the Routing and Remote Access Service and Demand-Dial Interfaces" earlier in this chapter. |
-
To configure a demand-dial interface for a temporary link to the ISP
-
Open Routing and Remote Access, right-click Network Interfaces, click New Demand-dial Interface, and then complete the wizard pages for the Demand-Dial Interface Wizard as shown in Table 10.15.
Table 10.15: Configuring an Additional Demand-Dial Interface for a Temporary Link to the ISP Wizard Page
Action
Interface Name
Type an appropriate name, such as Dial_ISP.
Connection Type
Choose one of the following alternative options:
Select Connect using a modem, ISDN adapter, or other physical device. Select this option to create a dial-up link to your local ISP.
-
On the Select a device screen, select the modem or adapter that this interface will use from the prepopulated list.
-
On the Phone Number screen, type the phone number of your local ISP.
-or-
Select Connect using PPP over Ethernet (PPPoE). Select this option to create a PPPoE link to your local ISP.
-
On the Service Name screen, type the name of the service in the text box provided. (If you leave this text box blank, Windows will automatically detect and configure your service when you connect.)
Do not select the third option, Connect using virtual private networking (VPN), because this demand-dial interface is for the link to the ISP, not for a VPN tunnel.
Protocols and Security
Select Route IP packets on this interface (do not select Add a user account so a remote router can dial in).
Static Routes for Remote Networks
To add a static host route for the IP address allocated to the answering router by the answering router's ISP (or by InterNIC):
-
Destination - Type the IP address of the answering router's Internet-connected interface.
-
Network Mask - Type 255.255.255.255
-
Metric - Select an appropriate number for the metric.
Dial-In Credentials
This page does not appear.
Dial-Out Credentials
Specify the dial-out credentials that this interface will use to connect to the local ISP:
-
User name - Type the name of the user account that has permission to access the local ISP (this is notthe router user account).
-
Domain - leave this field blank.
-
Password and Confirm password - Type the password.
Note Open Active Directory Users and Computers, and then, on the Dial-in tab of the user object's Properties page for the user account that has permission to access the local ISP, select Allow access.
-
-
Configure a Remote Access Policy
You can use a remote access policy to validate a variety of connection settings before a connection is authorized, and to specify a variety of connection restrictions after the connection is authorized.
Configure the Default Policy or Create a New Policy
Configuring the Routing and Remote Access service on a demand-dial router or installing IAS on a computer running Windows Server 2003 creates two default remote access policies. You can use the Connections to Microsoft Routing and Remote Access server default policy for your site-to-site connection. However, if you want more precise control over connection requirements than the default policy provides, you can create a common or a custom remote access policy.
-
To enable the default policy
Note Do not perform these steps if you plan to create a common or custom remote access policy, described next.
-
To enable the default policy, do one of the following:
-
If you use Windows authentication, on the answering router open Routing and Remote Access, and, if necessary, double-click Routing and Remote Access and the server name. (Use Windows authentication for a site-to-site only connection.)
-
If you use RADIUS authentication, on the IAS server open Internet Authentication Service, and, if necessary, double-click Internet Authentication Service. (Use either Windows or RADIUS authentication if the answering router for the site-to-site connection also supports remote access users.)
-
-
In the console tree, click Remote Access Policies. In the details pane, right-click the default policy Connections to Microsoft Routing and Remote Access server, and then click Properties.
-
Select Grant remote access permission. (The default selection is Deny remote access permission.)
-
-
To add a common or custom remote access policy
Note Do not perform these steps if you plan to use the default policy, described earlier.
-
To add a common or custom remote access policy, do one of the following:
-
If you use Windows authentication, open Routing and Remote Access, and, if necessary, double-click Routing and Remote Access and the server name.
-
If you use RADIUS authentication, open Internet Authentication Service, and, if necessary, double-click Internet Authentication Service.
-
-
In the console tree, right-click Remote Access Policies, and then click New Remote Access Policy. Use the New Remote Access Policy wizard to create a common policy, as shown in Table 10.16, or to create a custom policy, as shown in Table 10.17.
Table 10.16: Creating a Common Remote Access Policy by Using the New Remote Access Policy Wizard Wizard Page
Action
Policy Configuration Method
Select Use the wizard to set up a typical policy for a common scenario, and then type an appropriate name for the policy, such as Authenticate BranchOfficeRouters.
Access Method
Select VPN or Dial-up, as appropriate.
User or Group Access
Click Group, click Add, and then type the group name you created earlier, such as BranchOfficeRouters.
Authentication Methods
Either accept the default method, MS-CHAP v2, or choose Extensible Authentication Protocol (EAP) and specify its type (either MD5-Challenge or Smart card or other certificate).
Policy Encryption Level
Select Strongest encryption, and clear any other selections.
Table 10.17: Creating a Custom Remote Access Policy by Using the New Remote Access Policy Wizard Wizard Page
Action
Policy Configuration Method
Select Set up a custom policy, and then type an appropriate name for the policy, such as Authenticate BranchOfficeRouters.
Policy Conditions
If this is a dial-up (non-VPN) connection:
-
Click Add.
-
Select Windows-Groups, click Add twice, and then specify the group name you created earlier (such as BranchOfficeRouters). Click OK twice to return to the Policy Conditions page.
-
Click Add, and select NAS-Port-Type. Click Add, and select the appropriate device type, such as Async (Modem), ISDN Async V.100, ISDN Async V.120, or ISDN Sync. Then click Add.
-
Click Add, select Authentication Type, click Add, select either MS-CHAP v2 or EAP, and then click Add.
-
Select and configure any other attributes for which you want to specify a setting.
-or-
If this is a VPN connection:
-
Click Add.
-
Select Windows-Groups, click Add twice, and then specify the group name you created earlier (such as BranchOfficeRouters). Click OK twice to return to the Policy Conditions page.
-
Click Add, select NAS-Port-Type, click Add, select Virtual VPN, and then click Add.
-
Click Add, select Tunnel-Type, click Add, select either Point-to-Point Tunneling Protocol or Layer 2 Tunneling Protocol (as appropriate), and then click Add.
-
Click Add, select Authentication-Type, select either MS-CHAP v2 or EAP, and then click Add.
-
Select and configure any other attributes for which you want to specify a setting.
Permissions
Select Grant remote access permission.
Profile
If you want to change the defaults, click Edit Profile, and then make the desired changes. For example, click Edit Profile, select the Encryption tab, select Strongest encryption, and clear any other selections.
-
-
Configure a Persistent Connection or a Disconnect Interval
By default, the wizards configure a site-to-site connection to be an on-demand rather than a persistent connection, and the idle time before disconnecting the on-demand connection is set to Never. You can change these defaults.
-
To configure a persistent connection or a disconnect interval
-
On the calling router, open the Routing and Remote Access snap-in.
-
In the console tree, under the desired router, click Network Interfaces. Right-click the appropriate demand-dial interface in the details pane, and then click Properties.
-
Click the Options tab, and then, under Connection type, do one of the following:
-
If you want a connection that disconnects, accept the default Demand dial (on-demand) option, and then configure the Idle time before hanging up by using the drop-down list to select, for example, 10 minutes.
-
If you want a connection that is always available, select Persistent connection.
-
-
Specify values for Redial attempts and Average redial interval.
-
Configure Static Routes
You can configure several types of static routes for a site-to-site connection. You can add static routes manually or, when requesting routes from the remote router, by using auto-static updates.
Create Static Routes for a Site-to-Site Connection
For a site-to-site connection, you can use Routing and Remote Access to create the following types of static routes.
-
LAN interface. If you do not use routing protocols for the local intranet, you must create one or more static routes for locations on the local intranet.
-
Demand-dial interface for the remote site connection. Although you were prompted to provide a static route for the network ID of the remote site when you ran the Demand-Dial Interface Wizard, you might need to recreate this static route in the future. Alternatively, for a persistent site-to-site connection only, you can enable a routing protocol instead of using static routes.
-
Demand-dial interface for a link to a local ISP. If you created an additional demand-dial interface for a link to the local ISP, you were prompted to provide a static host route for the IP address of the answering router's Internet-connected interface when you ran the Demand-Dial Interface Wizard. You might need to recreate this static host route in the future.
-
Router user account. For a one-way initiated connection in which the answering router is a standalone router or a member of a native-mode Active Directory domain, you can omit creating a demand-dial interface on the answering router, but, in this case only, you must create one or more static routes on the calling router's user account that identify the network IDs of the calling router's site.
Use the following procedures to accomplish these tasks:
-
Create static routes on the LAN or demand-dial interfaces.
-
Create static routes on the router user account.
Create static routes on the LAN or demand-dial interfaces
For each static route you create, fill out the Static Route dialog box as shown in Table 10.18. For information about how to add static routes, see "Add a static route" in Help and Support Center for Windows Server 2003.
| Interface | Action |
|---|---|
| LAN interface (Calling and answering routers) | Specify values for the following fields:
(The check box Use this route to initiate demand-dial connections is unavailable.) |
| Demand-dial interface for the remote site [1] (Calling router only) | Specify values for the following fields:
Select the following check box:
|
| Demand-dial interface for the local ISP (if any)[1] (Calling router only) | Specify values for the following fields:
Select the following check box:
|
|
[1]You might have already created one or more static routes for one or both of these demand-dial interfaces when you ran the Demand-Dial Interface Wizard. | |
Create static routes on the router user account
For a one-way connection, you can create a demand-dial interface on the answering router, but this is not required. If you do not create a demand-dial interface on the answering router, you must create a static route or routes that identify the network IDs of the calling router's site on the calling router's user account.
For information about how to configure static routes on either a local user account or on an Active Directory user account, see "Configure static routes for a dial-in user" in Help and Support Center for Windows Server 2003. When performing the steps in that Help topic, you are prompted to provide a value for Destination. Type a network ID of the calling router's site.
Configure Auto-static Updates
You can use auto-static updates to request all of the routes of the router on the other side of a site-to-site connection. Auto-static updates are supported when you use RIP for IP, but not OSPF.
For more information about how to manually configure auto-static updates, see "Perform manual auto-static updates" in Help and Support Center for Windows Server 2003.
For more information about how to schedule auto-static updates, see "Perform scheduled auto-static updates" in Help and Support Center for Windows Server 2003.
Configure Routing Protocols
Instead of manually configuring static routes, you can use routing protocols for the following:
-
On each LAN interface.
-
On each demand-dial interface that is used for a persistent site-to-site connection.
If you use routing protocols, you must configure each new LAN interface or demand-dial interface to use the protocols, because, typically, each interface is connected to a different subnet.
-
To configure routing protocols for a persistent site-to-site connection
-
For information about how to deploy the IP unicast routing protocols supported by Routing and Remote Access, see "RIP for IP" and "OSPF" in Help and Support Center for Windows Server 2003.
-
Configure Internet Access Through the Calling Router
At a branch office, you can configure the calling router to grant users access to the Internet in addition to sending traffic to the main site over the site-to-site connection. Choose one of the following scenarios if you want to configure access to the Internet:
-
Access the Internet through the main office — for greater security.
-
Access the Internet directly — for faster performance.
For Security, Access the Internet Through the Main Office
To access the Internet through the main office, use the following steps to add a default (0.0.0.0/0.0.0.0) route to the demand-dial interface used for the dial-up or VPN connection. The default route ensures that all IP packets that cannot find specific routes on the private branch office network are sent to the Internet-connected interface of the demand-dial router at the main office. You might use this alternative if you use ISA Server at the main office.
-
To use the calling router to access the Internet through the main office
-
On the branch office demand-dial router, open the Routing and Remote Access snap-in.
-
In the console tree, expand the router you want to configure, expand IP Routing, right-click Static Routes, and then select New Static Route.
-
In the Static Route dialog box, configure the following:
-
In the Interface box, select the demand-dial interface used for the dial-up or VPN connection to the main office.
-
In the Destination box, type 0.0.0.0
-
In the Network Mask box, type 0.0.0.0
-
In the Metric box, accept the default value (1).
-
Select Use this route to initiate demand-dial connections.
-
Click OK.
-
-
For Performance, Access the Internet Directly
To access the Internet directly from the branch office, you have two options, depending on how the branch office connects to the local ISP:
-
The branch office uses a dial-up connection to its local ISP.
-
The branch office uses a demand-dial connection to its local ISP.
Option 1: The branch office uses a dial-up connection to its local ISP
This method, which is more common and requires configuring only one static route, assumes that the branch office uses a dial-up connection to the local ISP in conjunction with the demand-dial connection to the main office.
-
To use the calling router to access the Internet directly if the branch office uses a dial-up connection to its local ISP
-
On the branch office demand-dial router, open the Routing and Remote Access snap-in.
-
In the console tree, expand the router you want to configure, expand IP Routing, right-click Static Routes, and then select New Static Route.
-
In the Static Route dialog box, configure the following:
-
In the Interface box, select the demand-dial interface used for the dial-up or VPN connection to the main office.
-
In the Destination box, type the network ID of the main office network.
-
In the Network Mask box, type the network mask for the main office network ID.
-
In the Metric box, accept the default value (1).
-
Select Use this route to initiate demand-dial connections.
-
Click OK.
-
-
Option 2: The branch office uses a demand-dial connection to its local ISP
This method, which is less common and requires configuring two static routes, assumes that the branch office uses a demand-dial connection to the local ISP in conjunction with the demand-dial connection to the main office.
-
To use the calling router to access the Internet directly if the branch office uses a demand-dial connection to its local ISP
-
On the branch office demand-dial router, open the Routing and Remote Access snap-in.
-
In the console tree, expand the router you want to configure, expand IP Routing, right-click Static Routes, and then select New Static Route.
-
In the Static Route dialog box, configure the following:
-
In the Interface box, select the demand-dial interface used for connecting the branch office to its ISP.
-
In the Destination box, type 0.0.0.0.
-
In the Network Mask box, type 0.0.0.0.
-
In the Metric box, accept the default value (1).
-
Select Use this route to initiate demand-dial connections.
-
Click OK.
-
-
In the console tree, right-click Static Routes, and then select New Static Route.
-
In the Static Route dialog box, configure the following:
-
In the Interface box, select the demand-dial interface used for the dial-up or VPN connection to the main office.
-
In the Destination box, type the network ID of the main office network.
-
In the Network Mask box, type the network mask for the main office network ID.
-
In the Metric box, accept the default value (1).
-
Select Use this route to initiate demand-dial connections.
-
Click OK.
-
-
Configure IP Multicasting
You can configure your site-to-site connection to support IP multicast applications.
-
To configure demand-dial routers for IP multicasting
-
For both the calling and the answering router, in the Routing and Remote Access snap-in, expand IP Routing, right-click General, click New Routing Protocol, and then click IGMP Router and Proxy.
-
Right-click IGMP, click New Interface, select the interface you want to enable, and then configure the interface as follows:
-
Select Enable IGMP (the default), and then do the following:
If this is the demand-dial interface, select IGMP proxy.
If this is an intranet interface, select IGMP router.
-
Typically, for IGMP protocol version, you can accept Version 3 (the default).
-
-
If needed, modify the default IGMP router settings. In most cases, no changes are needed.
For more information about how to modify these settings, if analysis of your network indicates that you do need to modify them, see "Configure IGMP router settings" in Help and Support Center for Windows Server 2003.
-
Configure the Authentication Provider
After the Routing and Remote Access and Demand-Dial Interface wizards complete, Windows authentication and Windows accounting are selected by default. You can change these defaults from Windows authentication and Windows accounting to RADIUS authentication and RADIUS accounting, or you can choose separate providers for authentication and accounting. For a deployment that supports only a site-to-site connection, use Windows authentication and Windows accounting. However, you can change these defaults if the same answering router will support both the site-to-site connection and remote access users, and you want to use RADIUS as either the authentication provider or the accounting provider.
Use the following procedures to accomplish these tasks:
-
Configure the authentication provider on the answering router.
-
Configure the accounting provider on the answering router.
-
To configure the authentication provider on the answering router
-
Configure either Windows authentication or RADIUS authentication.
For information about how to configure Windows or RADIUS authentication, see "Use Windows authentication" or "Use RADIUS authentication" in Help and Support Center for Windows Server 2003.
-
If you select RADIUS authentication, add the answering router as a RADIUS client on the IAS server.
For information about how to add the answering router as a RADIUS client, see "Configure RADIUS clients" in Help and Support Center for Windows Server 2003.
-
-
To configure the accounting provider on the answering router
-
Select either Windows accounting or RADIUS accounting.
For information about how to select the accounting method you want to use, see "Use Windows accounting" or "Use RADIUS accounting" in Help and Support Center for Windows Server 2003.
-
If you select RADIUS accounting, add the answering router as a RADIUS client on the IAS server.
For information about how to add the answering router as a RADIUS client, see "Configure RADIUS clients" in Help and Support Center for Windows Server 2003.
-
Configure Authentication Methods
By default, the answering router is configured to accept EAP-TLS, MS-CHAP v2, and MS-CHAP as the authentication methods. To increase security, use either EAP-TLS alone or EAP-TLS along with MS-CHAP v2. Alternatively, you can use MS-CHAP v2 with passwords for user authentication.
-
To configure the authentication method on the answering router
-
On the answering router, specify which authentication method or methods to accept.
By default, the answering router is configured to accept EAP-TLS, MS-CHAP v2, and MS-CHAP.
-
To increase security, clear the MS-CHAP selection, and, if you plan to use EAP-TLS only, also clear the MS-CHAP v2 selection.
-or-
-
To use MS-CHAP v2 with passwords for user authentication, clear the EAP-TLS selection.
For information about how to add or clear authentication methods, see "Enable authentication protocols" in Help and Support Center for Windows Server 2003.
-
-
If you select EAP-TLS authentication, be sure to perform the steps in "Install Computer and User Certificates for EAP-TLS" earlier in this chapter.
-
Configure Ports
If needed, you can change the default values for Ports in Routing and Remote Access.
-
To configure ports
-
Fill out the Configure Device dialog box as shown in Table 10.19. For information about how to configure ports for your site-to-site connection, see "Enable routing on ports" in Help and Support Center for Windows Server 2003.
Table 10.19: Using the Configure Device Dialog Box to Configure Ports Option
Action
Remote access connections (inbound only)
Select this option if you want to allow connections from individual remote access users in addition to connections from a remote router.
Demand-dial routing connections (inbound and outbound)
Select this option if you want to enable a site-to-site demand-dial connection. This is the default.
Demand-dial routing connections (outbound only)
This option is available only for a PPPoE connection to the Internet. Select this option if you want this router to function only as a calling router.
Phone number for this device
If you configure a value for Called-Station-ID in the remote access policy associated with this connection, you must manually type a value for this field:
-
If this is a dial-up connection, type the phone number that was entered in the Called-Station-ID remote access policy attribute.
-
If this is a VPN connection, type the IP address of the VPN server's Internet-connected interface (entered in the Called-Station-ID remote access policy attribute).
Maximum ports
For PPTP or L2TP/IPSec VPN routers only, change the default number of ports. For optimal scalability, use 10 or fewer ports.
-
-
Configure Dial-out or Dial-in Hours
For on-demand connections, you can specify time limits for dial-out or dial-in hours.
-
To configure dial-out hours on a calling router
-
Configure dial-out routers on the calling router to prevent connections at unwanted times.
For information about how to use Routing and Remote Access to configure dial-out hours on the demand-dial interface of a calling router to block outgoing connections at specific times of the day or week (such as at night or on weekends), see "Configure dial-out hours" in Help and Support Center for Windows Server 2003.
-
-
To configure dial-in hours on an answering router
-
Configure dial-in hours on the answering router to specify when the calling router can access the answering router.
For information about how to use remote access policies to configure dial-in hours on an answering router to block incoming connections at specific times of the day or week (such as at night or on weekends), see "Configure dial-in constraints" in Help and Support Center for Windows Server 2003.
-
Configure IP Packet Filters and Demand-Dial Filters
For an on-demand VPN connection, you can specify IP packet filters and demand-dial filters.
Use the following procedures to accomplish these tasks:
-
Configure IP packet filters on the Internet interface
-
Match IP demand-dial filters to IP packet filters on the demand-dial interface
Configure IP Packet Filters on the Internet Interface
You can configure PPTP or L2TP/IPSec input and output filters on the Internet-connected interface of a VPN router to allow only PPTP or only L2TP/IPSec traffic to travel between the two sites.
How you configure firewall filters and filters on the VPN router depends on the relative position of the VPN router and firewall. For information about configuring filters for a VPN site-to-site server, see "Deploying Dial-up and VPN Remote Access Servers" in this book, and see "VPN servers and firewall configuration," "Add PPTP filters," and "Add L2TP over IPSec filters" in Help and Support Center for Windows Server 2003.
Configure IP Demand-Dial Filters and Match Them to IP Packet Filters on the Demand-Dial Interface
You can configure demand-dial filters to specify which types of traffic are allowed to create a site-to-site connection. By matching demand-dial filters to the IP packet filters, you can also prevent a calling router from establishing a demand-dial connection for traffic that IP packet filters are configured to discard.
For information about how to configure demand-dial filters and to match them to IP packet filters, see "Configure demand-dial filters" and "Demand-dial routing design considerations" in Help and Support Center for Windows Server 2003.
Initiate the Connection
First, ensure that both routers are enabled for dial-up access, and then initiate the connection.
-
To confirm that a router has permission to initiate an on-demand connection
-
Open Active Directory Users and Computers, and then on the Dial-in tab of the user account of the router's Properties page, confirm that either Allow access or Control access through Remote Access Policy is selected.
-
If Control access through Remote Access Policy is selected, open the Routing and Remote Access snap-in and confirm that the remote access permission setting on the Properties page of the associated Remote Access Policy is set to Grant remote access permission.
-
-
To initiate the on-demand connection on the calling router
-
On the calling router, in the Routing and Remote Access snap-in, click Network Interfaces, right-click the demand-dial interface for which you want to initiate a connection, and then click Connect.
-
If the calling router uses a dial-up connection to the local ISP, the local ISP assigns the router a temporary IP address. You can confirm that this IP address exists by typing ipconfig at a command prompt.
Test Connectivity
Use the following procedures to test the remote site connection:
-
Test network connectivity. To test network connectivity, ping a client computer at the main office from a client computer in the branch office.
-
Test application connectivity. To test application connectivity, map a network drive to a client computer at the main office from a client computer in the branch office. For example, map a drive to \\ClientComputerName\c$.
-
Force replication between domain controllers in both sites. If you have a domain controller in both sites, use the following procedure to test replication:
-
Open Active Directory Users and Computers, and create a new user account called, for example, TestReplication.
-
Use the Active Directory Replicate Now option to test that replication takes place over the site-to-site connection.
For information about how to force replication between the two sites, see "Force replication over a connection" in Help and Support Center for Windows Server 2003.
-
Confirm that the new user account exists on domain controllers located in both sites.
-
Configure Replication
If you installed an Active Directory domain controller in the branch office, you must ensure that replication takes place continually. How you do this depends on whether this is a persistent connection or an on-demand connection.
Use the following procedures to accomplish these tasks:
-
Configure a replication interval for a persistent connection
-
Configure reciprocal replication for a one-way initiated on-demand connection
Configure a Replication Interval for a Persistent Connection
If this is a persistent connection, you can schedule replication to occur after a specified interval.
Use the Active Directory Sites and Services snap-in to configure a replication interval. For information about how to specify a replication interval, see "Configure site link replication frequency" in Help and Support Center for Windows Server 2003.
Configure Reciprocal Replication for a One-Way Initiated On-Demand Connection
If this is a one-way initiated on-demand connection, you must configure reciprocal replication using the Active Directory Service Interfaces (ADSI) Edit tool.
Install ADSI Edit, a Windows Support tool, on a domain controller in the main office or in the branch office. For information about how to install Windows Support Tools, which include ADSI Edit, in Help and Support Center for Windows Server 2003, click Tools, and then click Windows Support Tools.
| Caution | If you use the ADSI Edit snap-in and incorrectly modify the attributes of Active Directory objects, you can cause serious problems that might require you to reinstall Windows Server 2003. Microsoft cannot guarantee that problems resulting from the incorrect modification of Active Directory object attributes can be solved. Modify these attributes at your own risk. |
-
To enable reciprocal replication on a site link for a one-way initiated on-demand connection
-
On a domain controller, type adsiedit.msc in the Run dialog box to open the ADSI Edit snap-in.
-
Expand the Configuration container, expand the Sites container, expand the Inter-Site Transports container, and then click CN=IP.
-
In the details pane, right-click the site link object for the sites for which you want to enable reciprocal replication, and then click Properties.
-
In the Attributes box, double-click Options.
-
In the Integer Attribute Editor dialog box, take one of the following actions:
-
If the Value box displays <not set>, type 2.
-
If a value is displayed, convert the integer value to a binary value and use the binary OR operation to combine that value with the binary value 0010, and then type the integer value of the result in the Value box.
For a job aid that includes a table of examples showing how to perform this operation, see "Example: Contoso Connects Remote Sites" (DNSREM_1.doc) on the Windows Server 2003 Deployment Kit companion CD (or see "Example: Contoso Connects Remote Sites" on the Web at http://www.microsoft.com/reskit).
-
Alternatively, you can enable reciprocal replication on a connection, instead of on a site link.
-
-
To confirm reciprocal replication over a one-way initiated on-demand connection
-
On the branch office domain controller, create a user account called TestReplication.
-
On the calling router in the branch office, establish a connection to the answering router in the main office.
-
Wait 15 to 20 minutes, and then open Active Directory Users and Computers on a domain controller in the main office. If your connection is working correctly, the TestReplication user account will be listed.
-
To confirm that replication did in fact take place over the one-way initiated site-to-site connection, perform the following steps:
-
On both the calling router and the answering router, type ipconfig at a command prompt. If, when you ran the Routing and Remote Access wizard, you chose the recommended option to configure IP address assignment from a specified range of addresses, the output of both ipconfig commands will include IP addresses from the specified address ranges.
-
On the branch office domain controller, type tracert at a command prompt. If, when you ran the Routing and Remote Access wizard, you configured IP address assignment from a specified range of addresses, the output of the tracert command will include an IP address from the specified range that the answering router assigns to the calling router.
-
-
EAN: N/A
Pages: 146