Creating and Modifying a Table of Contents
Microsoft Office Specialist A table of contents generally appears at the beginning of a document, and lists the main headings and subheadings along with corresponding page numbers. A table of contents provides an overview of the topics covered in a document and lets readers navigate quickly to a topic. For example, The Garden Company might add a table of contents to a garden tools catalog that has several sections.
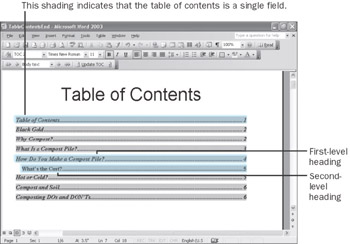
To create and format a table of contents, you designate headings and subheadings and then click Index and Tables on the Reference submenu of the Insert menu. Word then uses the heading styles to identify table of contents entries, and inserts the table at the insertion point. When the table is selected, shading indicates that Word treats it as a single field. Each entry is hyperlinked to the heading it references, and you can hold down the [CONTROL] key and click the entry to go to the corresponding section.
Word provides several predefined table-of-contents formats, including Classic, Formal, and Simple. The default format is “From template,” which takes the table of contents styles from whatever template is attached to the document. If this is the Normal template (the default), the “From template” styles create a table of contents in which the headings are title case (important words have initial capital letters). You can format a table of contents manually as you would any other text in Word—by selecting text and then applying character or paragraph formatting or styles.
| Tip | You can customize a table of contents format by changing the format’s styles. On the Insert menu, point to Reference, click Index and Tables, and click the Table of Contents tab. Click the Modify button. The Style dialog box opens, displaying the nine table of contents styles. You can then change these styles the same way you change any other style. |
If you create a table of contents but later make changes to the document that affect its headings or pagination, you can update the table of contents by clicking the Update TOC button on the Outlining toolbar and selecting an update option. Although you can edit the text in a table of contents directly, updating it instead ensures that the entries and headings match exactly.
| Tip | You can also update the table of contents by clicking anywhere in the table, opening the Index and Tables dialog box from the Insert menu, and clicking OK. |
In this exercise, you will open a document that uses heading styles and then create a table of contents. You will then change the document by inserting page breaks and update the table of contents.
| USE | the TableContents document in the practice file folder for this topic. This practice file is located in the My Documents\Microsoft Press\Word 2003 SBS\MakingAvail\CreatingContents folder and can also be accessed by clicking Start/All Programs/Microsoft Press/Word 2003 Step by Step. |
| OPEN | the TableContents document. |
-
With the insertion point at the beginning of the document, press [CONTROL]+[ENTER] to insert a new page.
-
Press [CONTROL]+[HOME] to move to the beginning of the document.
-
Type Table of Contents, and press [ENTER].
-
On the Insert menu, point to Reference, and then click Index and Tables.
The Index and Tables dialog box appears.
-
Click the Table of Contents tab to display table of contents settings.
-
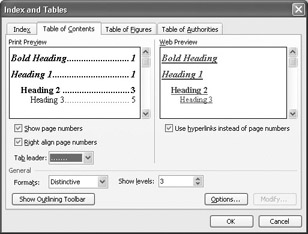
Click the down arrow to the right of the Formats box, and click Distinctive.
The Distinctive table of contents format appears in the preview boxes.
-
Click the down arrow to the right of the Tab leader box, and click the dotted line (the second option) in the drop-down list.
The preview box changes to display dotted tab leaders.
-
Click Show Outlining Toolbar, and click OK.
Word inserts a table of contents with the Distinctive format modified to include dotted leaders. It also displays the Outlining toolbar.
-
Scroll down to page 2, click to the left of the What Is a Compost Pile? heading, and press [CONTROL]+[ENTER] to start a new page.
The What Is a Compost Pile? heading is now on page 3.
-
Scroll down, click to the left of the How Do You Make a Compost Pile? heading, and press [CONTROL]+[ENTER] to start another new page.
The How Do You Make a Compost Pile? heading is moved to page 4.
-
Scroll down to page 5, and select the What’s the Cost? heading.
-
On the Formatting toolbar, click the down arrow to the right of the Style box, and then click Heading 2 in the drop-down list.
The heading’s style changes to Heading 2.

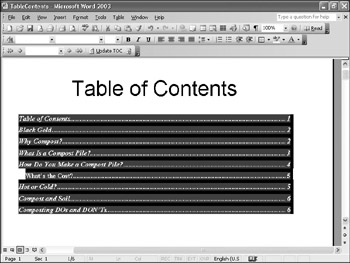
Go to TOC
-
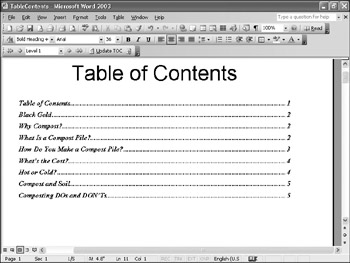
On the Outlining toolbar, click the Go to TOC button to select the table of contents on page 1, and then scroll up to display the entire table.

-
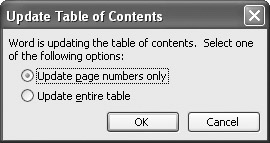
On the Outlining toolbar, click the Update TOC button.
The Update Table of Contents dialog box appears with the “Update page numbers only” option selected.
-
Select the Update entire table option, and then click OK.
Word updates the table of contents to reflect the new page numbers and headings.

Save
-
On the Standard toolbar, click the Save button to save the document.
CLOSE the TableContents document, and turn off the Outlining toolbar.
Creating Other Types of Tables
Microsoft Office Specialist If a document includes figures or tables that have descriptions, or captions, you can use the Index and Tables dialog box to create a table of figures. If a legal document contains items such as regulations, cases, and statutes that are designated with legal citations, you can use the Index and Tables dialog box to create a table of authorities. Word uses the captions or citations to create these types of tables the same way it uses headings to create a table of contents.
To insert captions and create a table of figures:
-
Click where you want the caption to appear, and on the Insert menu, point to Reference, and then click Caption.
-
In the Caption dialog box, click the New Label button, type the default text for the caption (for example, Figure), and click OK.
-
In the Caption box, click to the right of your label and its number, type the caption, and click OK.
The caption is added to the document.
-
Repeat steps 1 and 3 for each caption.
-
Click where you want to insert the table of figures, and on the Insert menu, point to Reference, and click Index and Tables.
The Index and Tables dialog box appears.
-
Click the Table of Figures tab.
-
Click the down arrow to the right of the Caption label box, and click the type of caption you want to include in the table.
-
Click the down arrow to the right of the Formats box, and click the format you want for the table.
-
Select any additional options you’d like, and click OK.
Word inserts the table of figures in the specified format.
To insert citations and create a table of authorities:
-
Select the first legal reference that you want to mark with a citation.
-
Press [ALT]+[SHIFT]+i.
The Mark Citation dialog box appears.
-
In the Selected text box, edit the citation to reflect the way you want it to appear in the table.
-
In the Category box, click the category that applies to the citation.
-
In the Short citation box, edit the text as necessary to match the entry in the Selected text box.
-
To mark a single citation, click Mark. To mark all citations that match the selected citation, click Mark All.
-
Repeat steps 1 through 6 for each citation you want to include in the table of authorities.
-
Click Close to close the Mark Citation dialog box.
-
Click where you want the table of authorities to appear, and on the Insert menu, point to Reference, and then click Index and Tables.
The Index and Tables dialog box appears.
-
Click the Table of Authorities tab.
-
In the Category list, click the category you want in your table of authorities, or click All to include all categories.
-
Select formatting options for the table, and then click OK.
Word inserts the table of authorities in the specified format.
EAN: 2147483647
Pages: 156
- Challenging the Unpredictable: Changeable Order Management Systems
- Enterprise Application Integration: New Solutions for a Solved Problem or a Challenging Research Field?
- Distributed Data Warehouse for Geo-spatial Services
- Relevance and Micro-Relevance for the Professional as Determinants of IT-Diffusion and IT-Use in Healthcare
- Development of Interactive Web Sites to Enhance Police/Community Relations